Using one button to toggle another device (approach 2)
WARNING!

Quite often you will find yourself in a situation where you would like to have the ability where you want to want to use one button to toggle another device between ON and OFF states. The best way to operate a device with 1 button on another device than the target device is to use scenes but you will discover that scenes don’t have a toggle feature (at least at the moment of writing this tutorial at February 28, 2021 and eWeLink 4.9.x). How do you solve that issue?
With thanks to the community we created our first “Using one button to toggle another device” tutorial. The original idea came from Anuar Ahmad who shared his idea and screenshots on Facebook.
Later on some people reported that the scenes caused some sort of loop rendering the target device to stay always on. That’s why Agisilaos Ignatiadis came up with another approach. This approach has as disadvantage that manual operating the target devices cause the scenes for the external button to get out of sync and so you will need to press the external button twice to get in sync again. There is a solution for that too but requires 2 additional scenes. In this Knowledge Base Agisilaos’ approach is described first followed by the 2 additional scenes for the synchronization solution.
This article assumes the button to control the target device with is a RF button but this could be a Zigbee button instead of you desire so. This article also assume that you already added the RF button as an Alarm to the RF bridge.
Index
We start with:
The order in which you create and modify the scenes is:
2 scenes are optional for synchronisation between manual operation of the target devices and the scenes of the external button:
And at the end:
In short
Terminology
trigger device. Often we refer to this as external button or RF button too.The device that you want to toggle is called the
target device.You will need to create 4 scenes:
- Scene 1
- Turn the target device on after an external button press.
- Execute helper scene
Scene offto disable thisScene 1so that this scene doesn’t react on the external button press as the target device is already on.
- Scene 2
- Turn the target device off after an external button press.
- Execute helper scene
Scene onto disable thisScene 2so that this scene doesn’t react on the external button press as the target device is already off.
- Scene on
- Enables
Scene 1so thatScene 1will turn the target device on when the external button is pressed. - Disables
Scene 2so thatScene 2doesn’t turn the target device off when the external button is pressed.
- Enables
- Scene off
- Disables
Scene 1so thatScene 1doesn’t turn the target device on when the external button is pressed. - Enables
Scene 2so thatScene 2will turn the target device off when the external button is pressed.
- Disables
To get a correct synchronization between manual operation of the target device and the scenes that reacts on the external button presses you can add 2 additional scenes:
- Scene auto on
- Shortcut to
Scene onreacting on the target device state going tooff.
- Shortcut to
- Scene auto off
- Shortcut to
Scene offreacting on the target device state going toon.
- Shortcut to
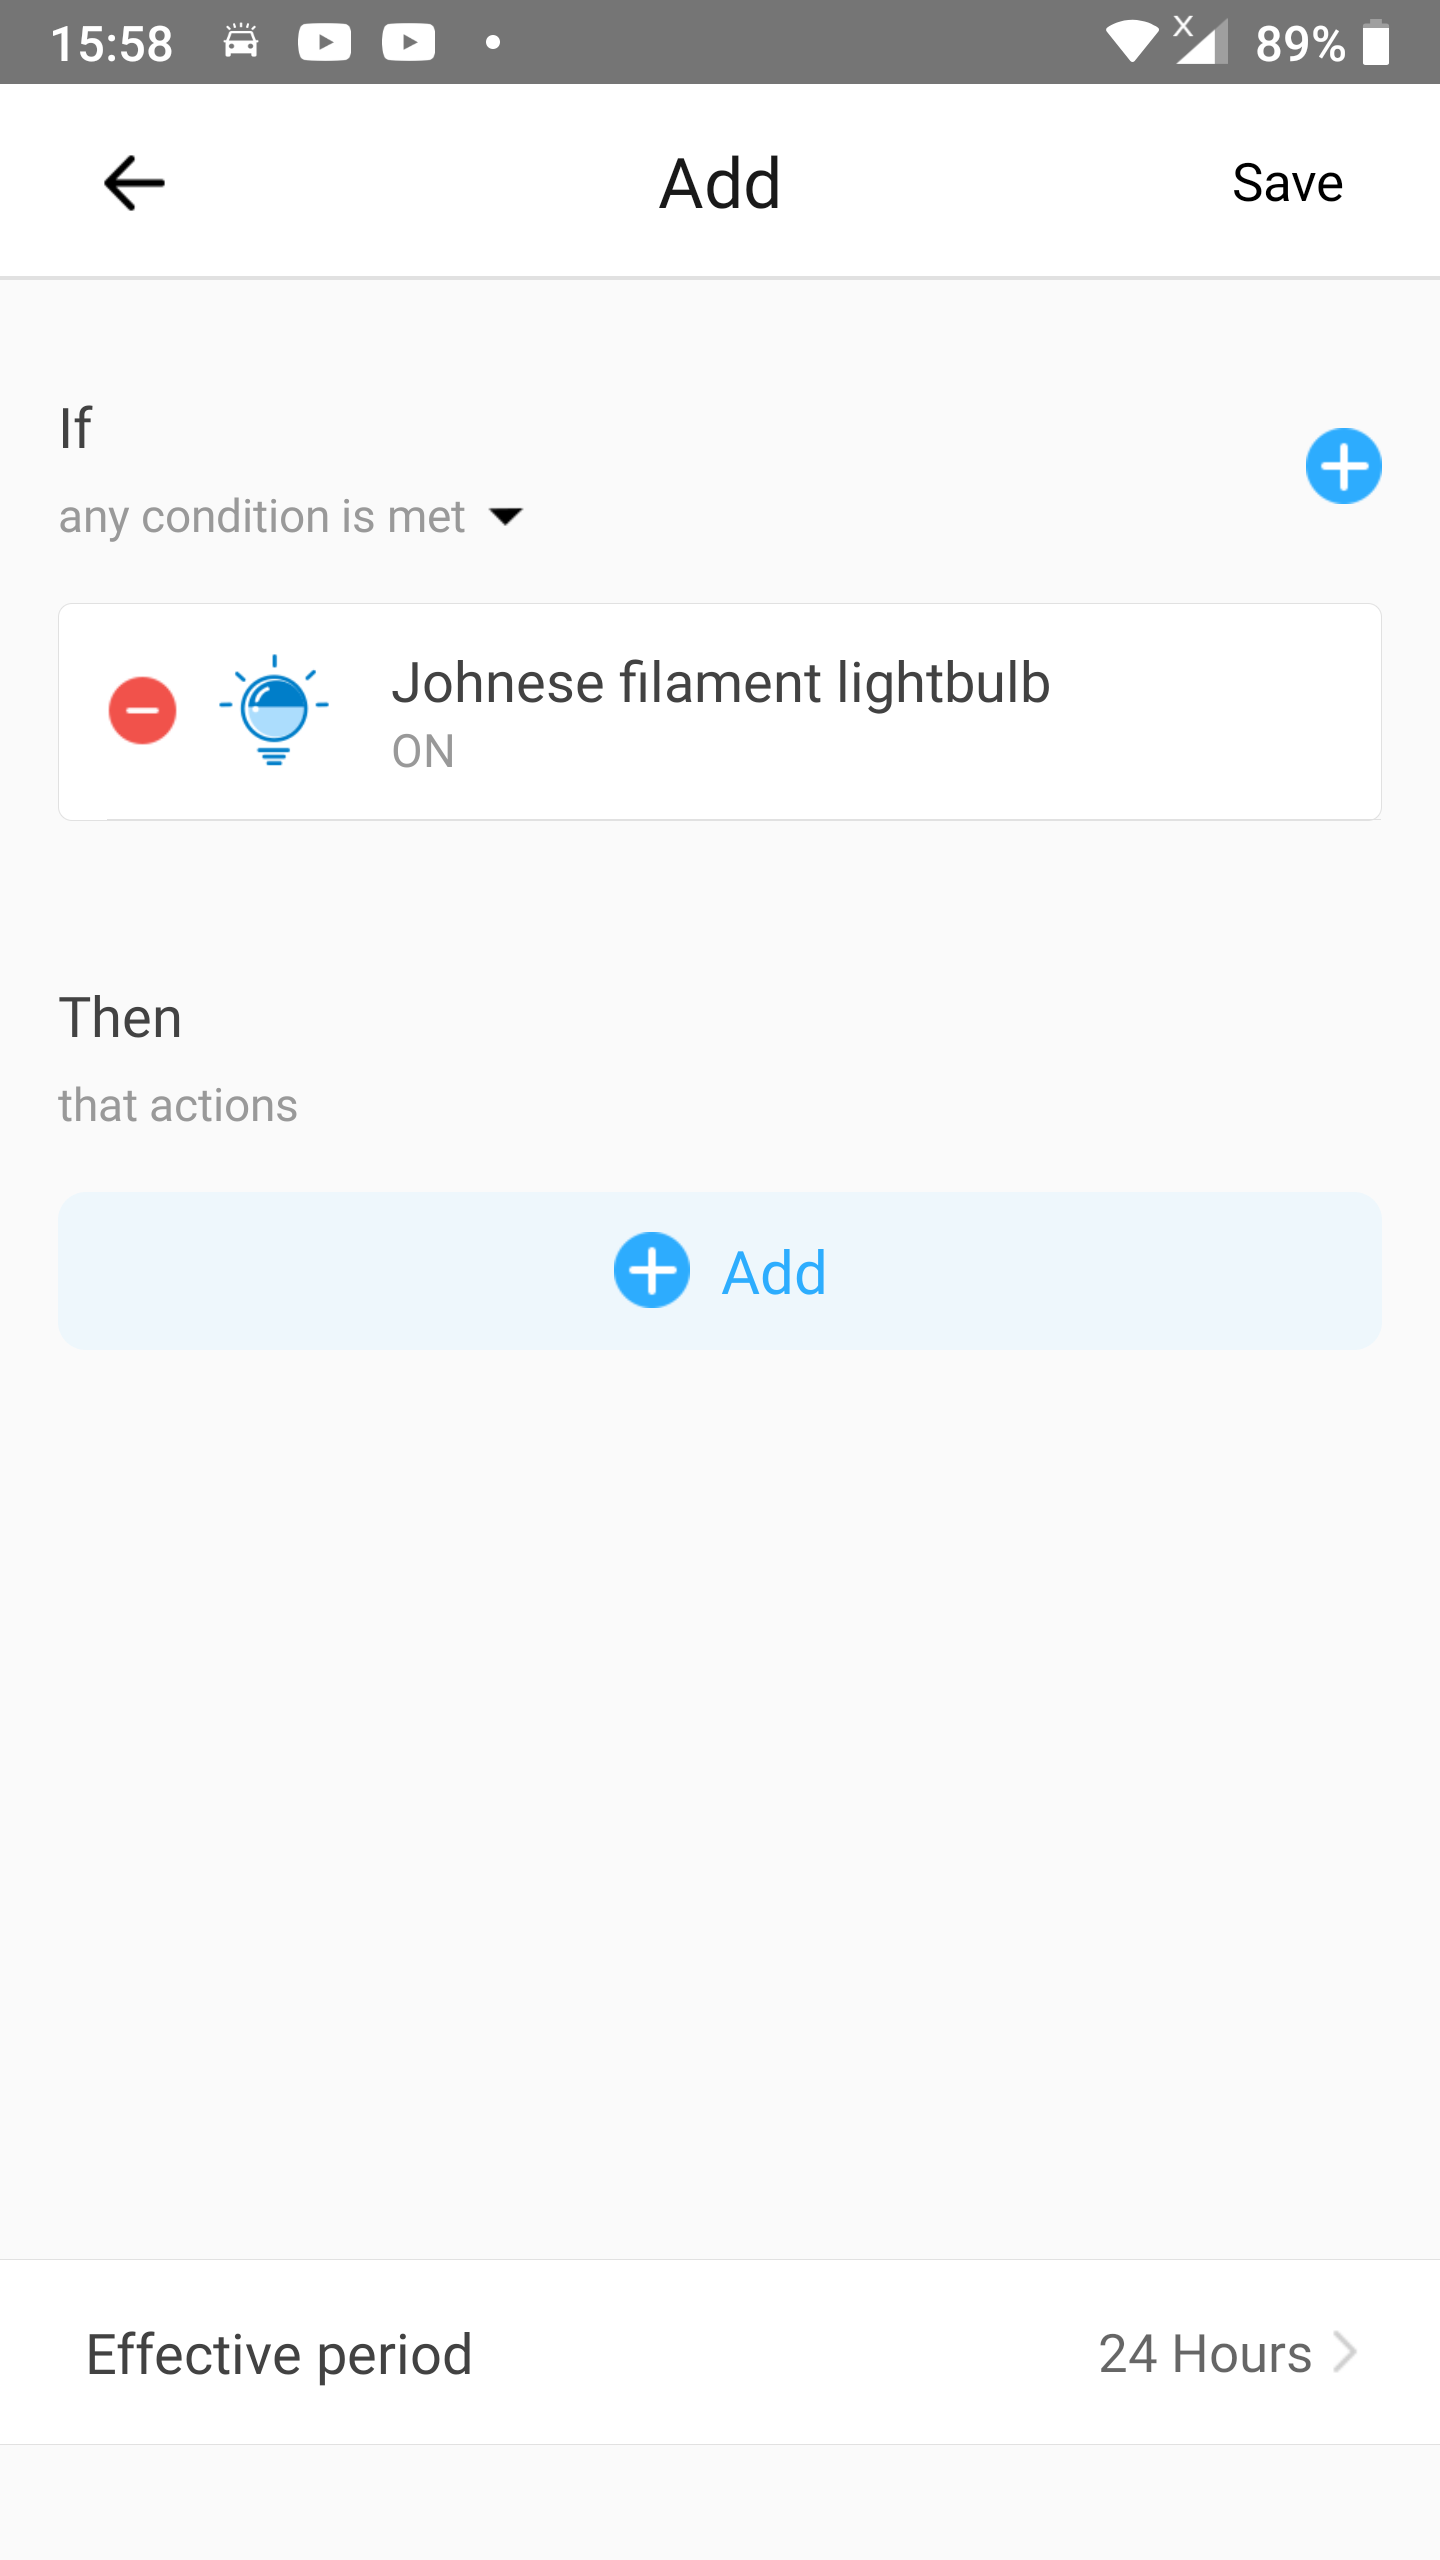
Add Scene 1
This scene will:
- Turn the target device on after an external button press.
- Execute helper scene
Scene offto disable thisScene 1so that this scene doesn’t react on the external button press as the target device is already on.
Because both Scene 1 and the helper scene will refer to each other we can’t complete this scene in one flow. We will modify Scene 1 later on.
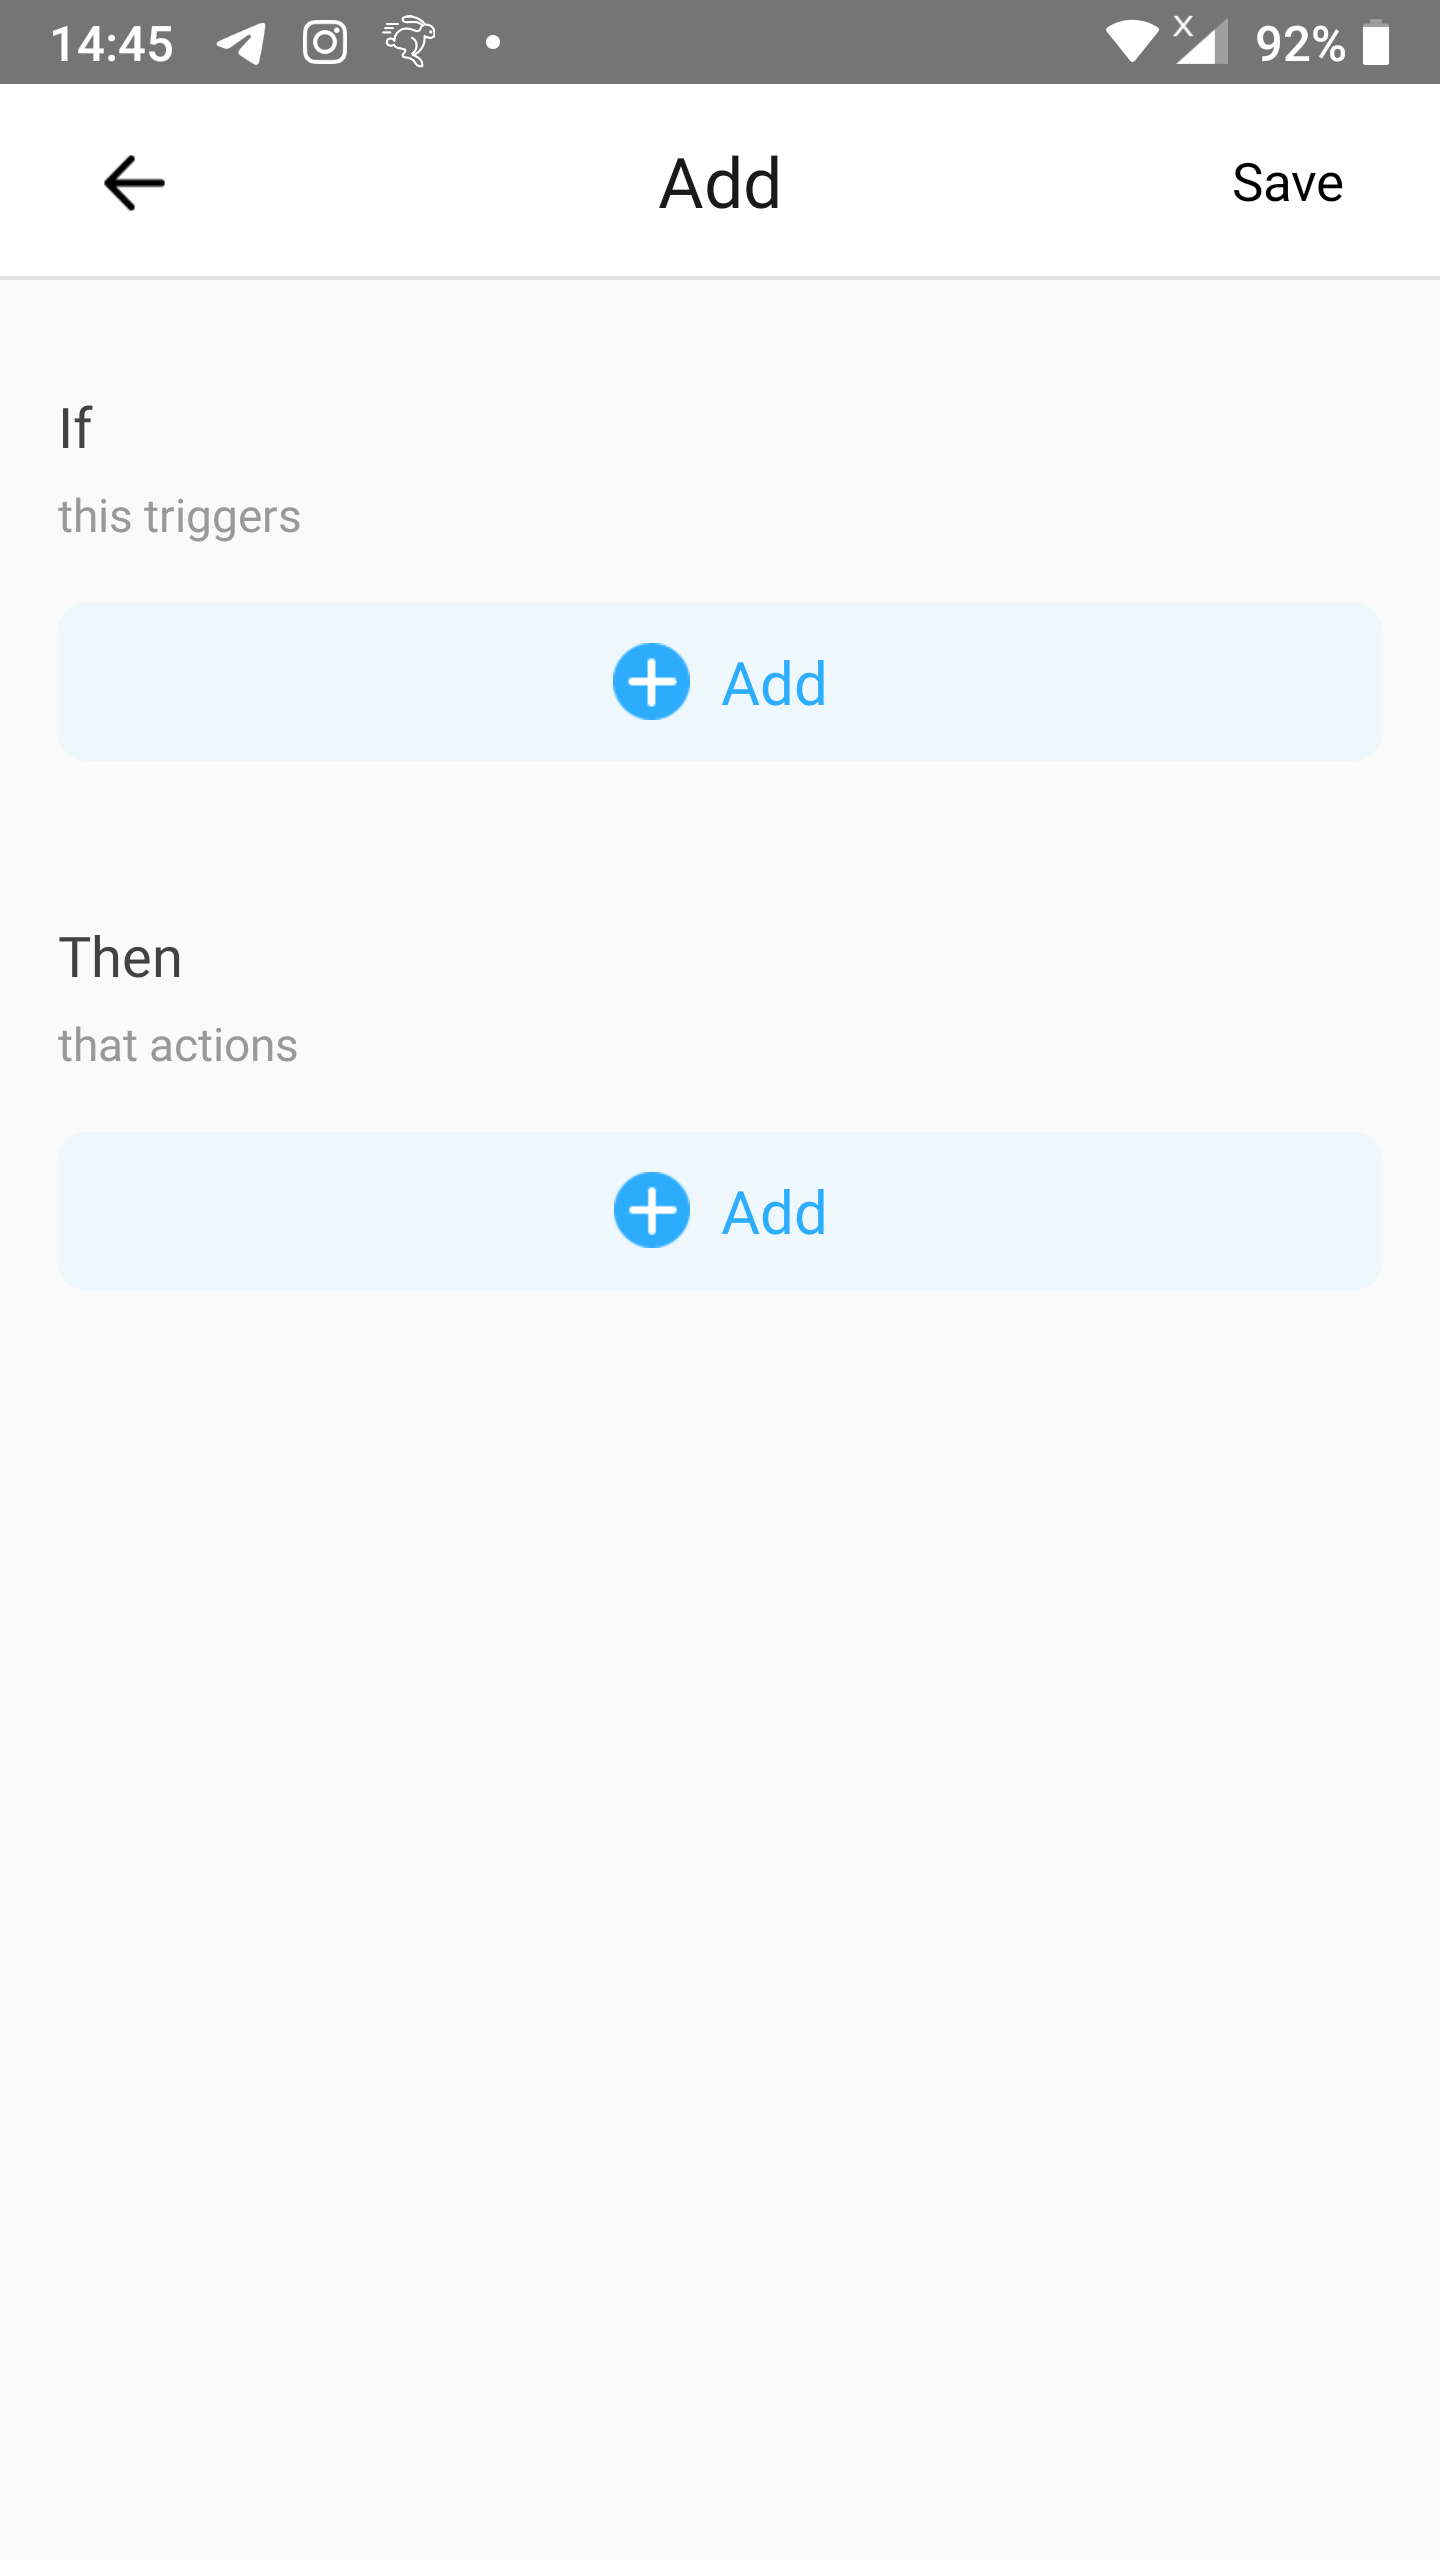
Step 1
- Go to the
Scenescreen. - Tap the
+icon in the top right corner.

Step 2
- Tap
Addright belowIf.
Step 3
- Tap
Smart Device.
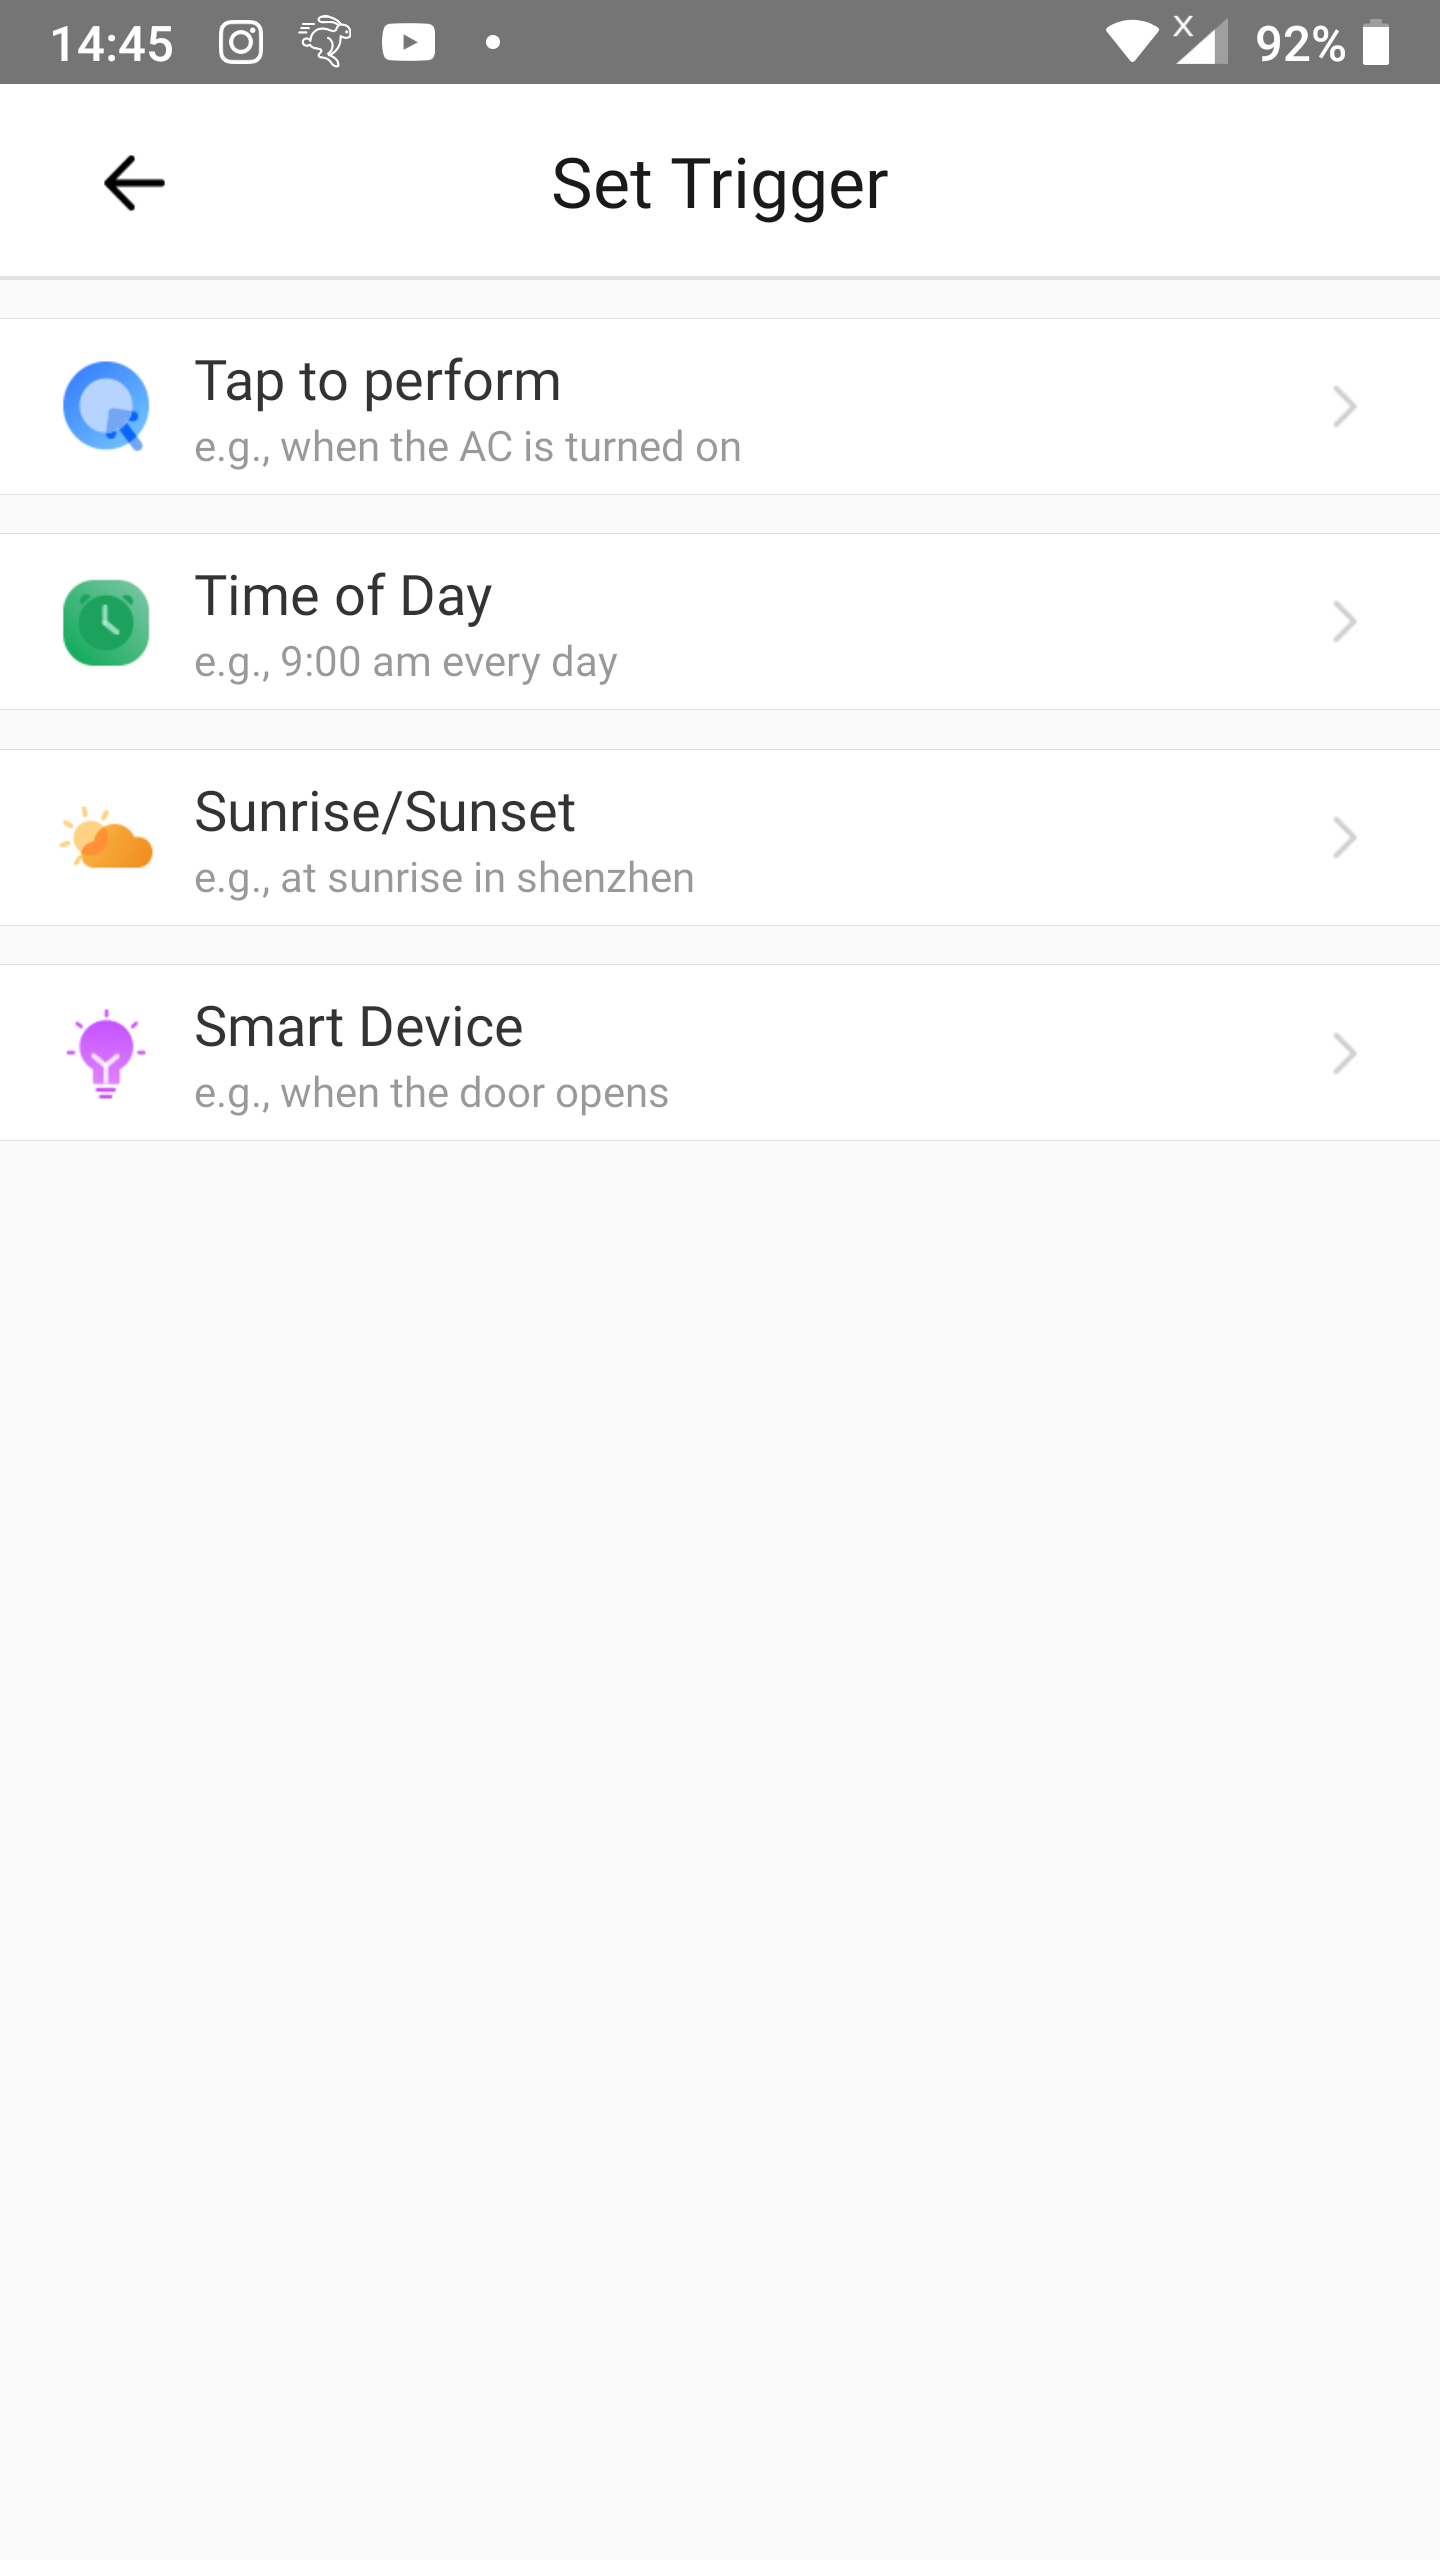
Step 4
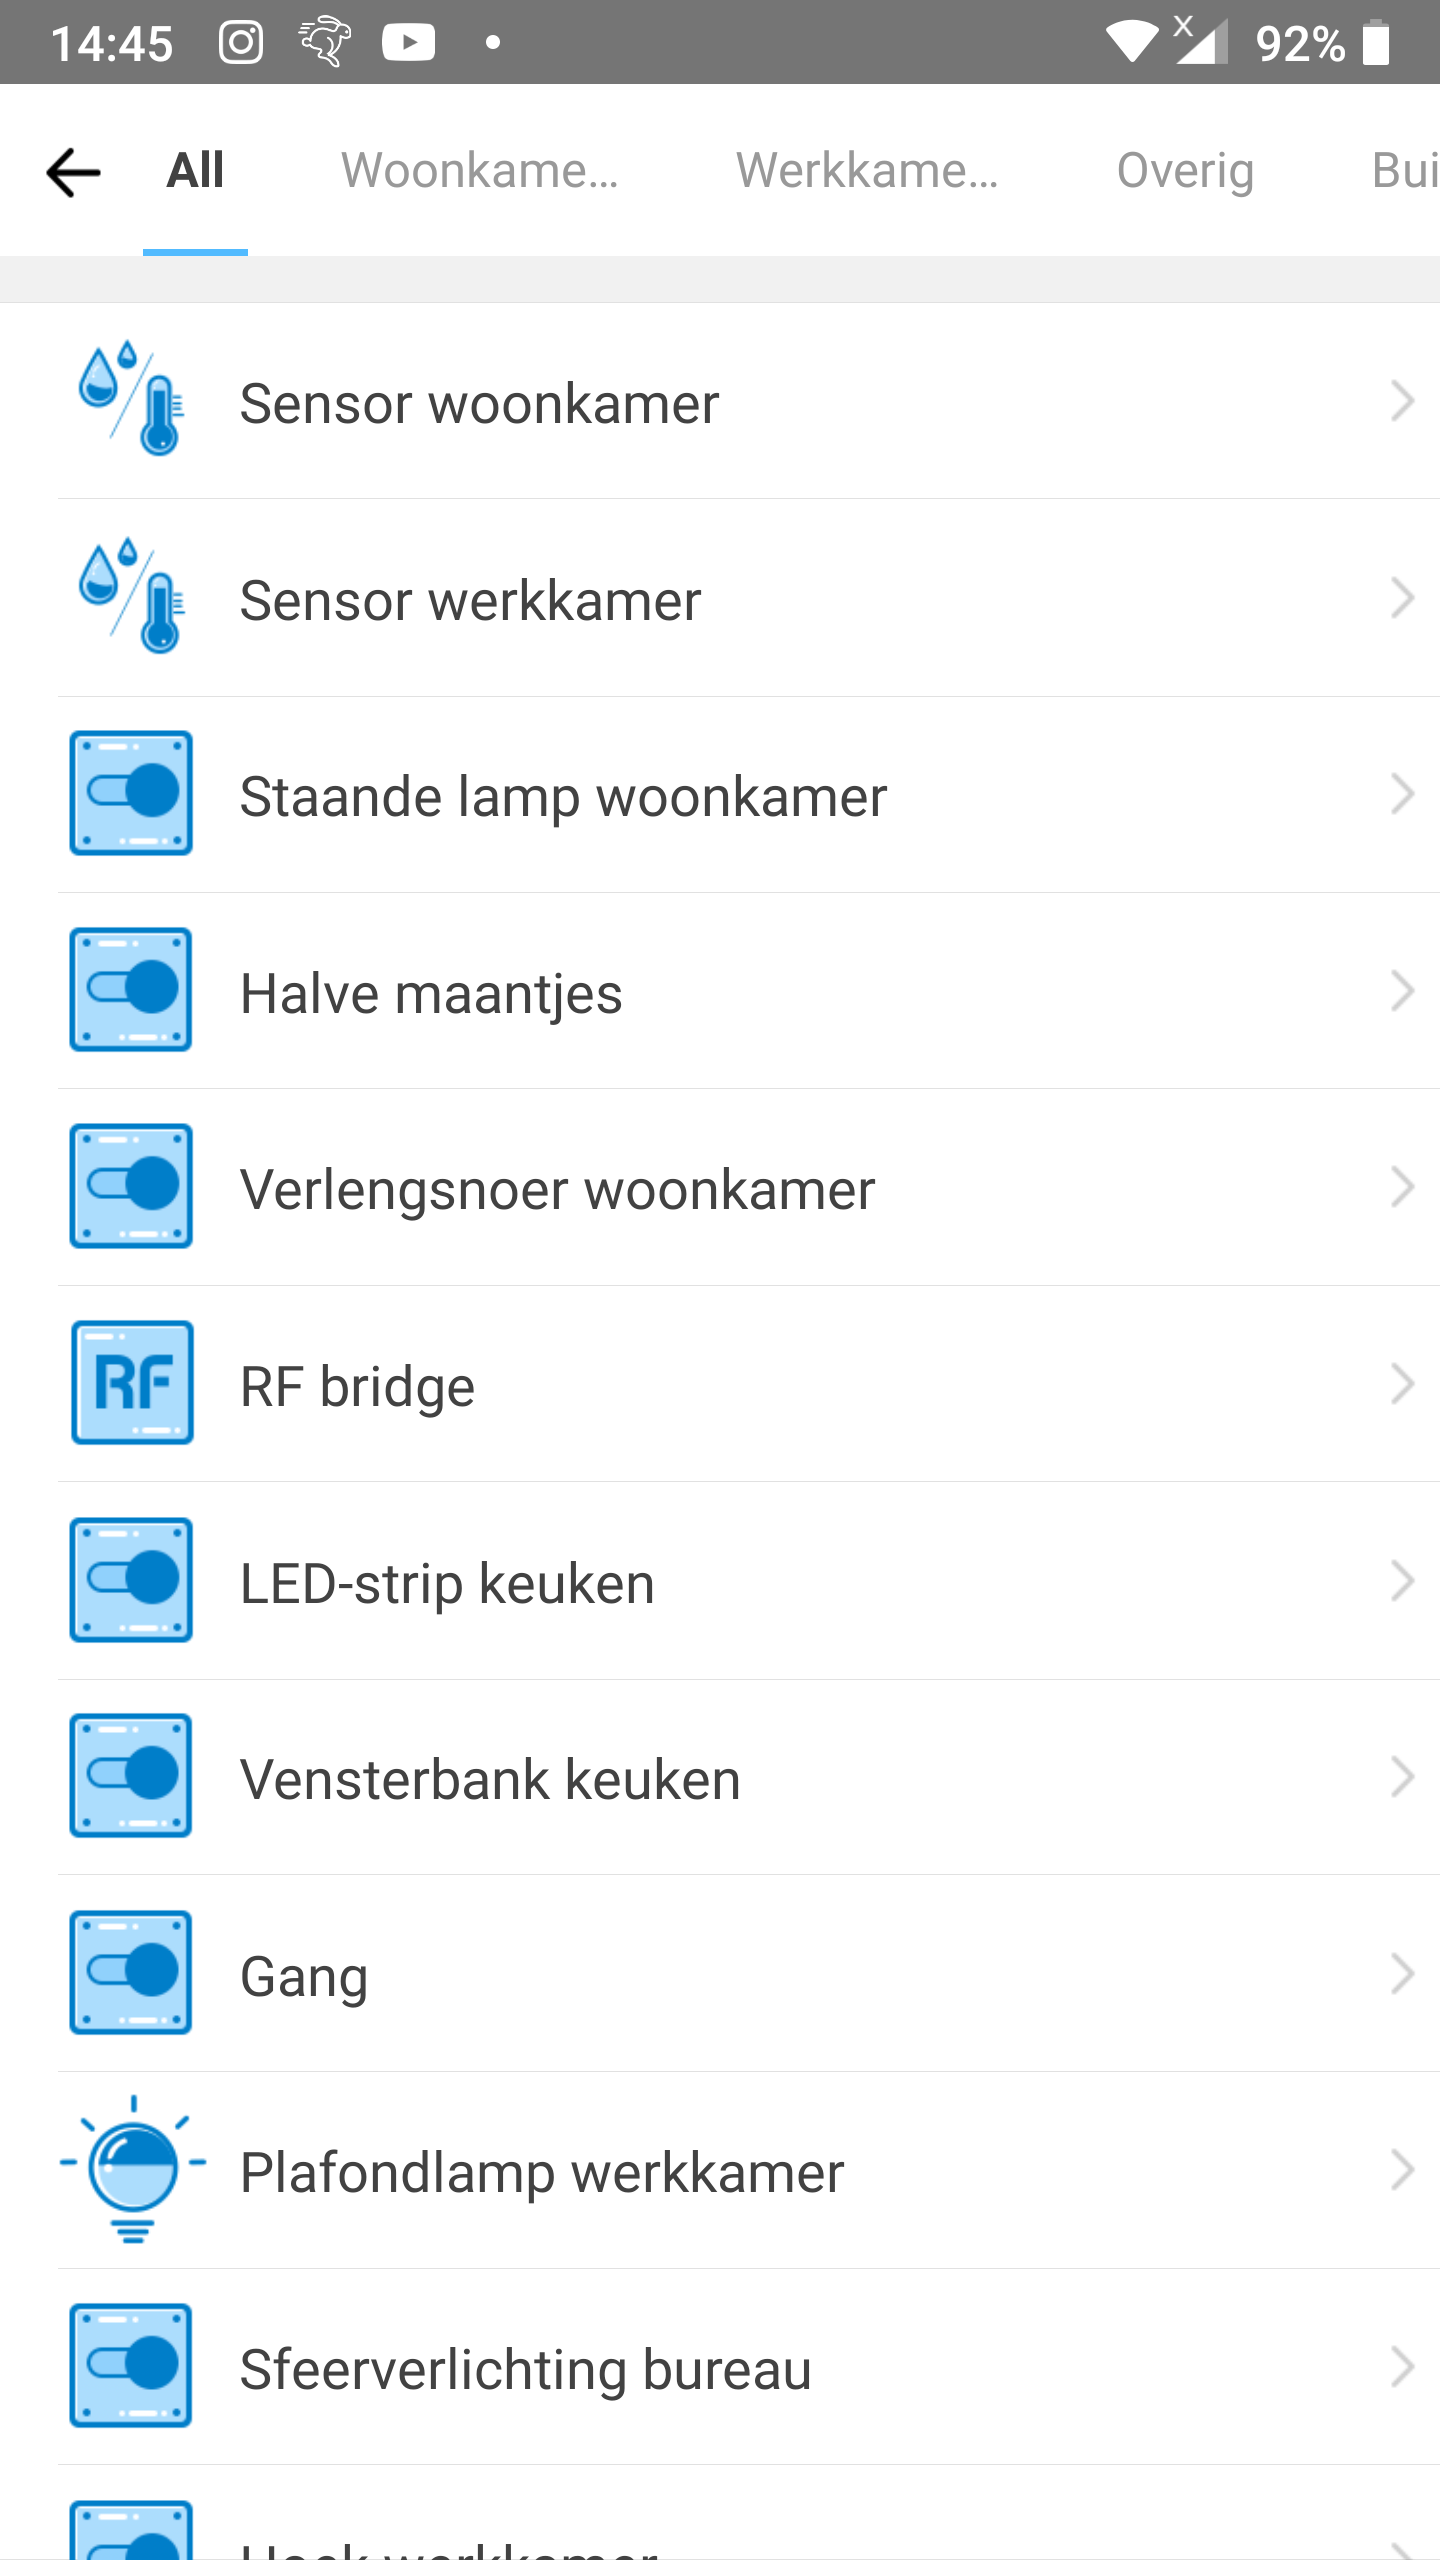
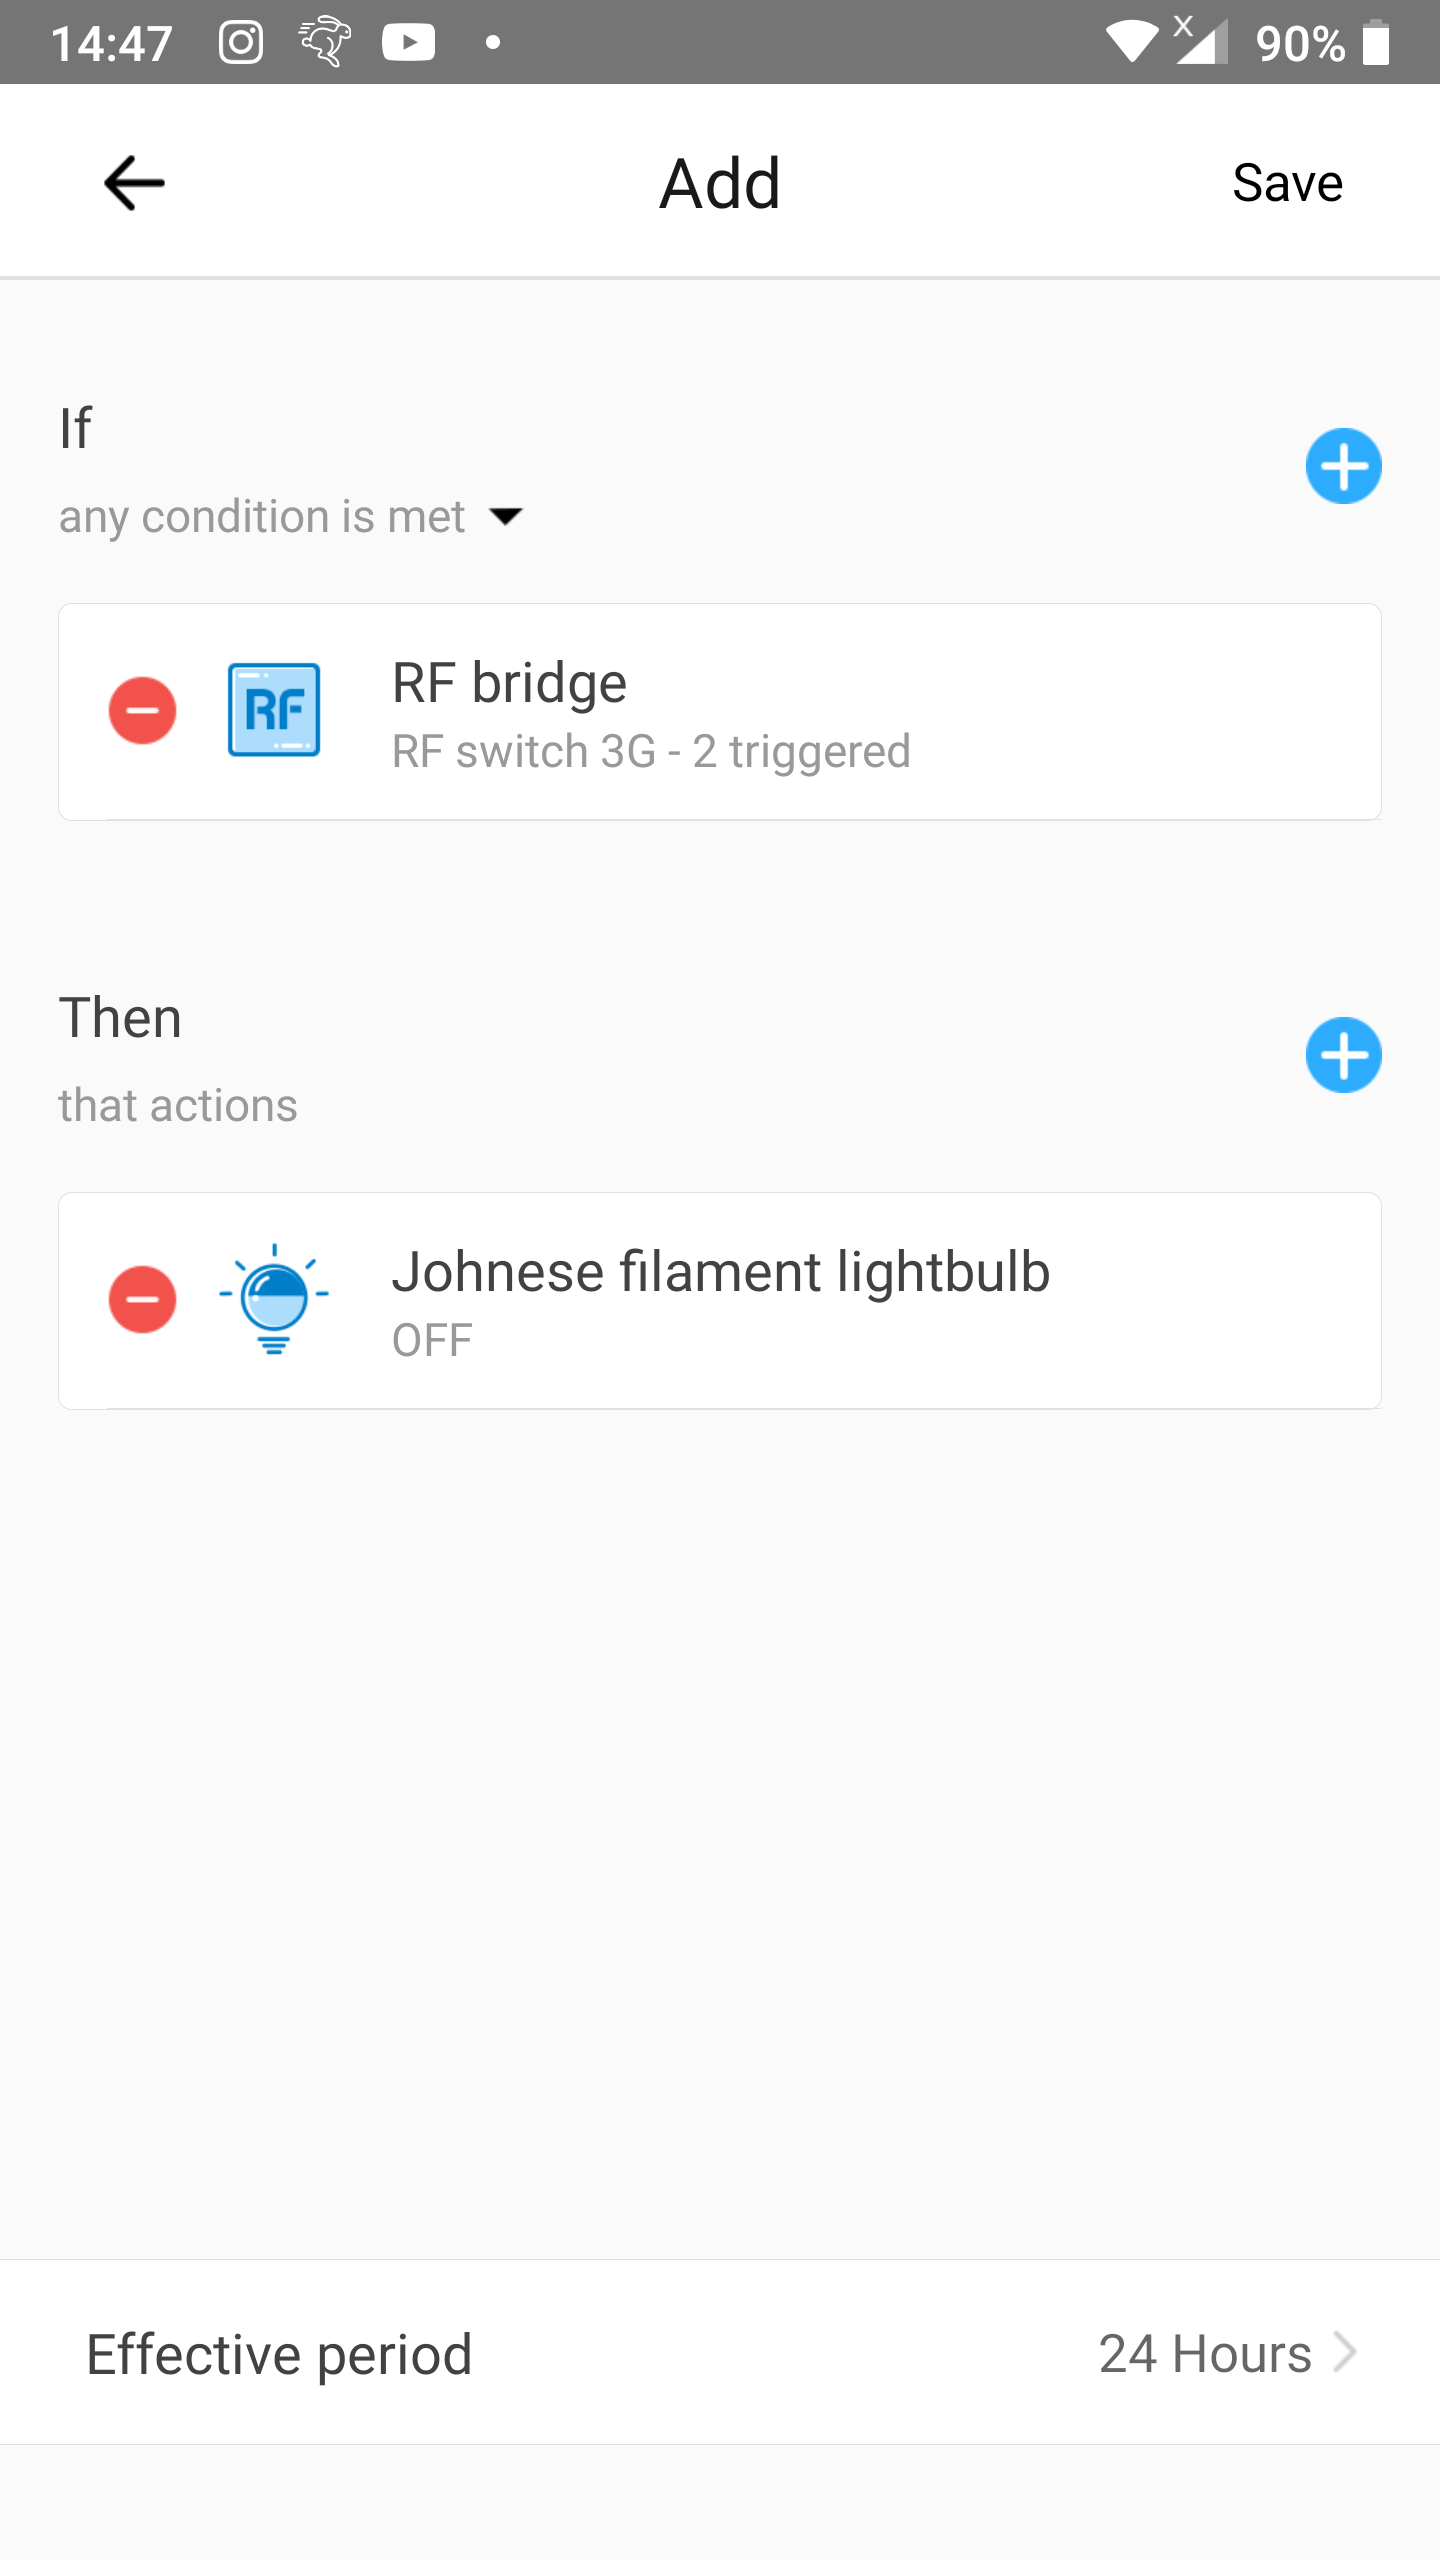
- Select the trigger device.
- If you want to use a Zigbee button you can tap the name of the Zigbee button and then choose the press type (single, double or long press).
- In our example we use a RF button and so we select our RF bridge called
RF bridge.
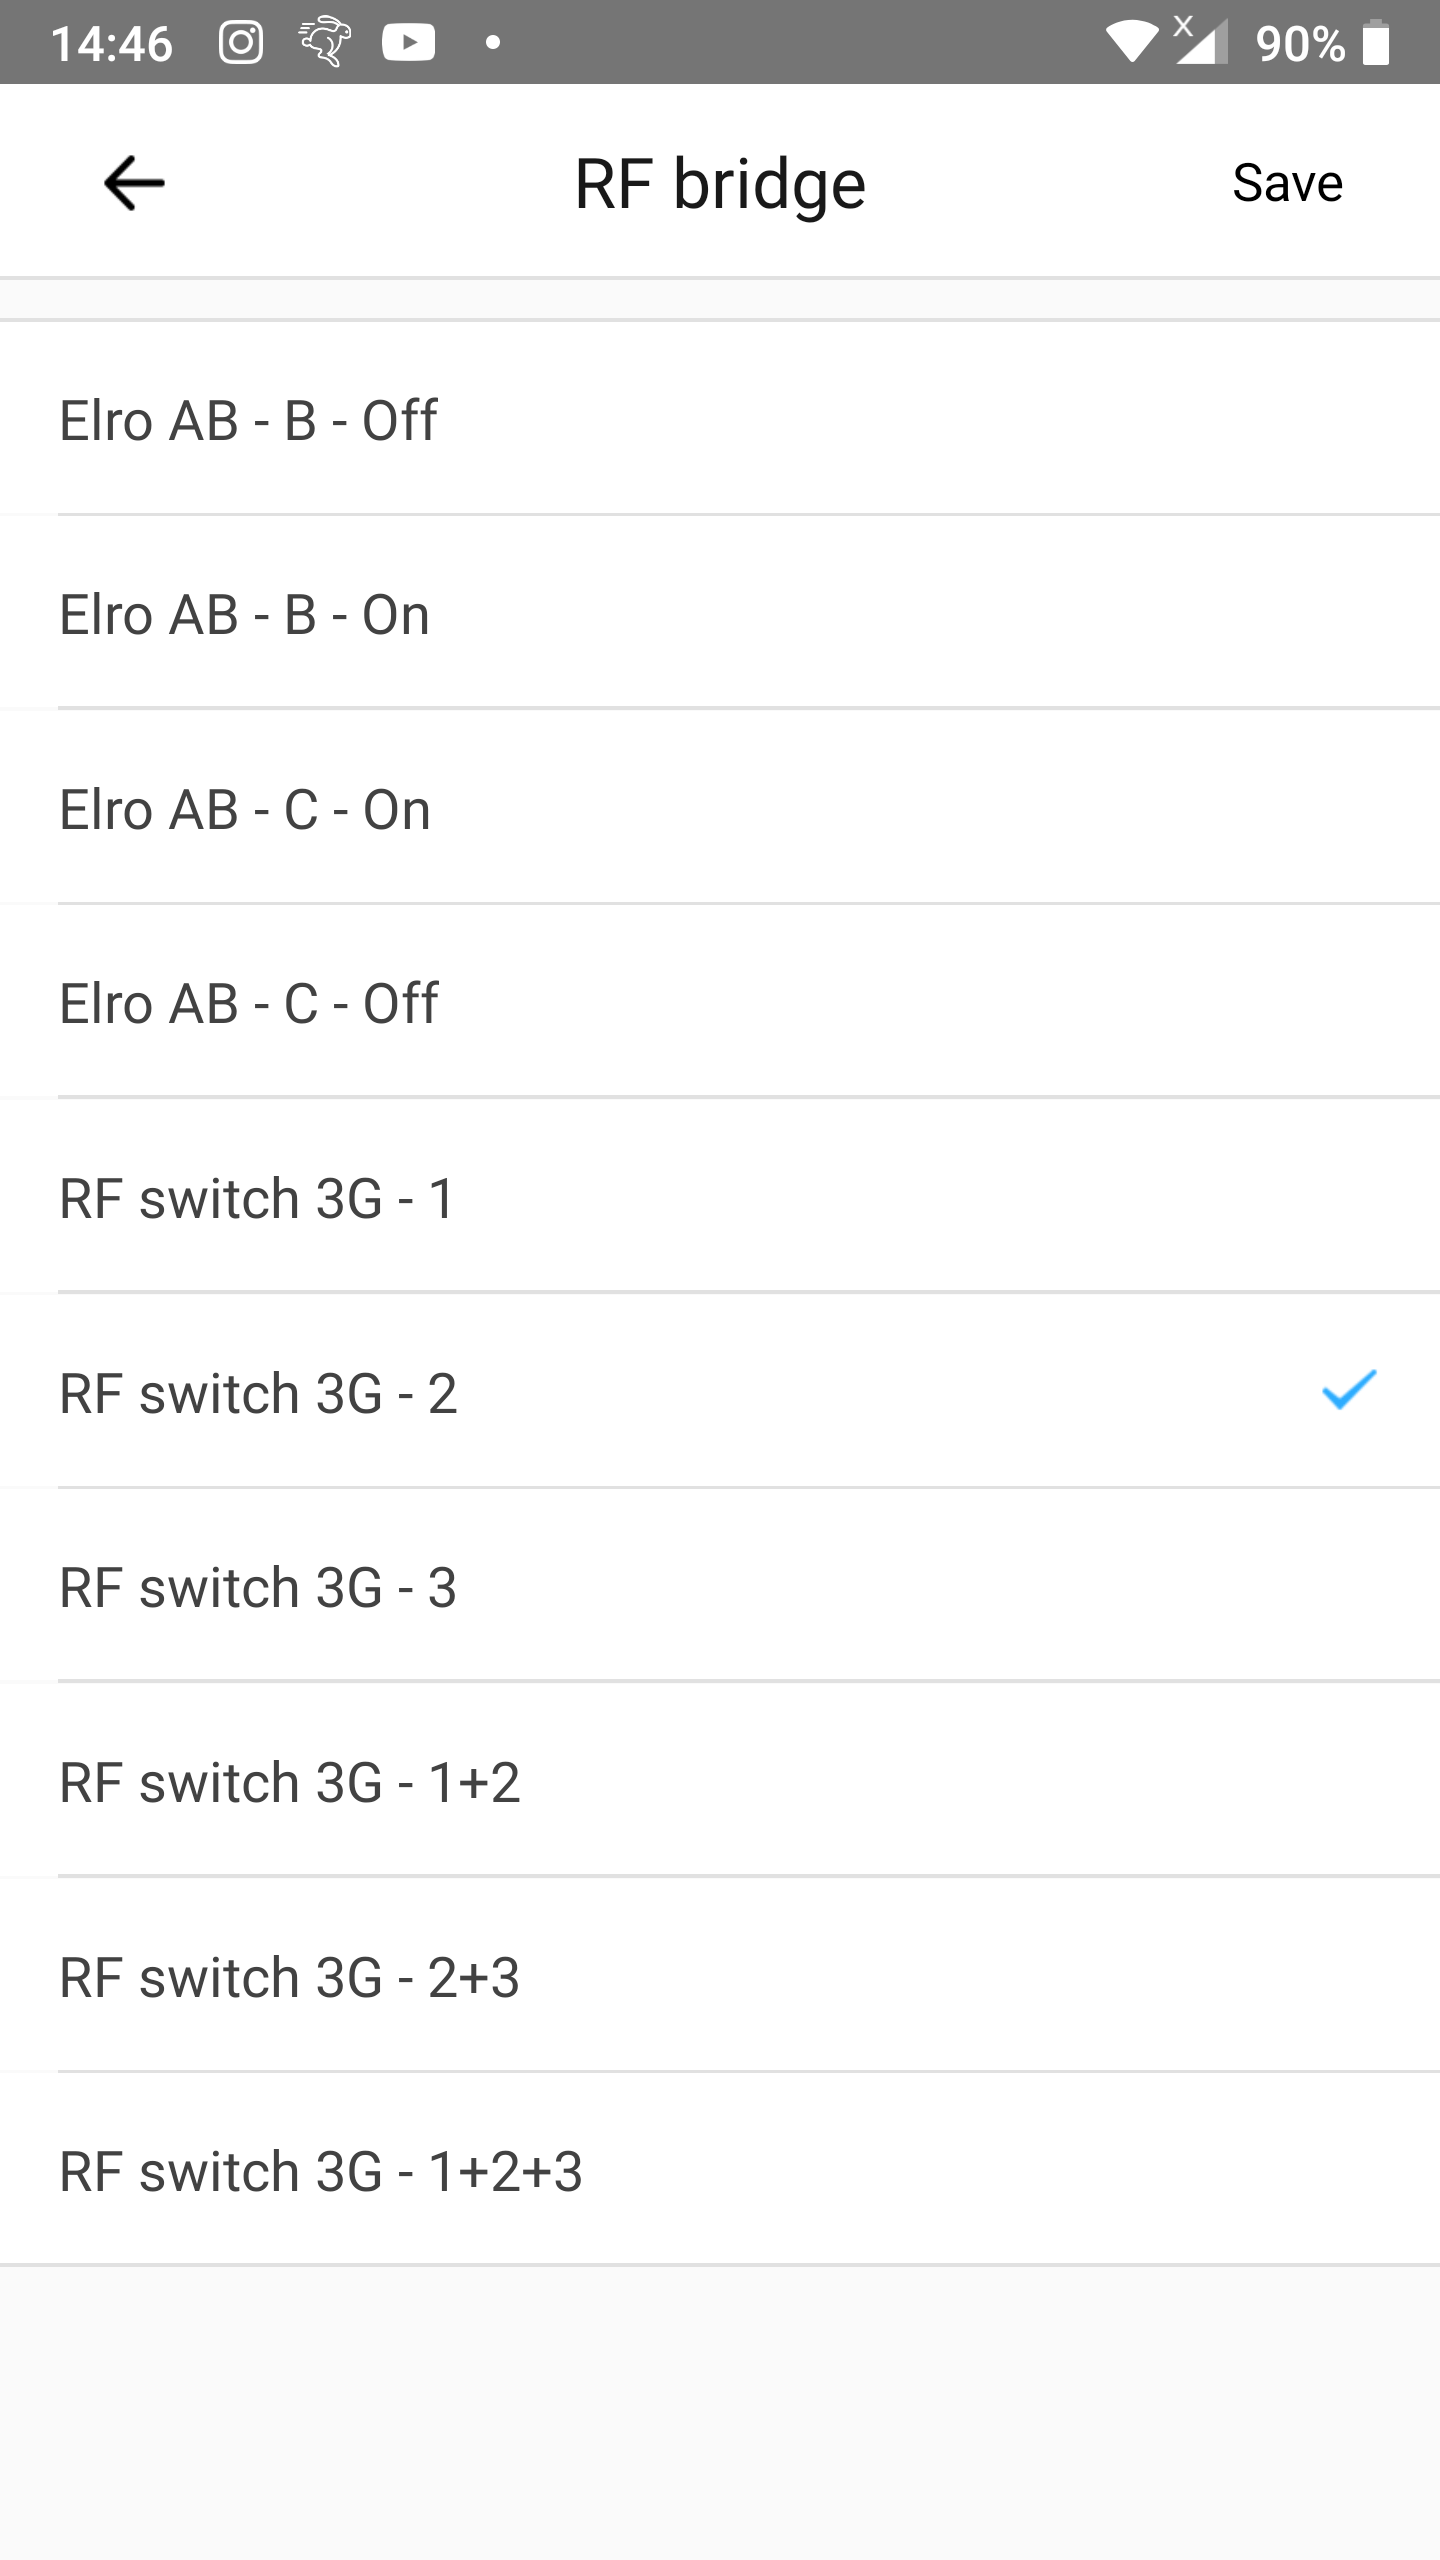
Step 5
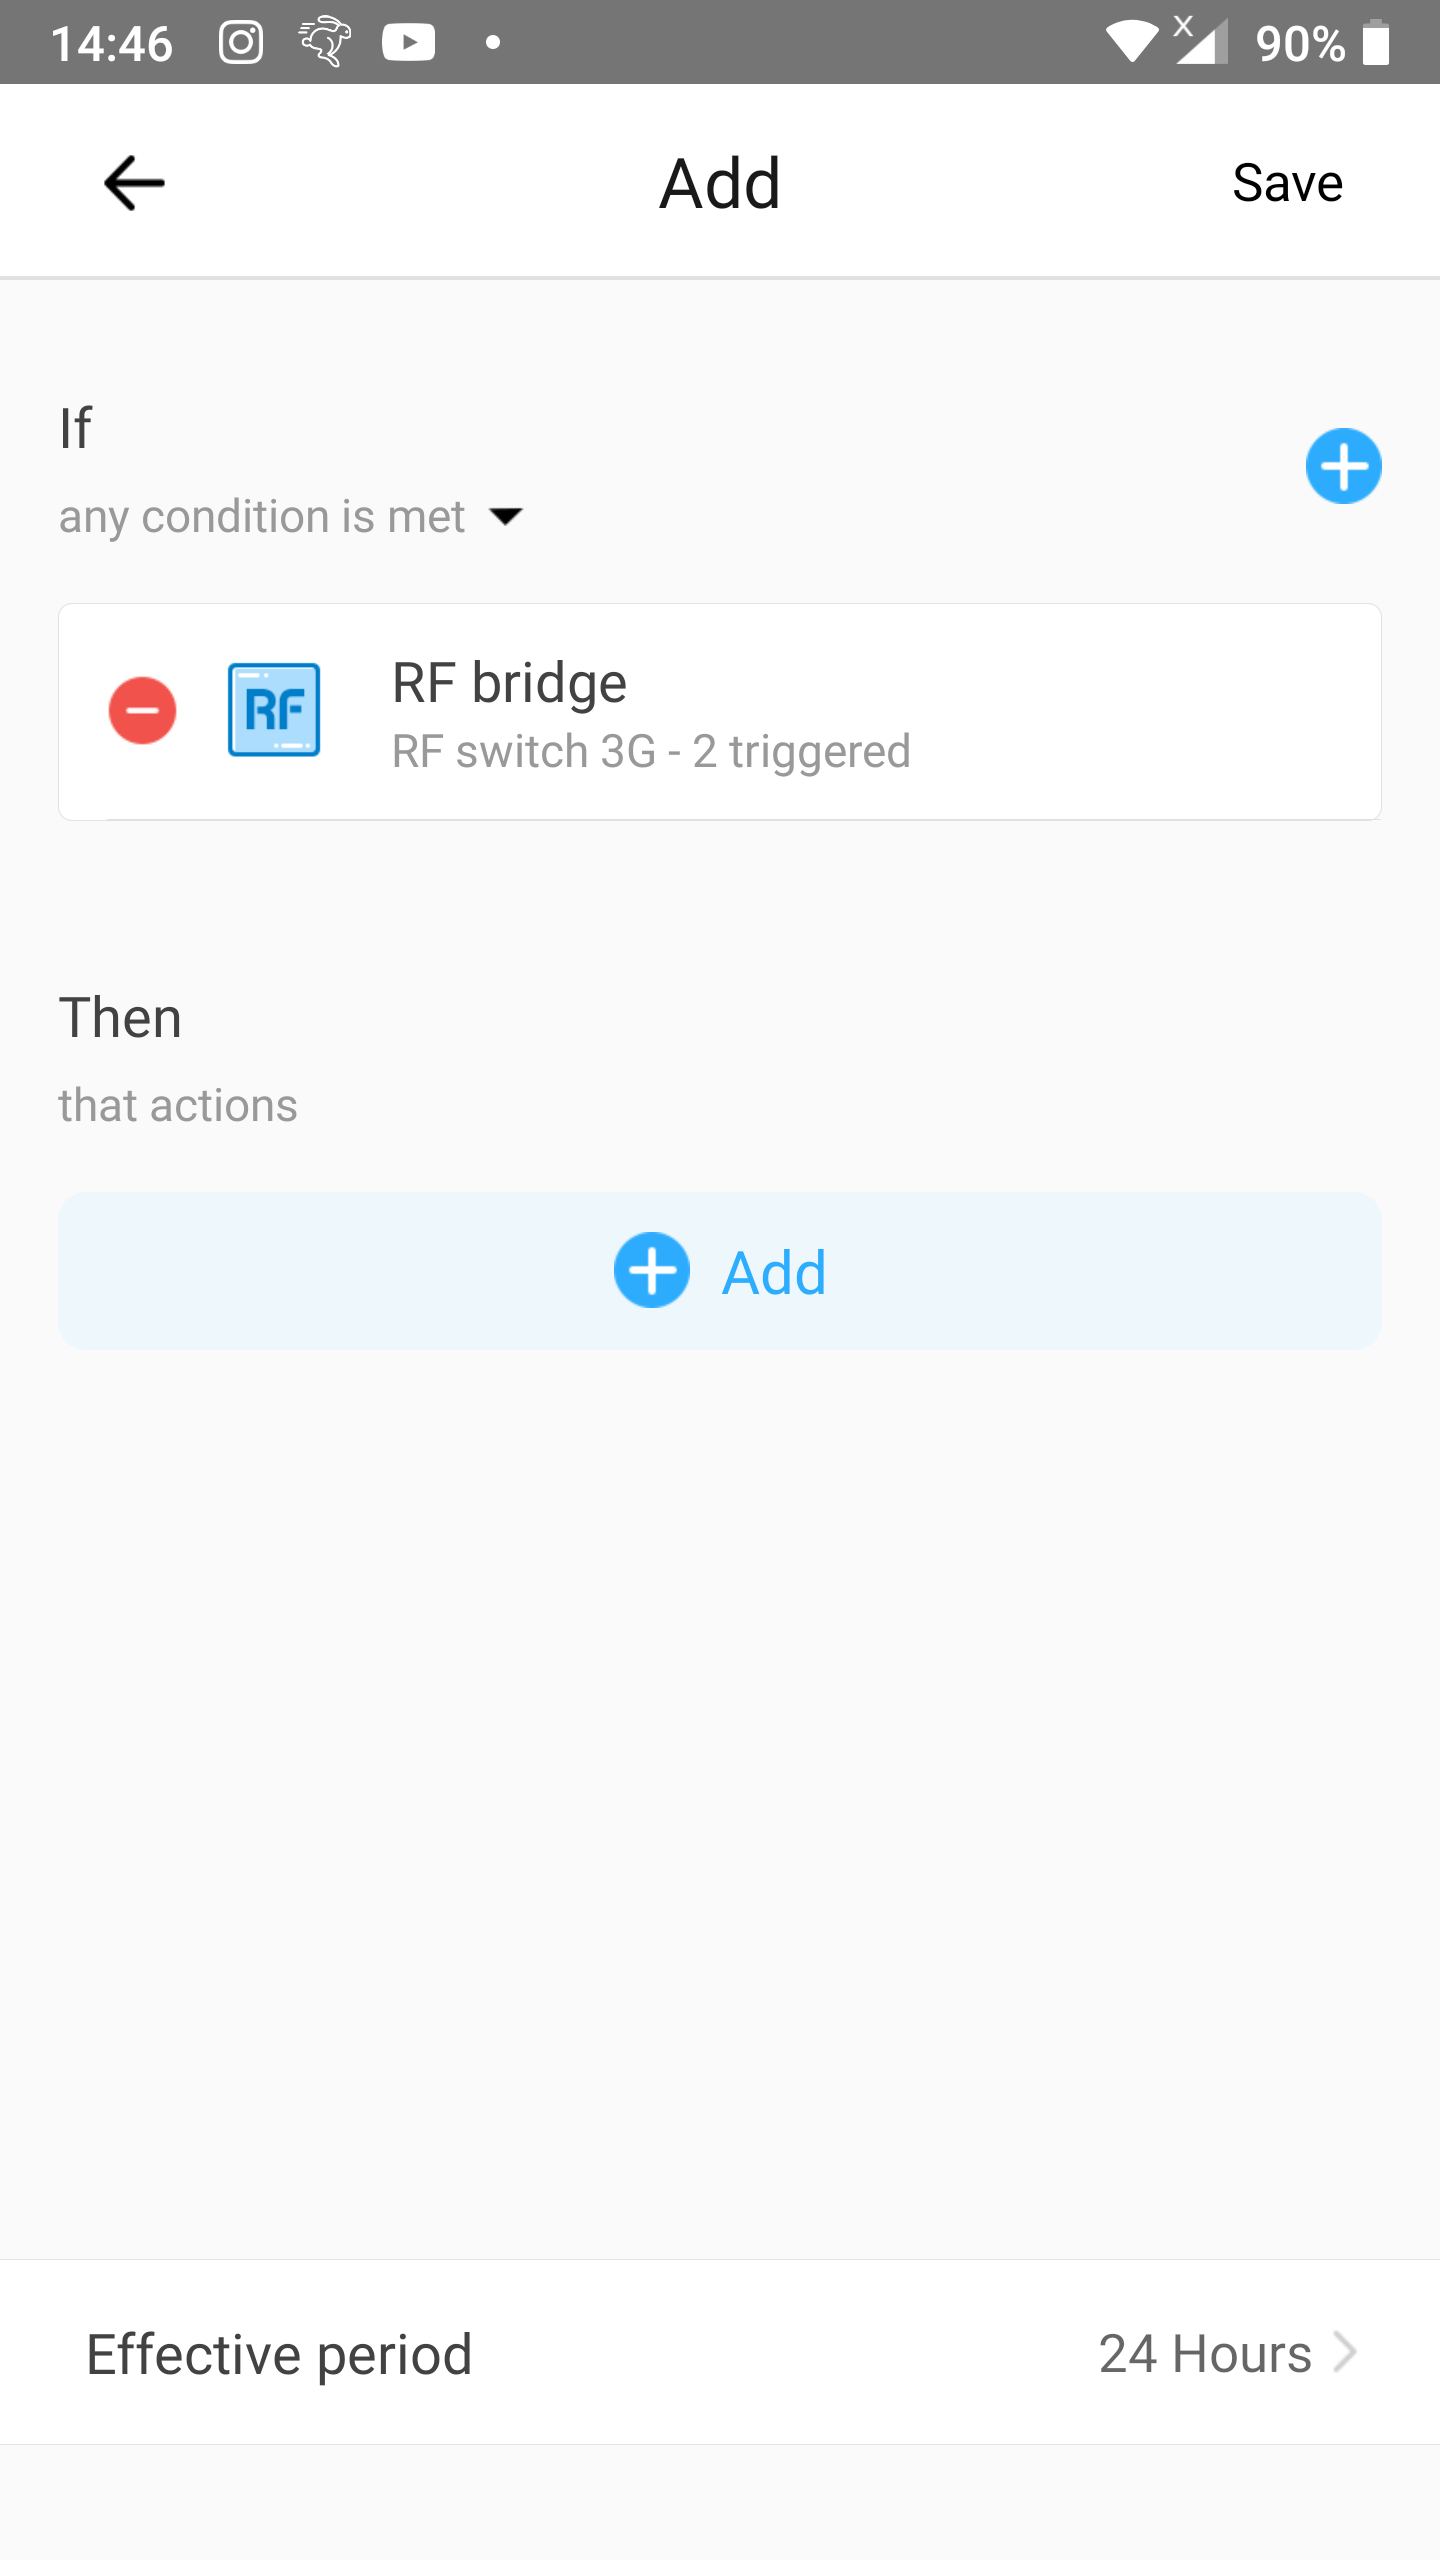
- Select the correct RF alarm that represents your RF button.
- In our case it is
RF switch 3G - 2(the middle button of a 3-gang RF switch).
- In our case it is
- Tap
Savein the upper right corner.
Step 6
- Tap
Addright belowThen.
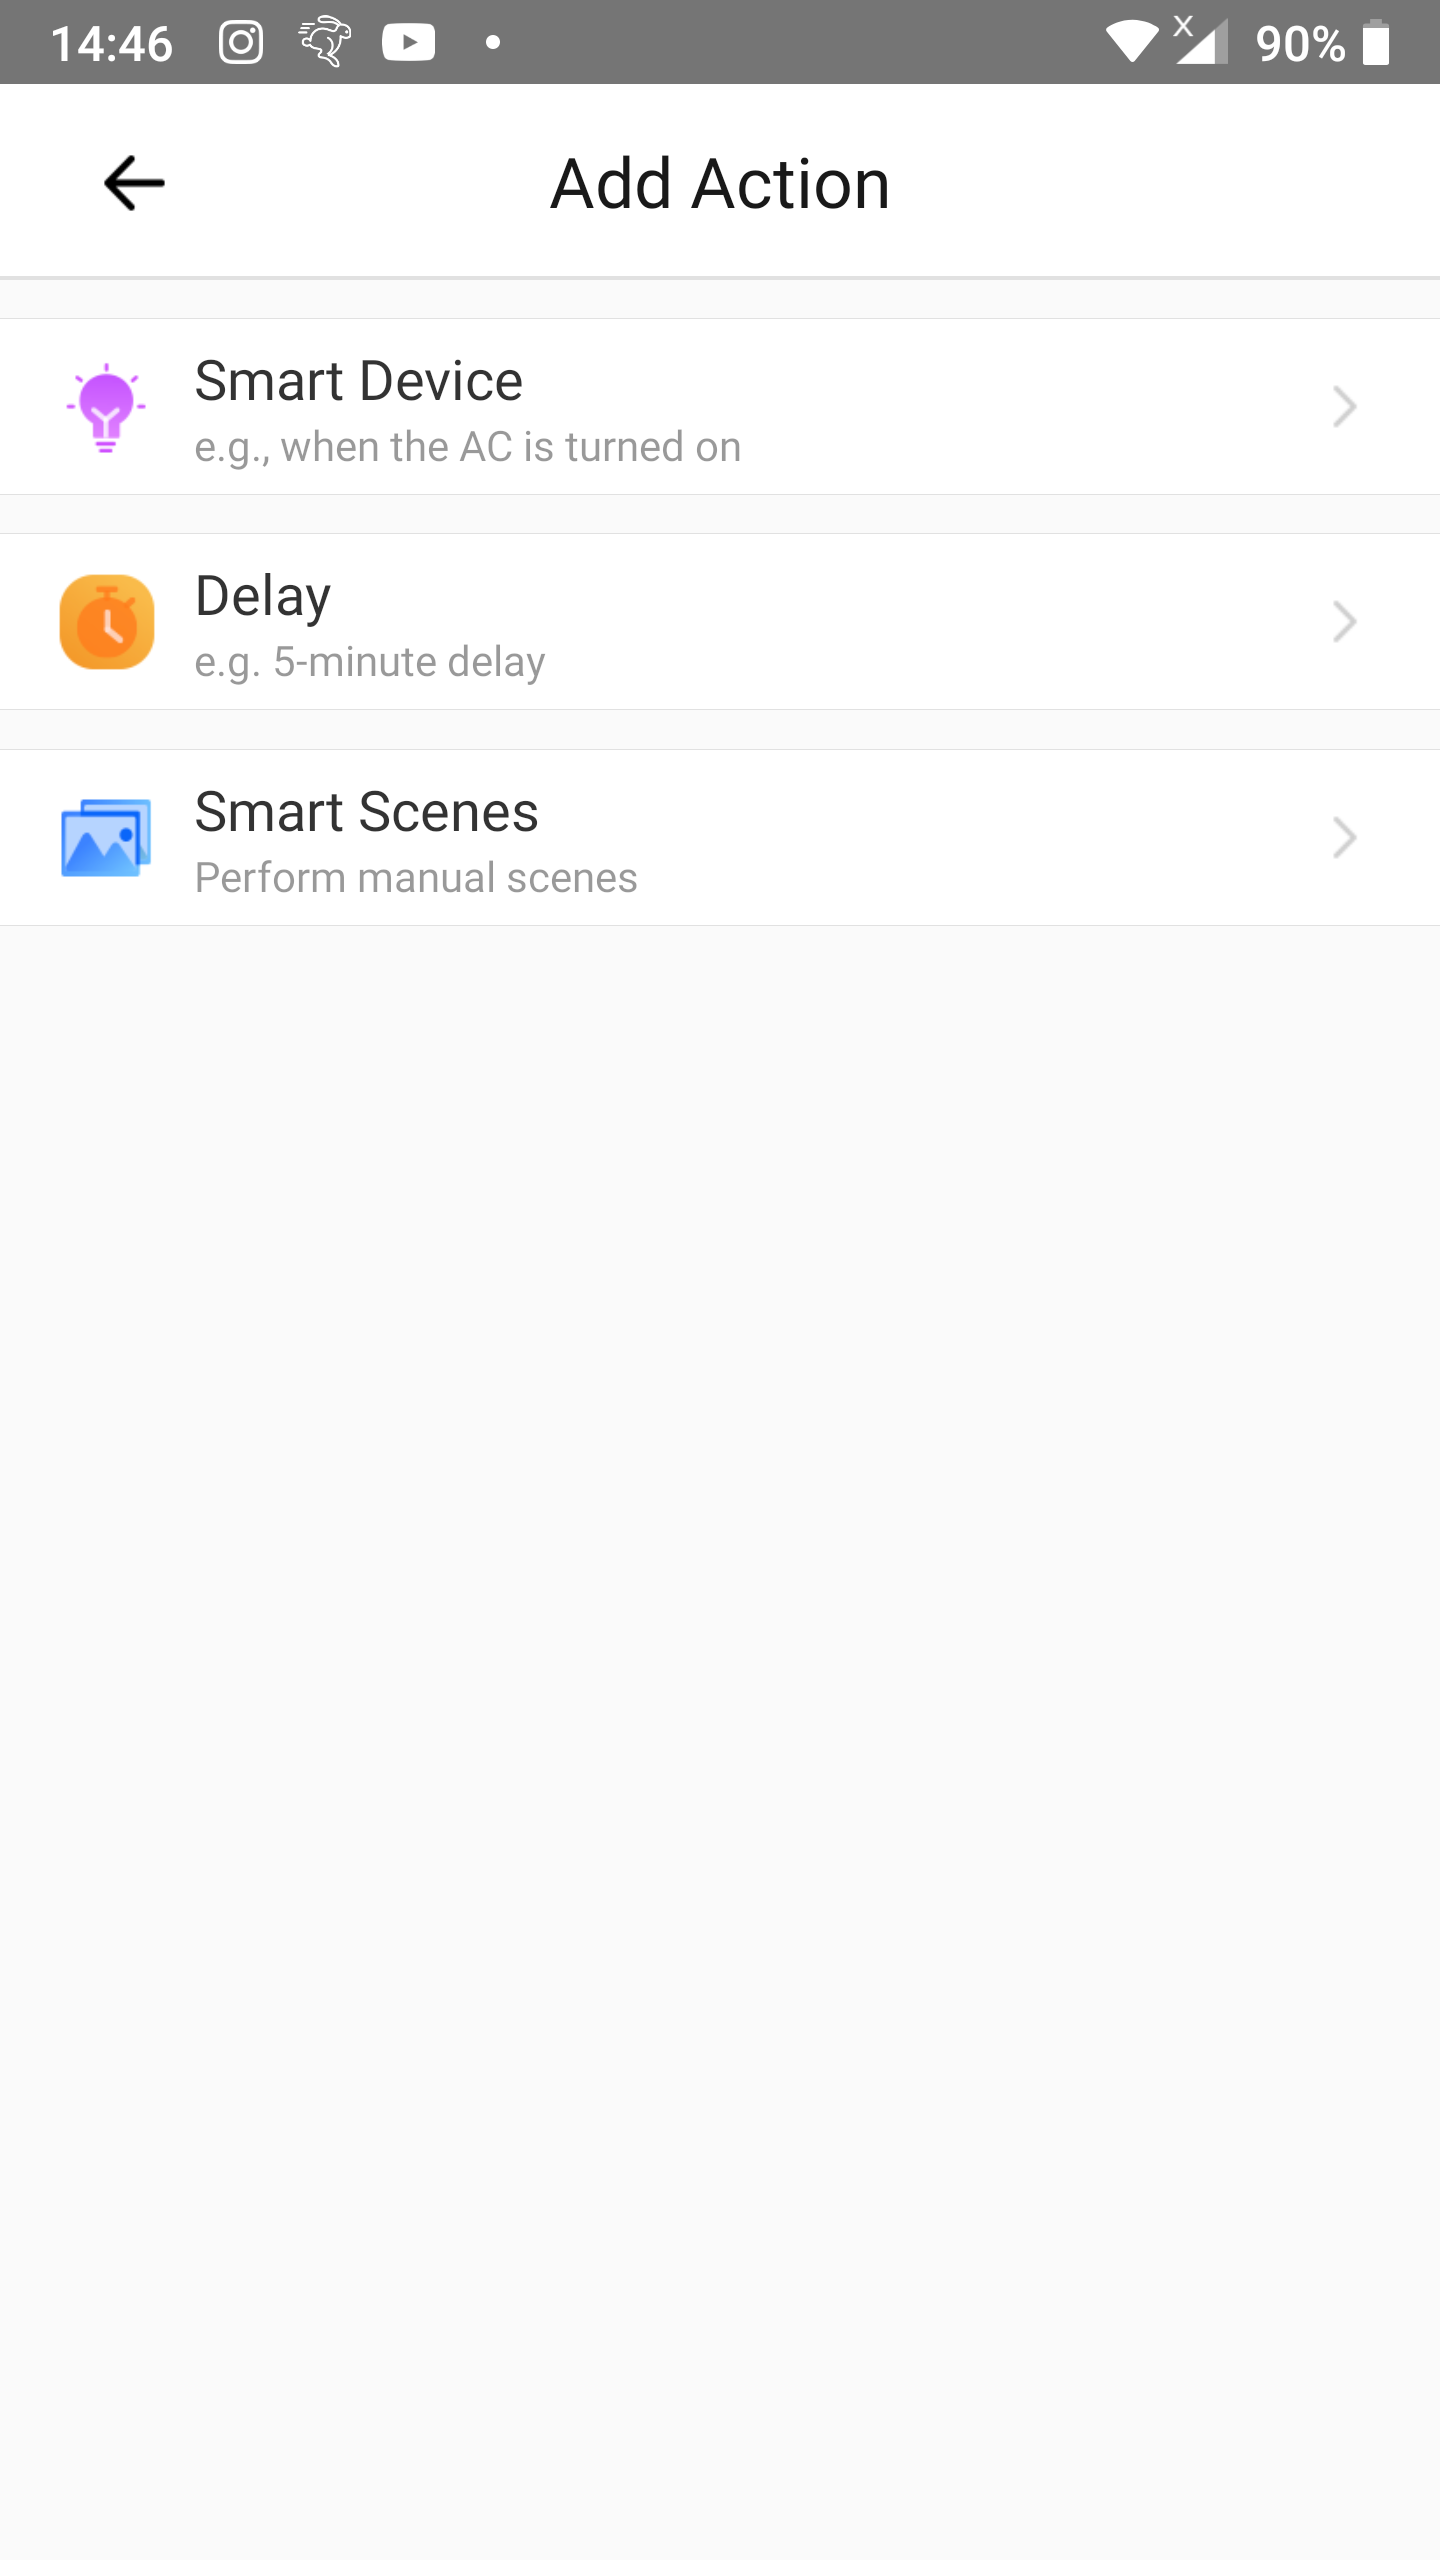
Step 7
- Tap
Smart Device.
Step 8
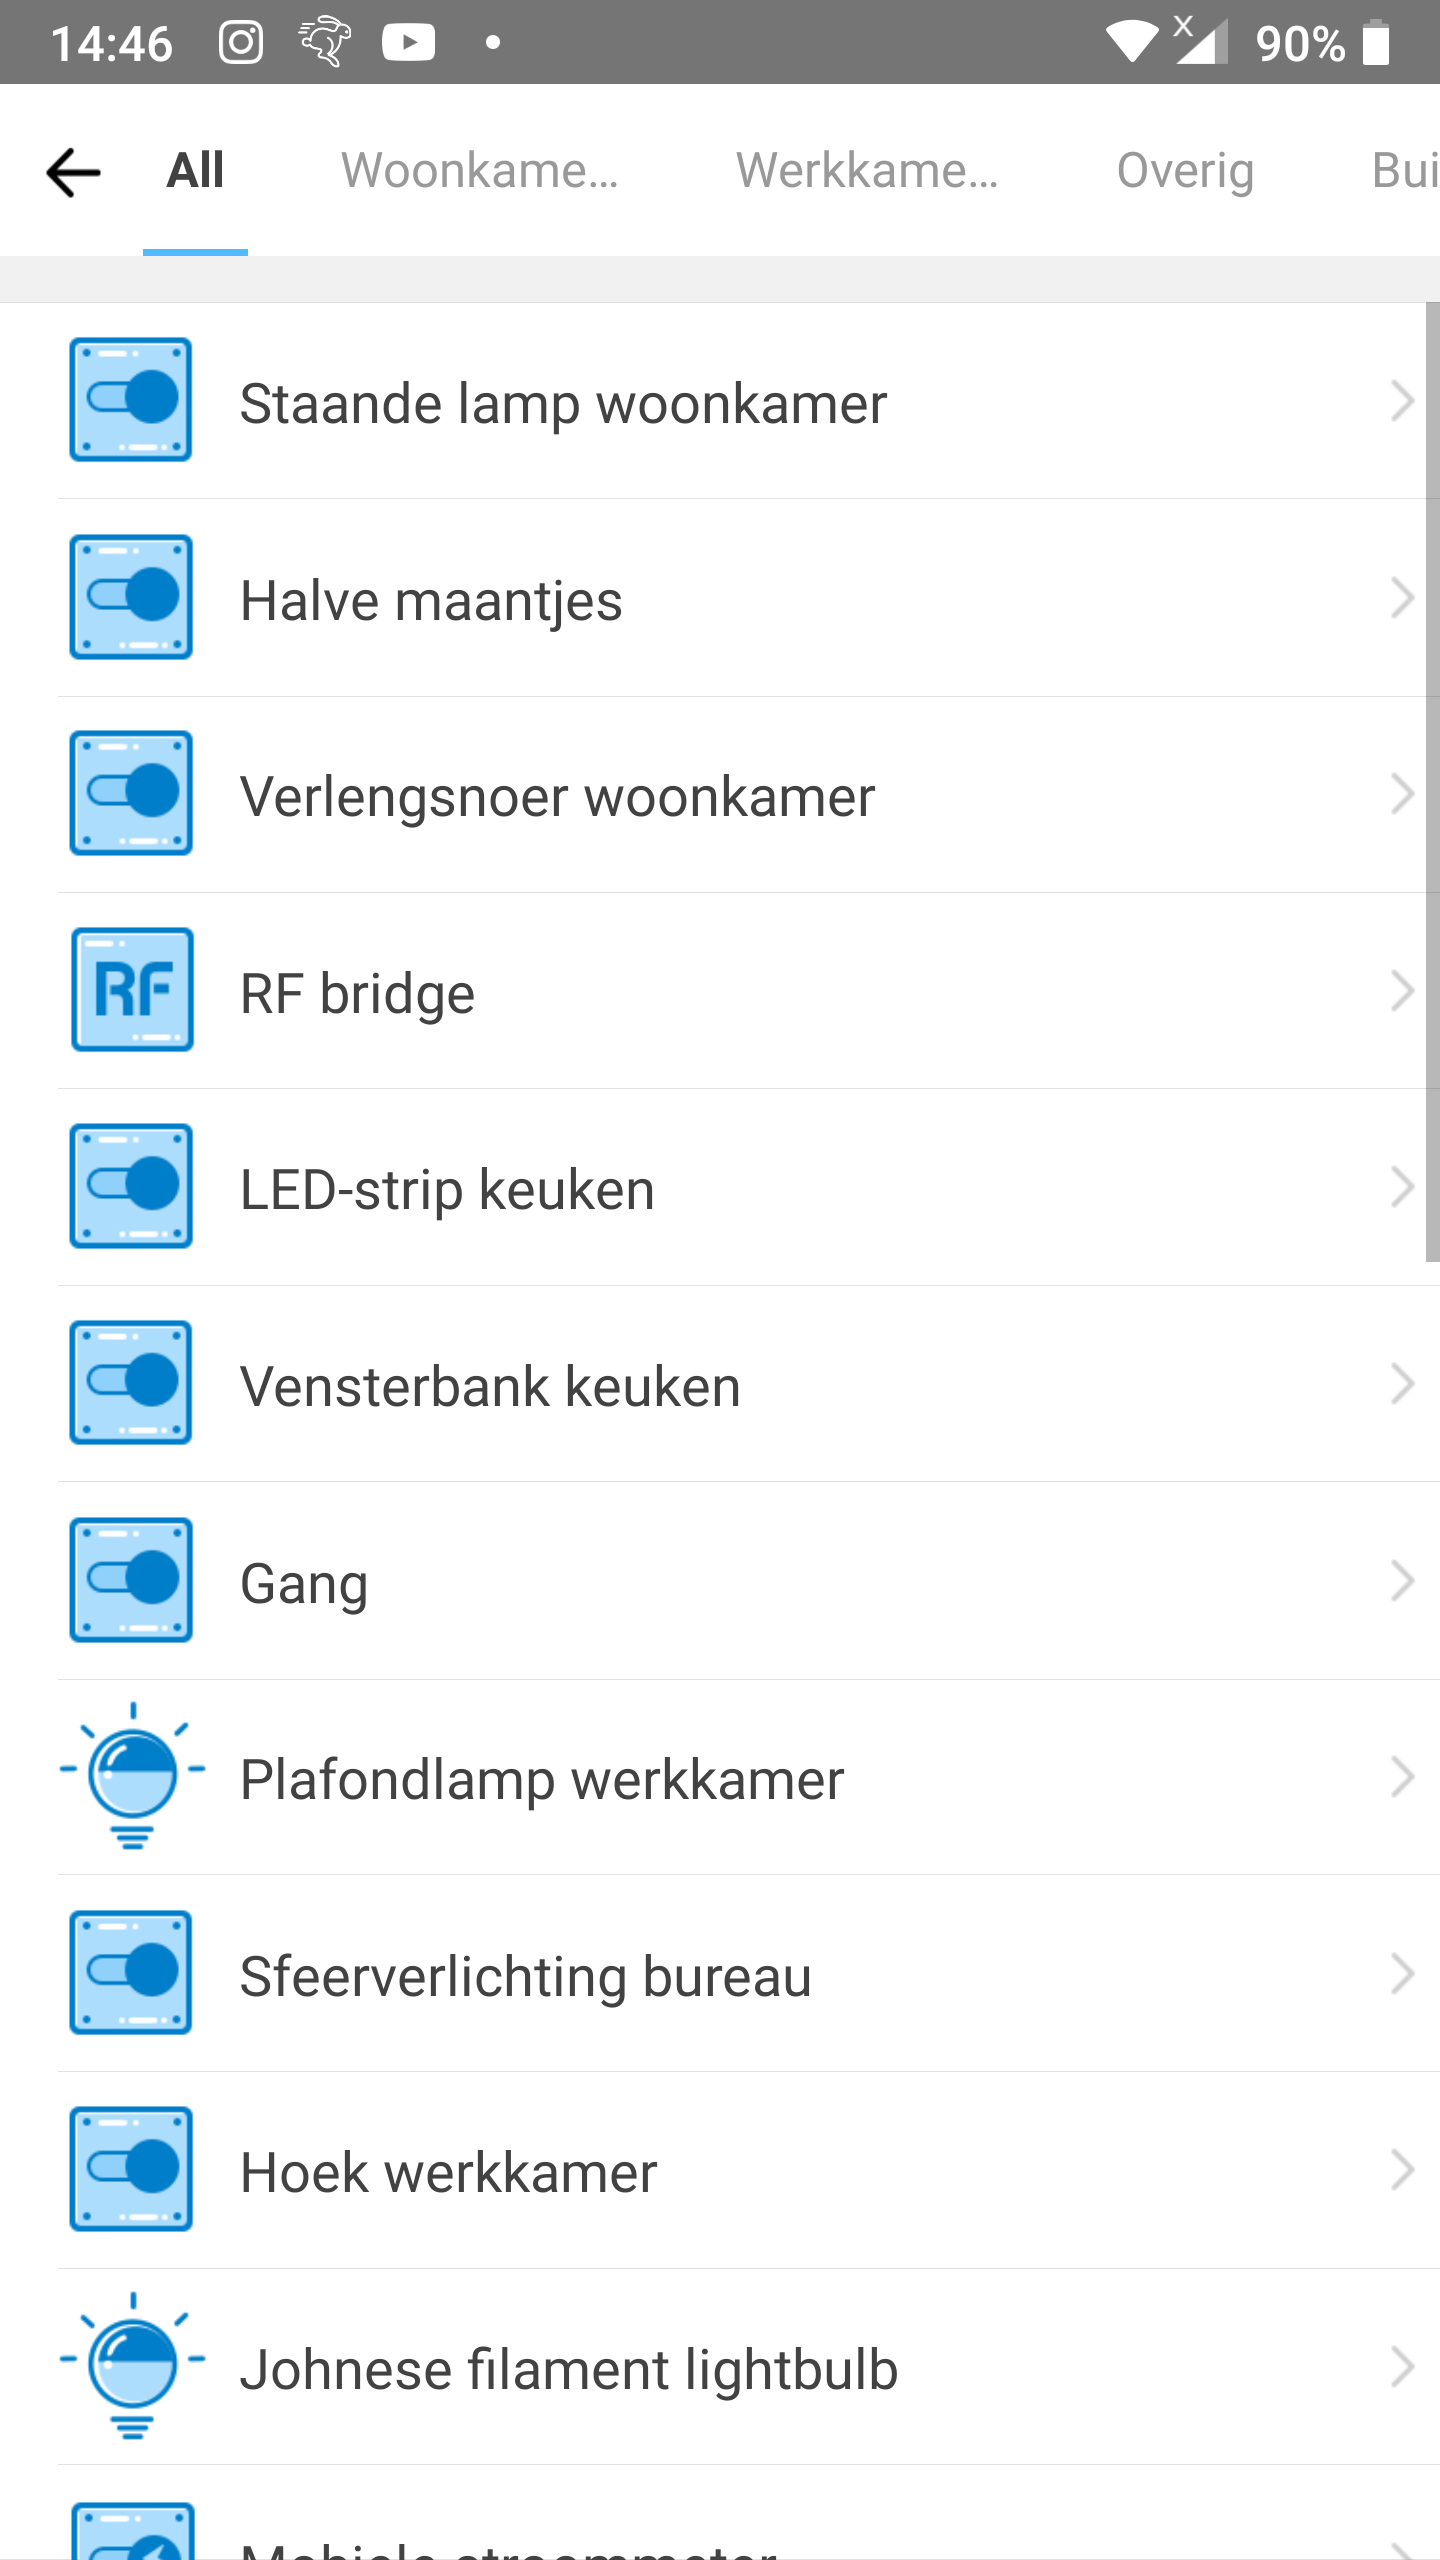
- Tap the target device.
- In our case that will be
Johnese filament lightbulb.
- In our case that will be
Step 9
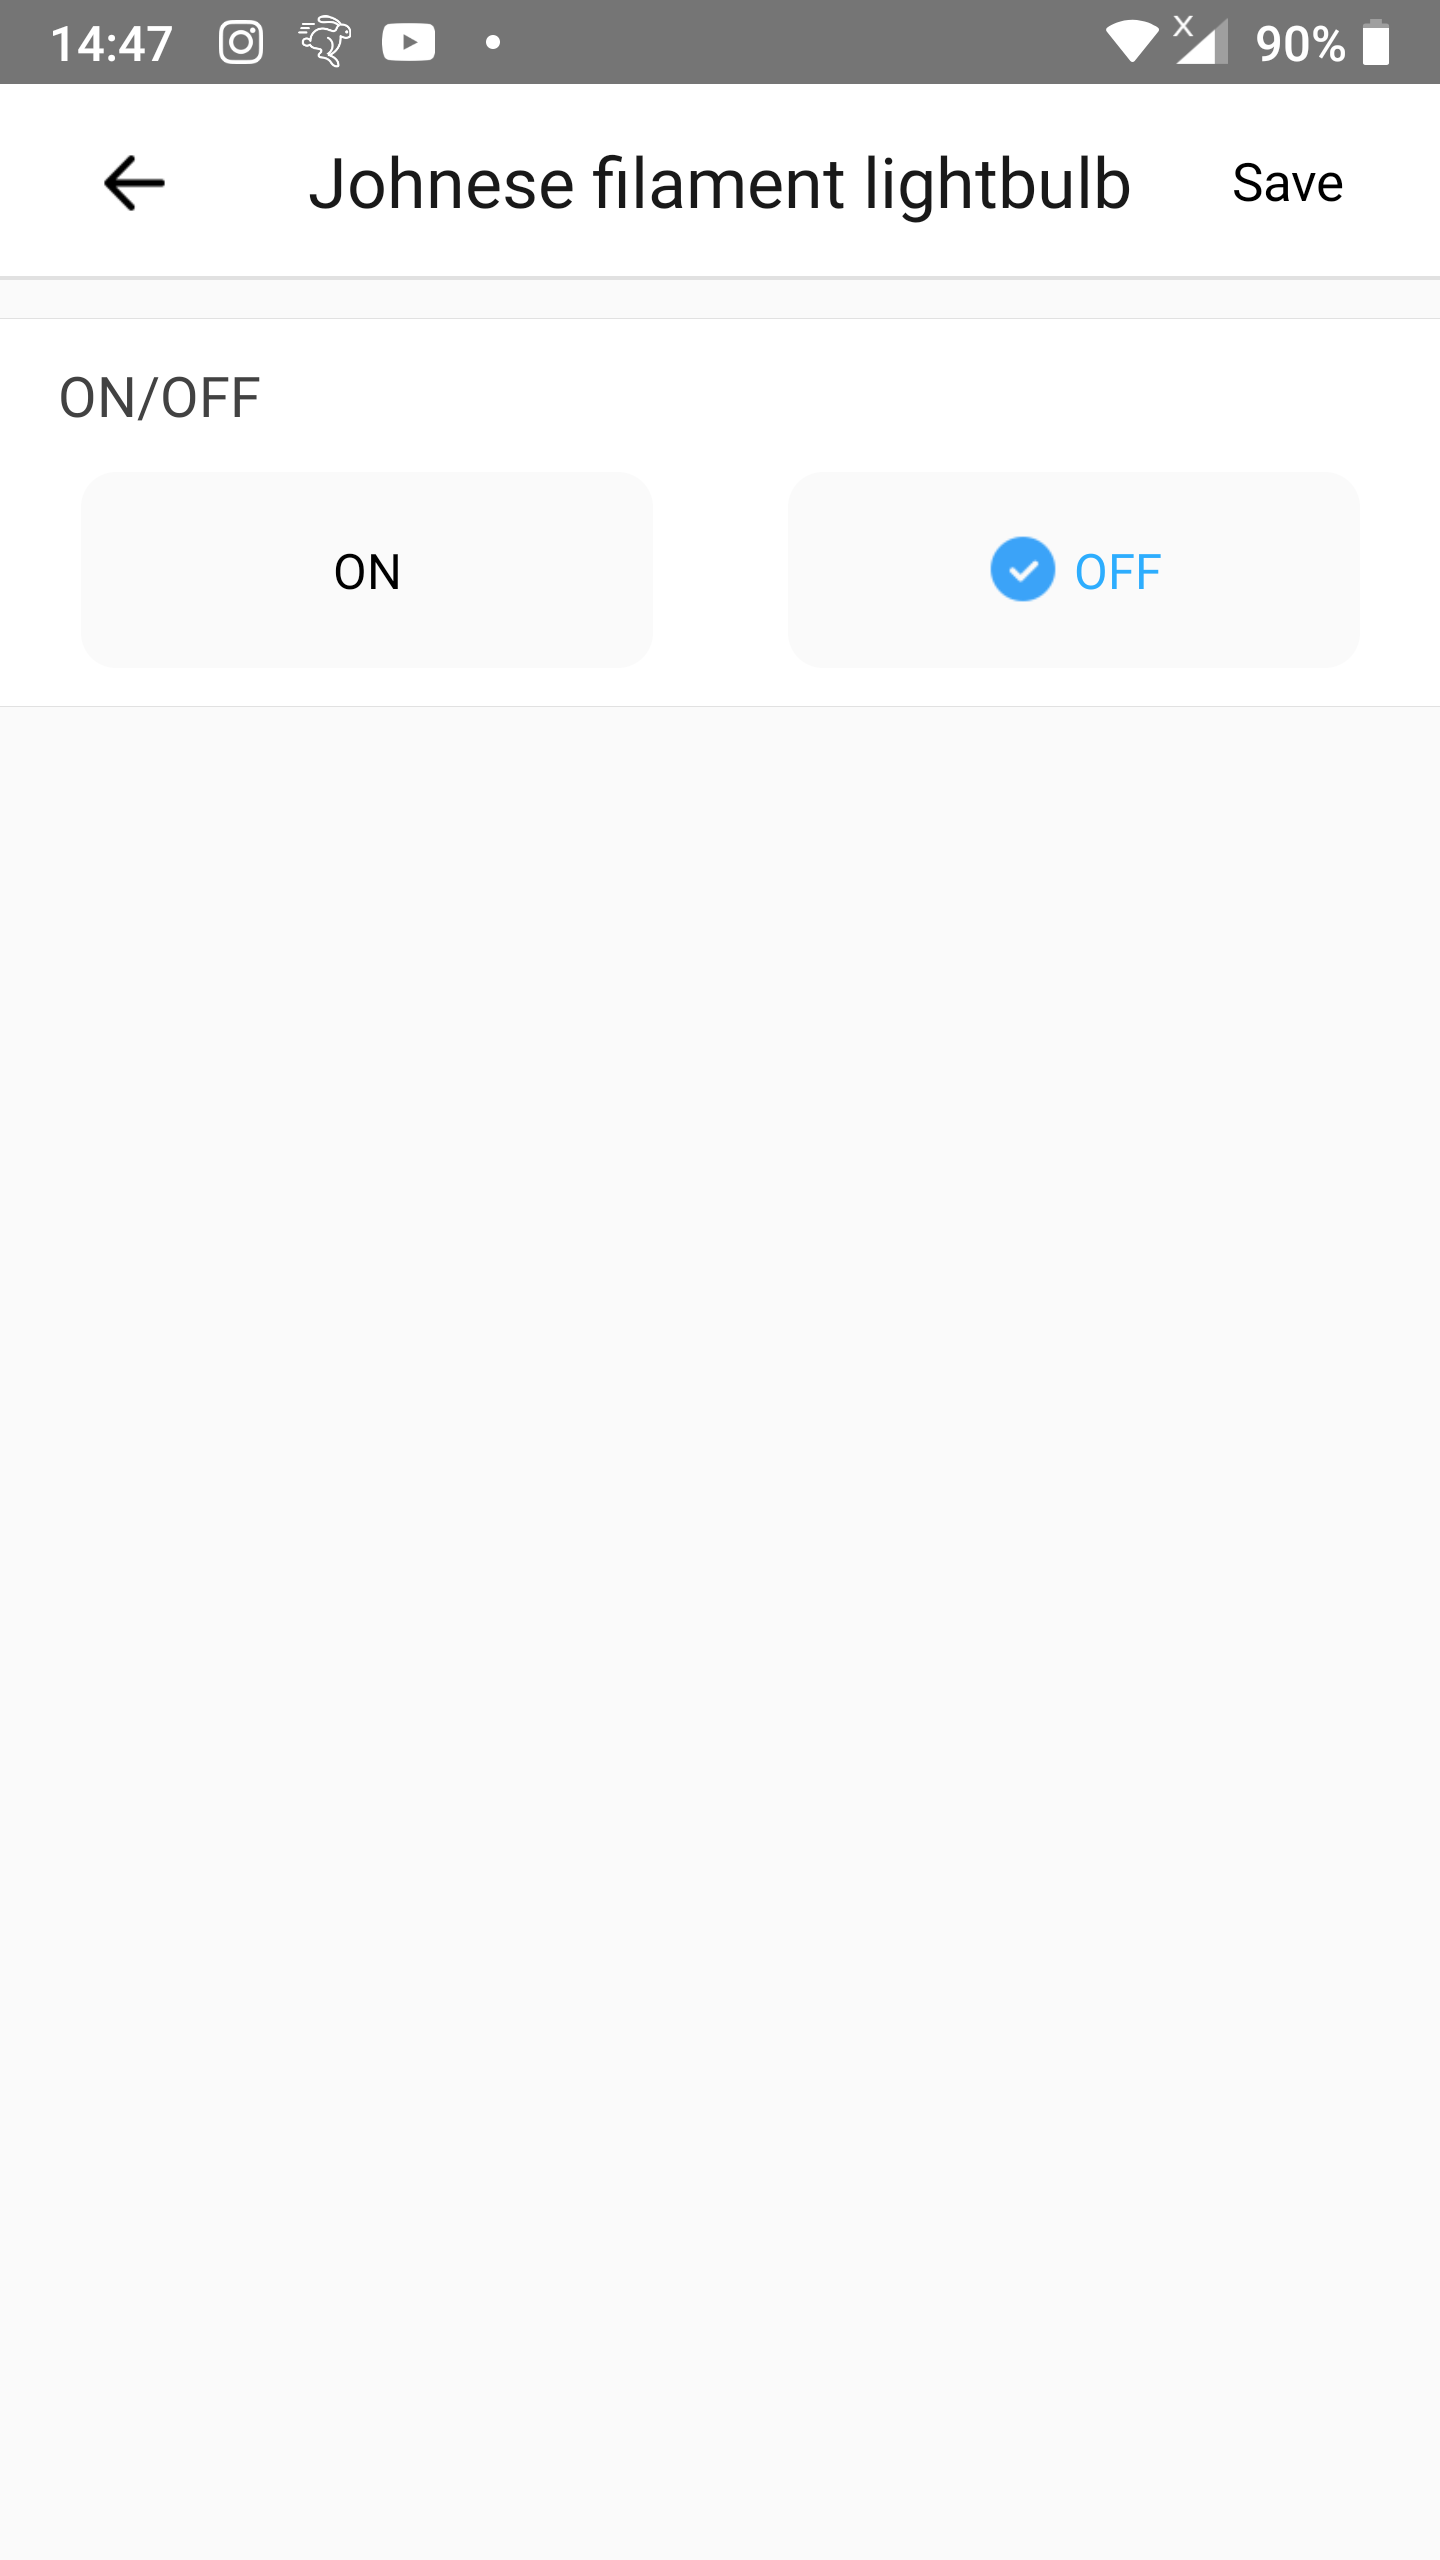
- Tap the button
ON.- A blue circle with a white checkmark will appear before the word
ON.
- A blue circle with a white checkmark will appear before the word
- Tap
Save.

Step 10
- Tap
Save.

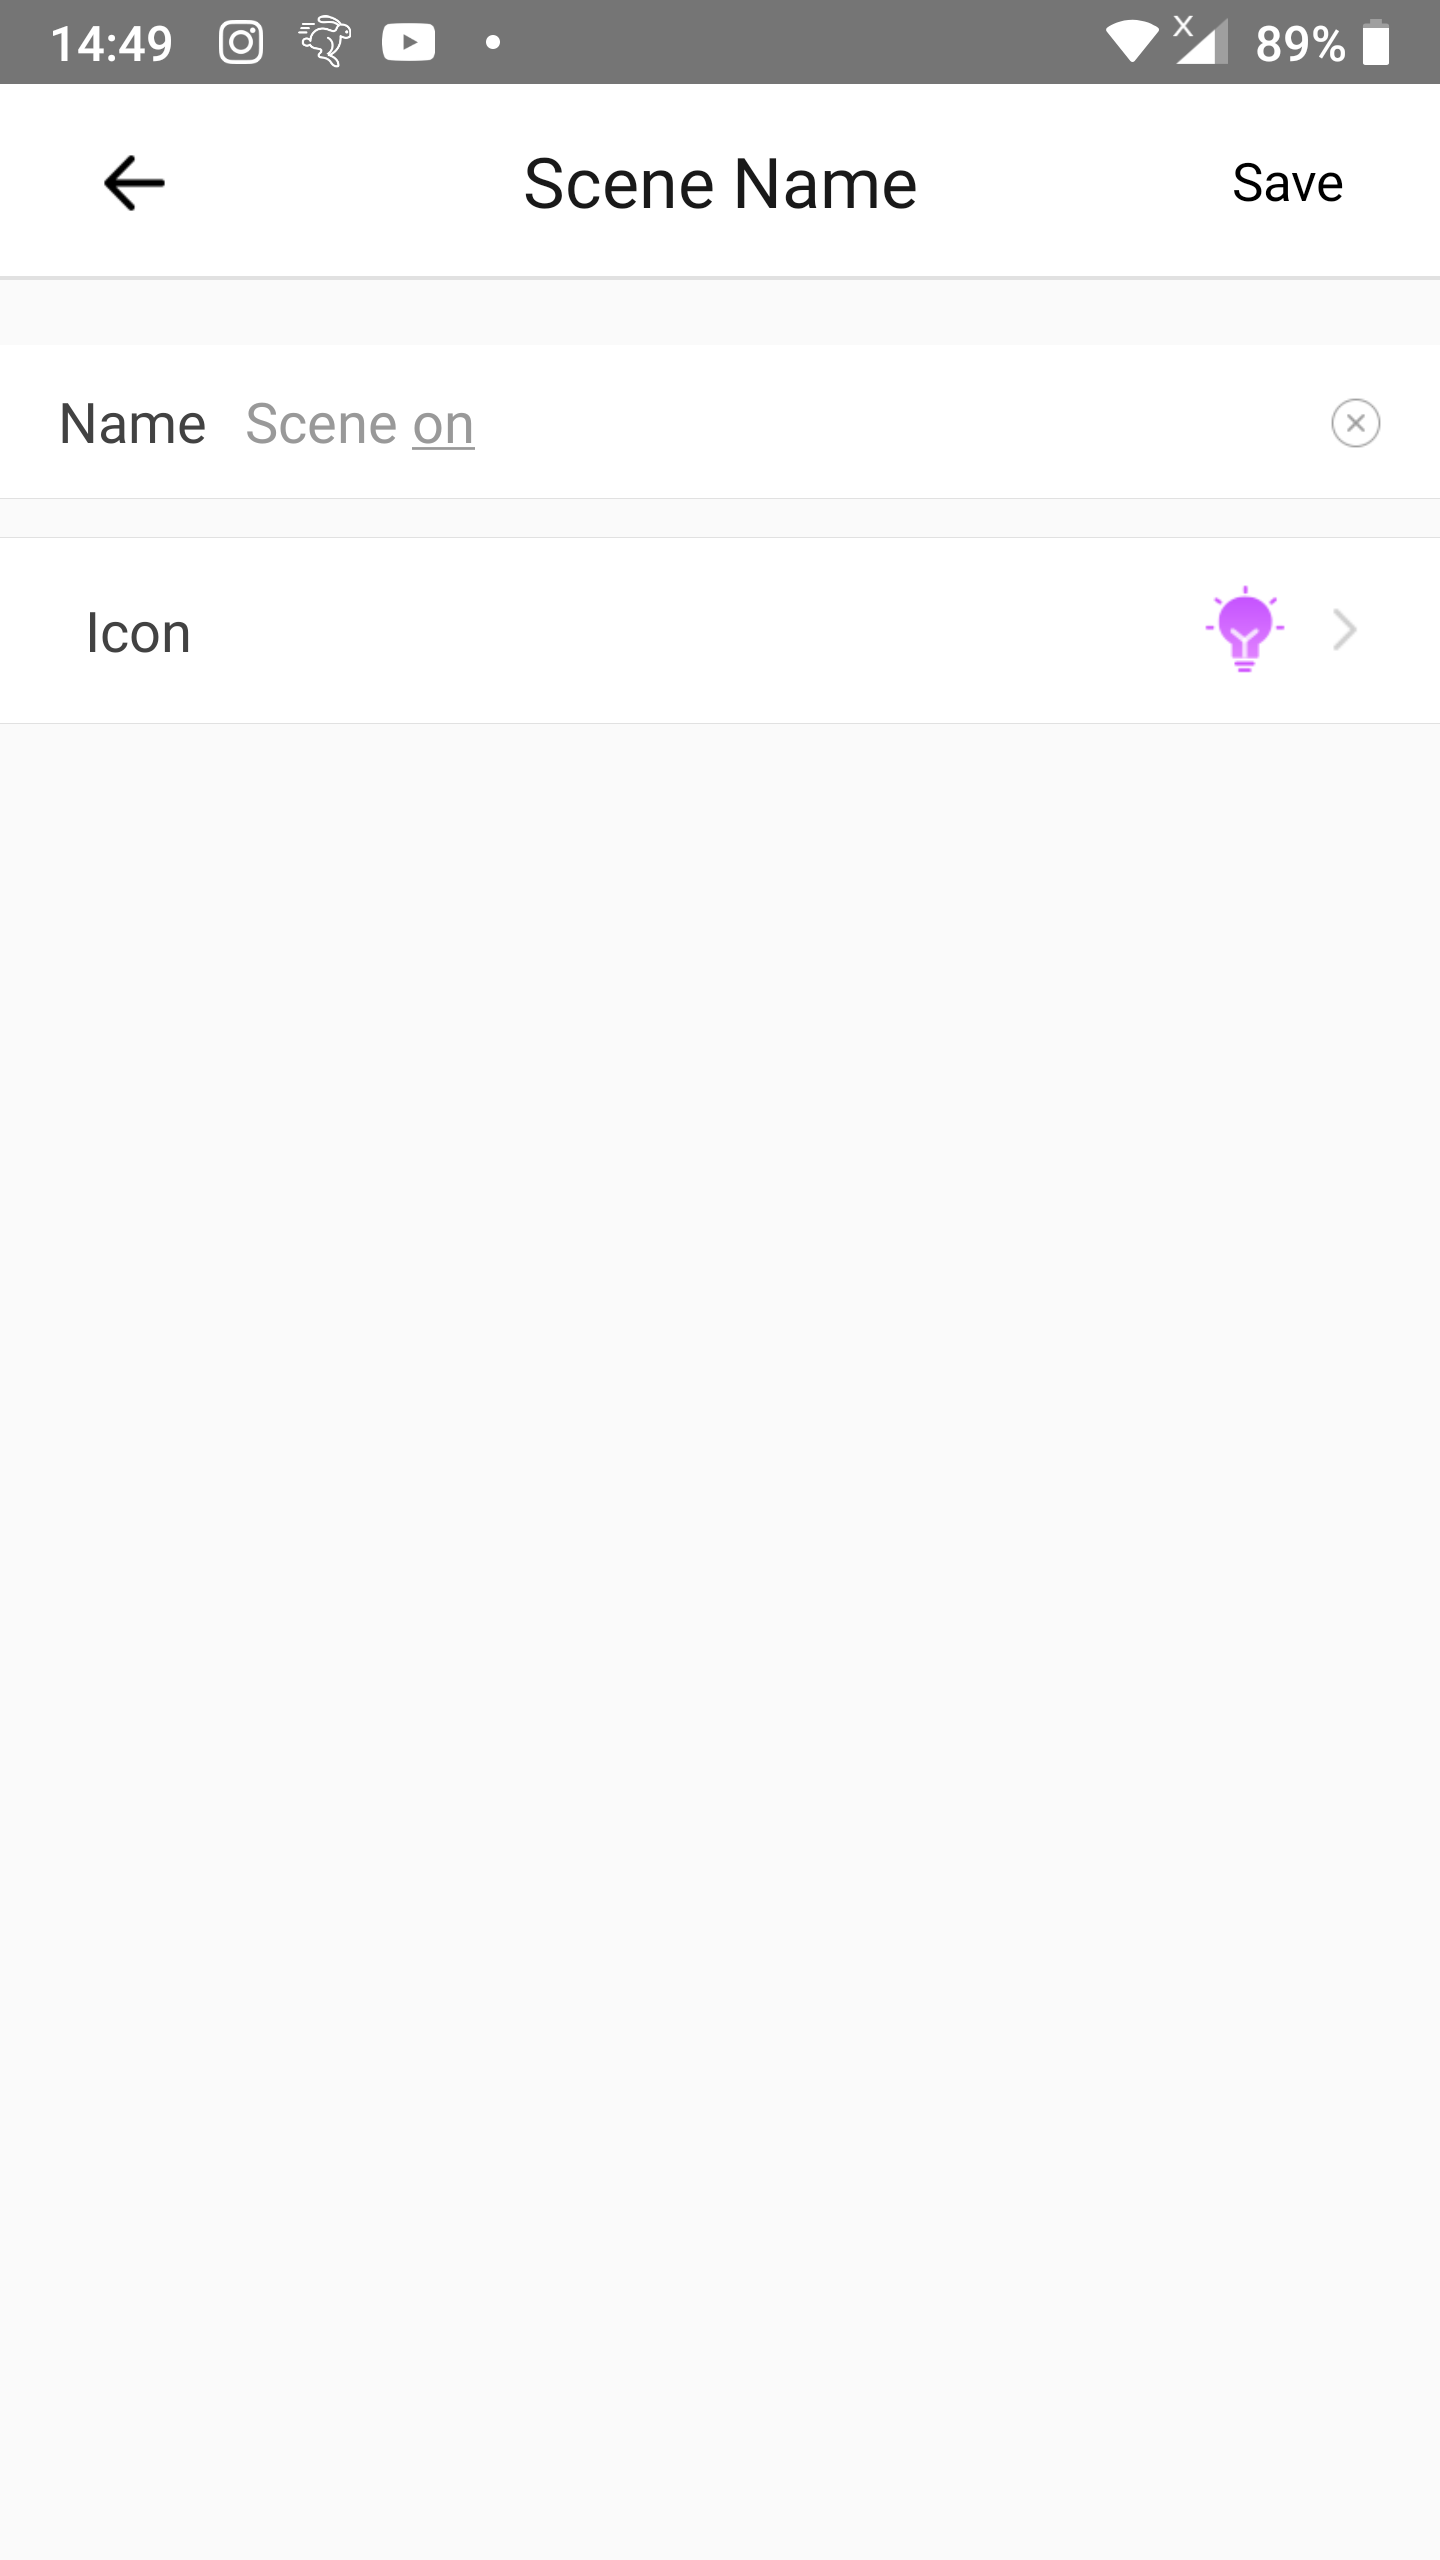
Step 11
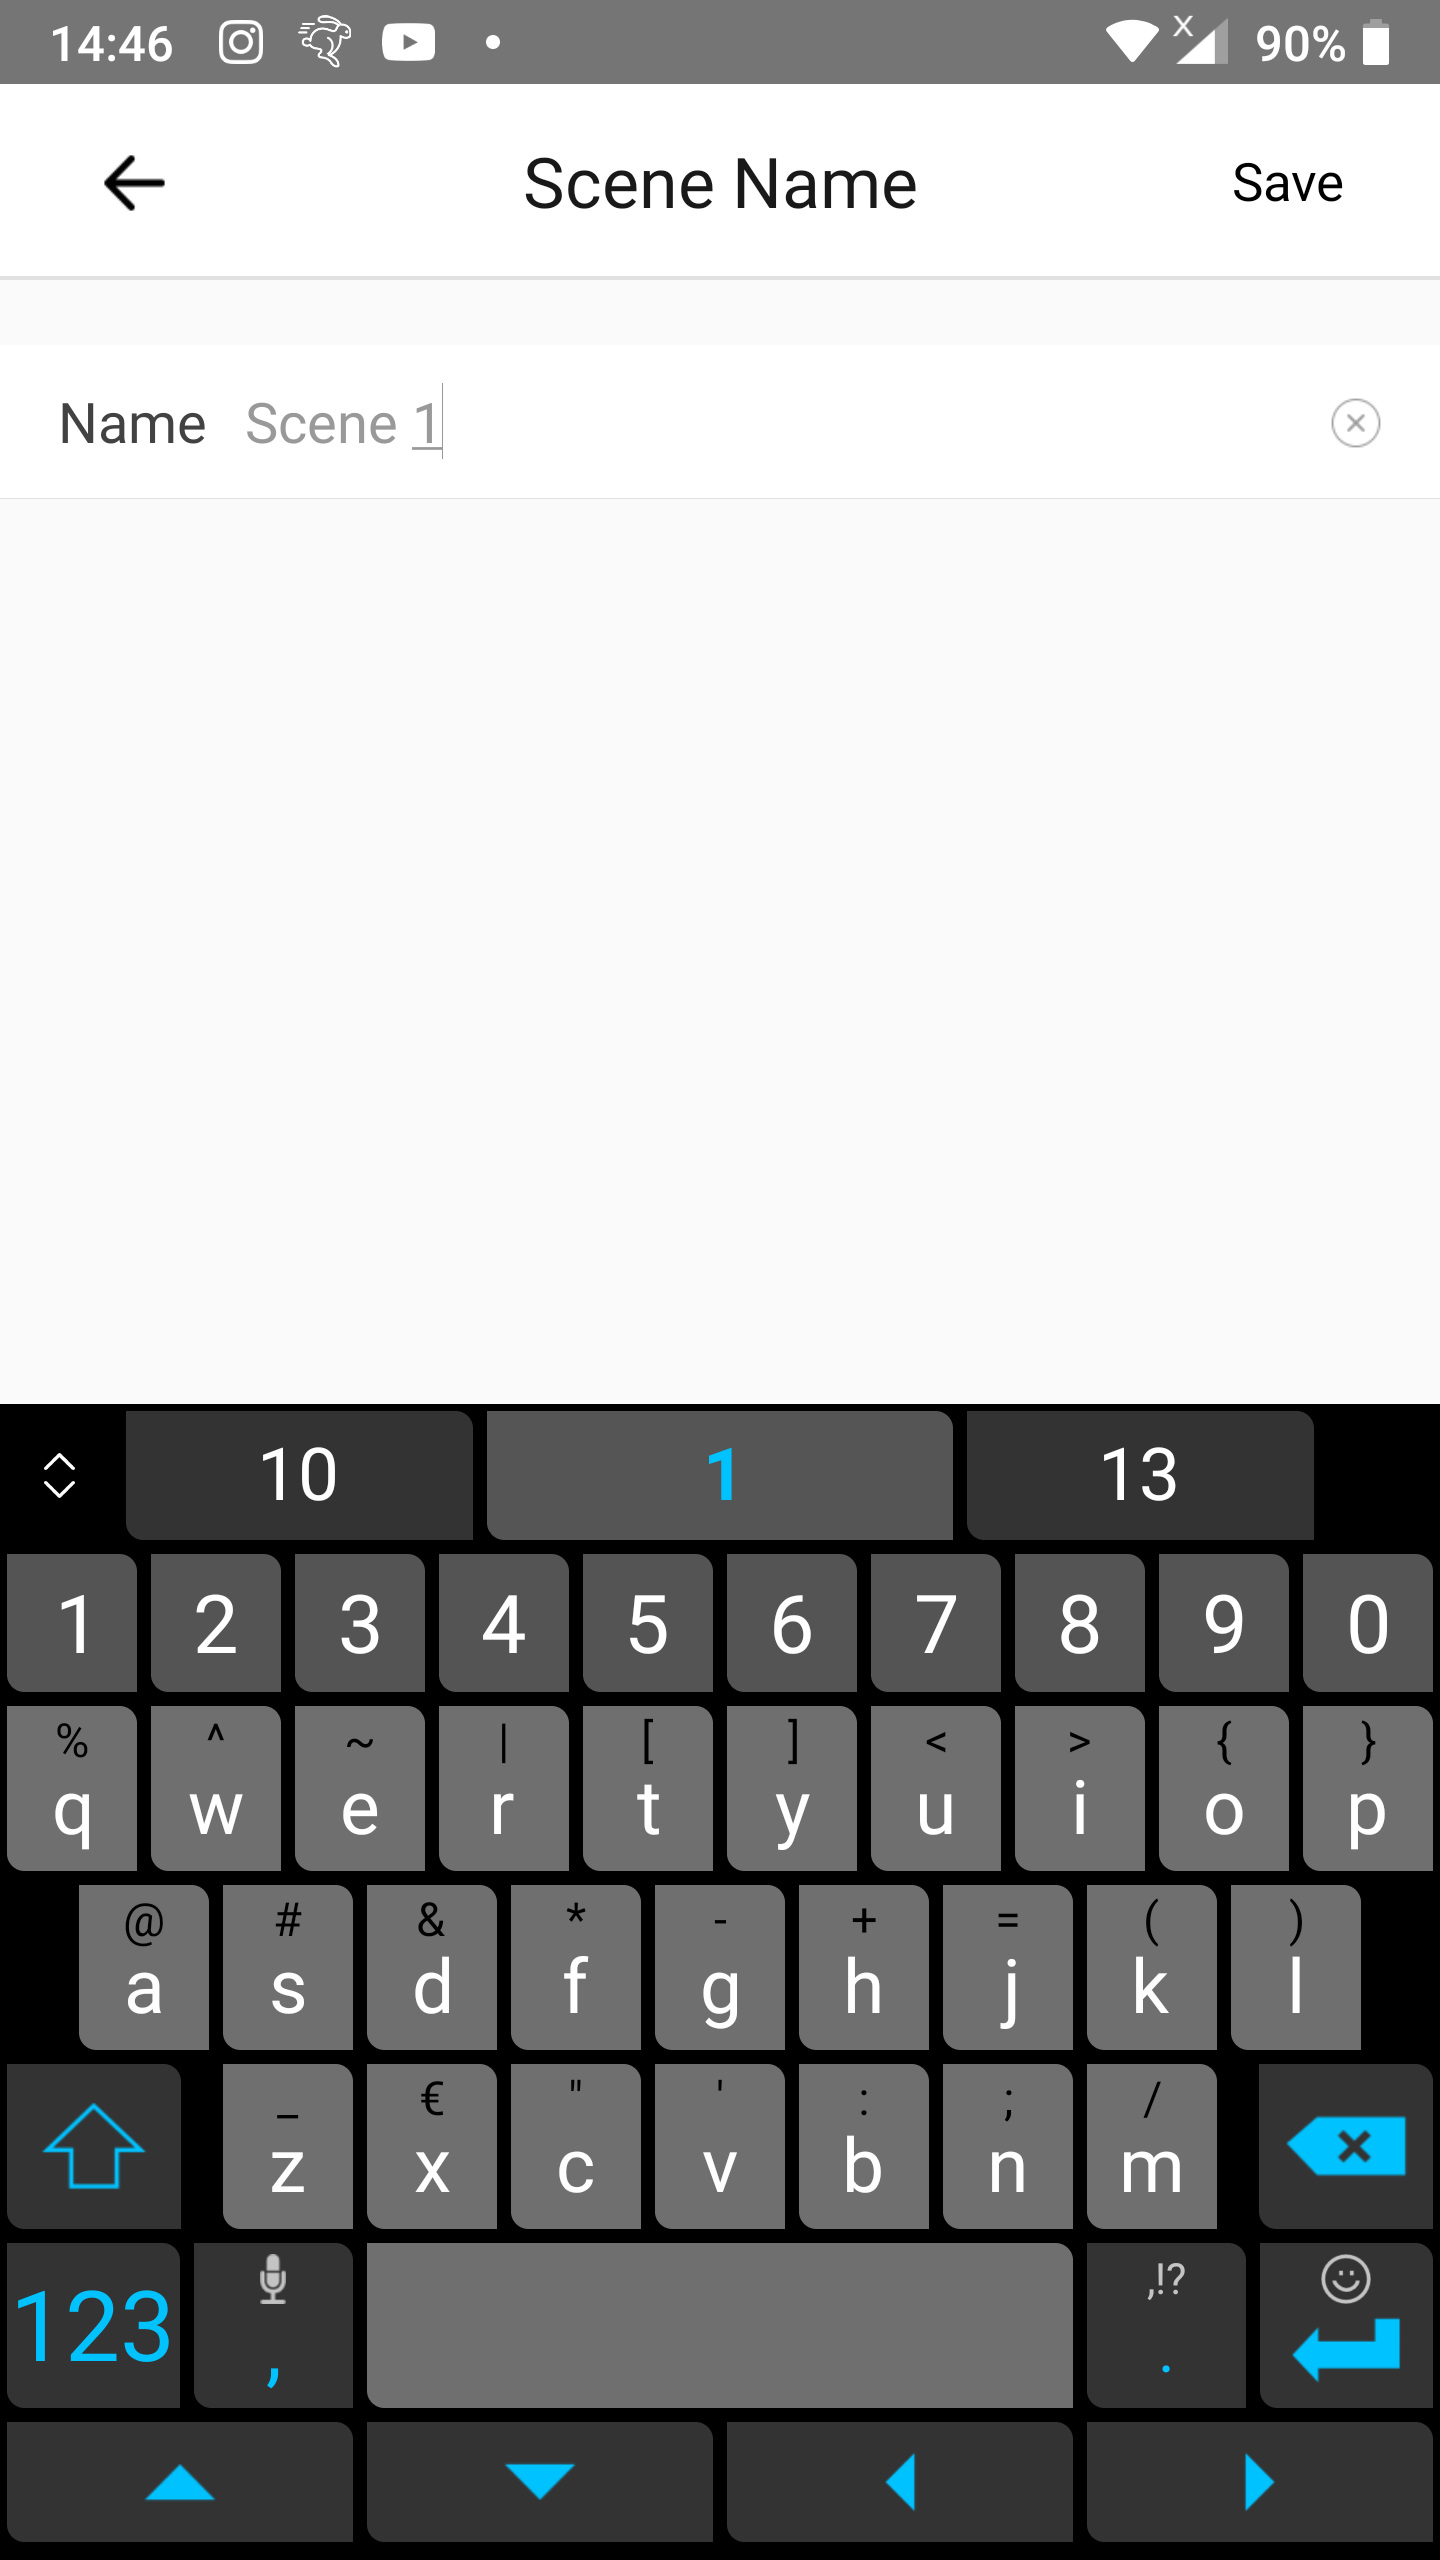
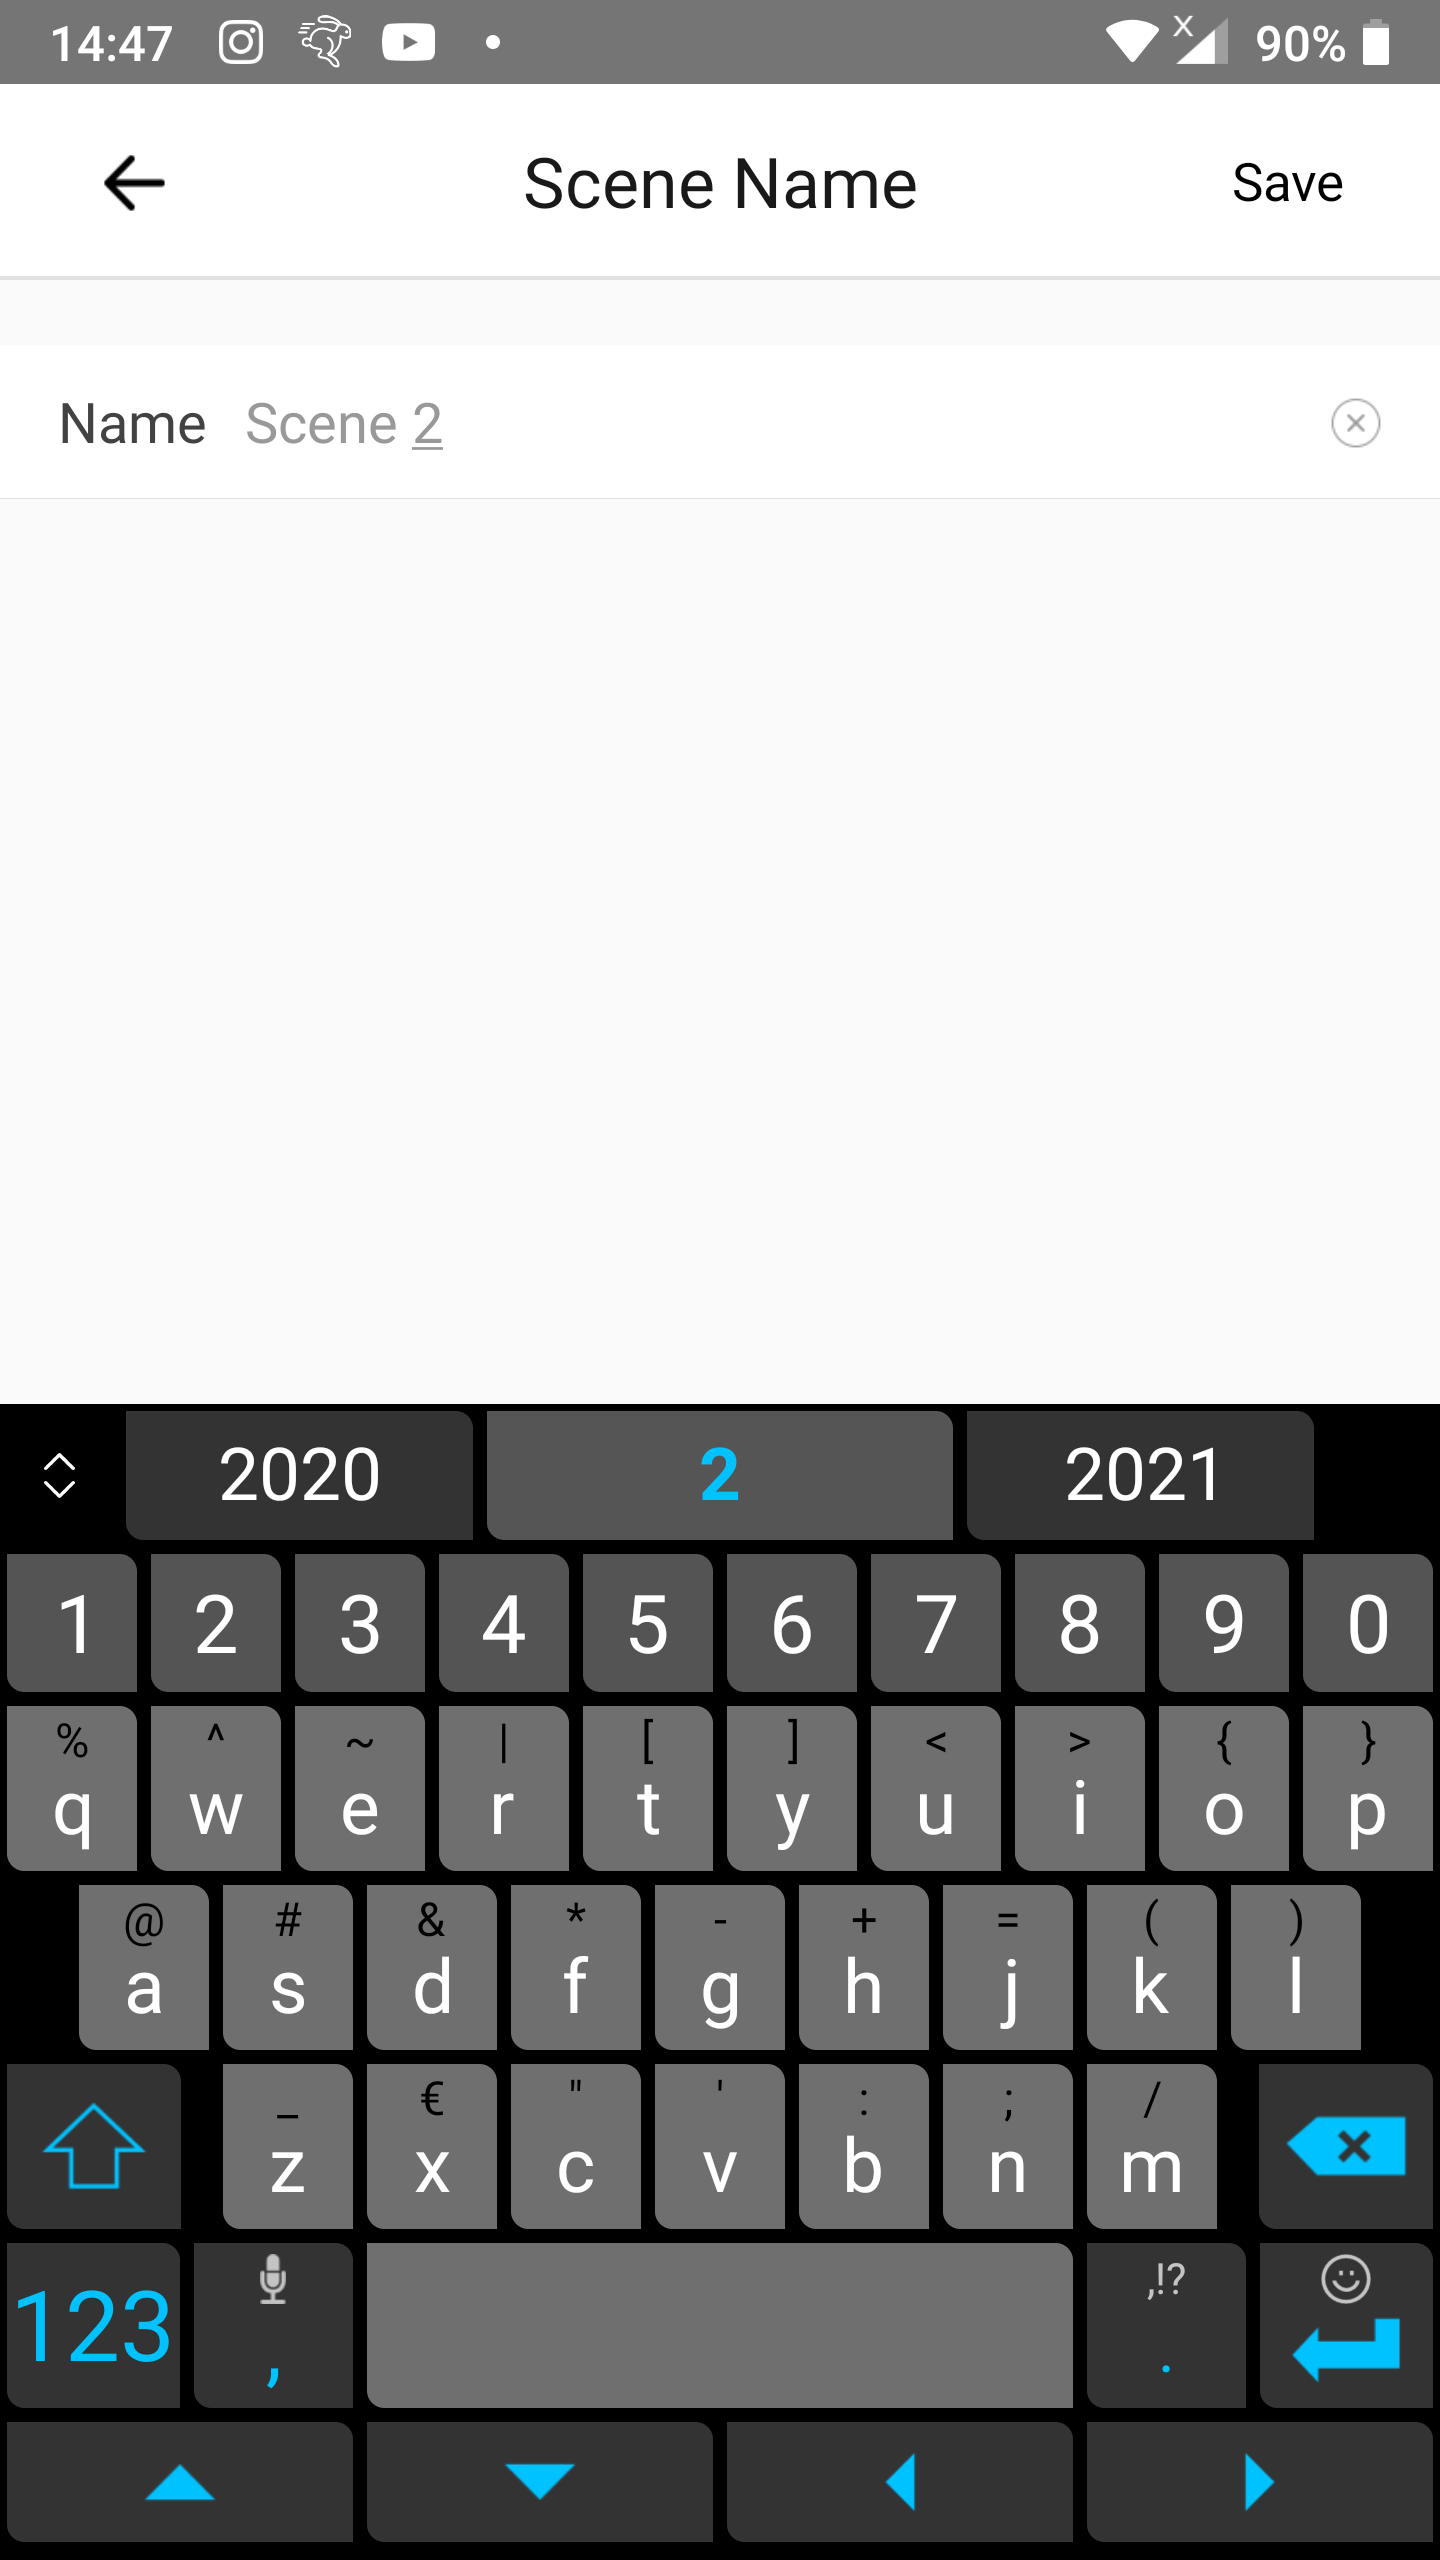
- Insert a name for the scene after
Name.- In our case we entered
Scene 1as name.
- In our case we entered
- Tap
Save.
Scene 1 is now complete.
Add Scene 2
This scene will:
- Turn the target device off after an external button press.
- Execute helper scene
Scene onto disable thisScene 2so that this scene doesn’t react on the external button press as the target device is already off.
Because both Scene 2 and the helper scene will refer to each other we can’t complete this scene in one flow. We will modify Scene 2 later on.
Step 1
- Go to the
Scenescreen. - Tap the
+icon in the top right corner.
Step 2
- Tap
Addright below If.
Step 3
- Tap Smart Device.
Step 4
- Select the trigger device.
- If you want to use a Zigbee button you can tap the name of the Zigbee button and then choose the press type (single, double or long press).
- In our example we use a RF button and so we select our RF bridge called
RF bridge.
Step 5
- Select the correct RF alarm that represents your RF button.
- In our case it is
RF switch 3G - 2(the middle button of a 3-gang RF switch).
- In our case it is
- Tap
Savein the upper right corner.
Step 6
- Tap
Addright belowThen.
Step 7
- Tap
Smart Device.
Step 8
- Tap the target device.
- In our case that will be
Johnese filament lightbulb.
- In our case that will be
Step 9
- Tap the button
OFF.- A blue circle with a white checkmark will appear before the word
OFF.
- A blue circle with a white checkmark will appear before the word
- Tap
Save.
Step 10
- Tap
Save.
Step 11
- Insert a name for the scene after
Name.- In our case we entered
Scene 2as name.
- In our case we entered
- Tap
Save.
Scene 2 is now complete.
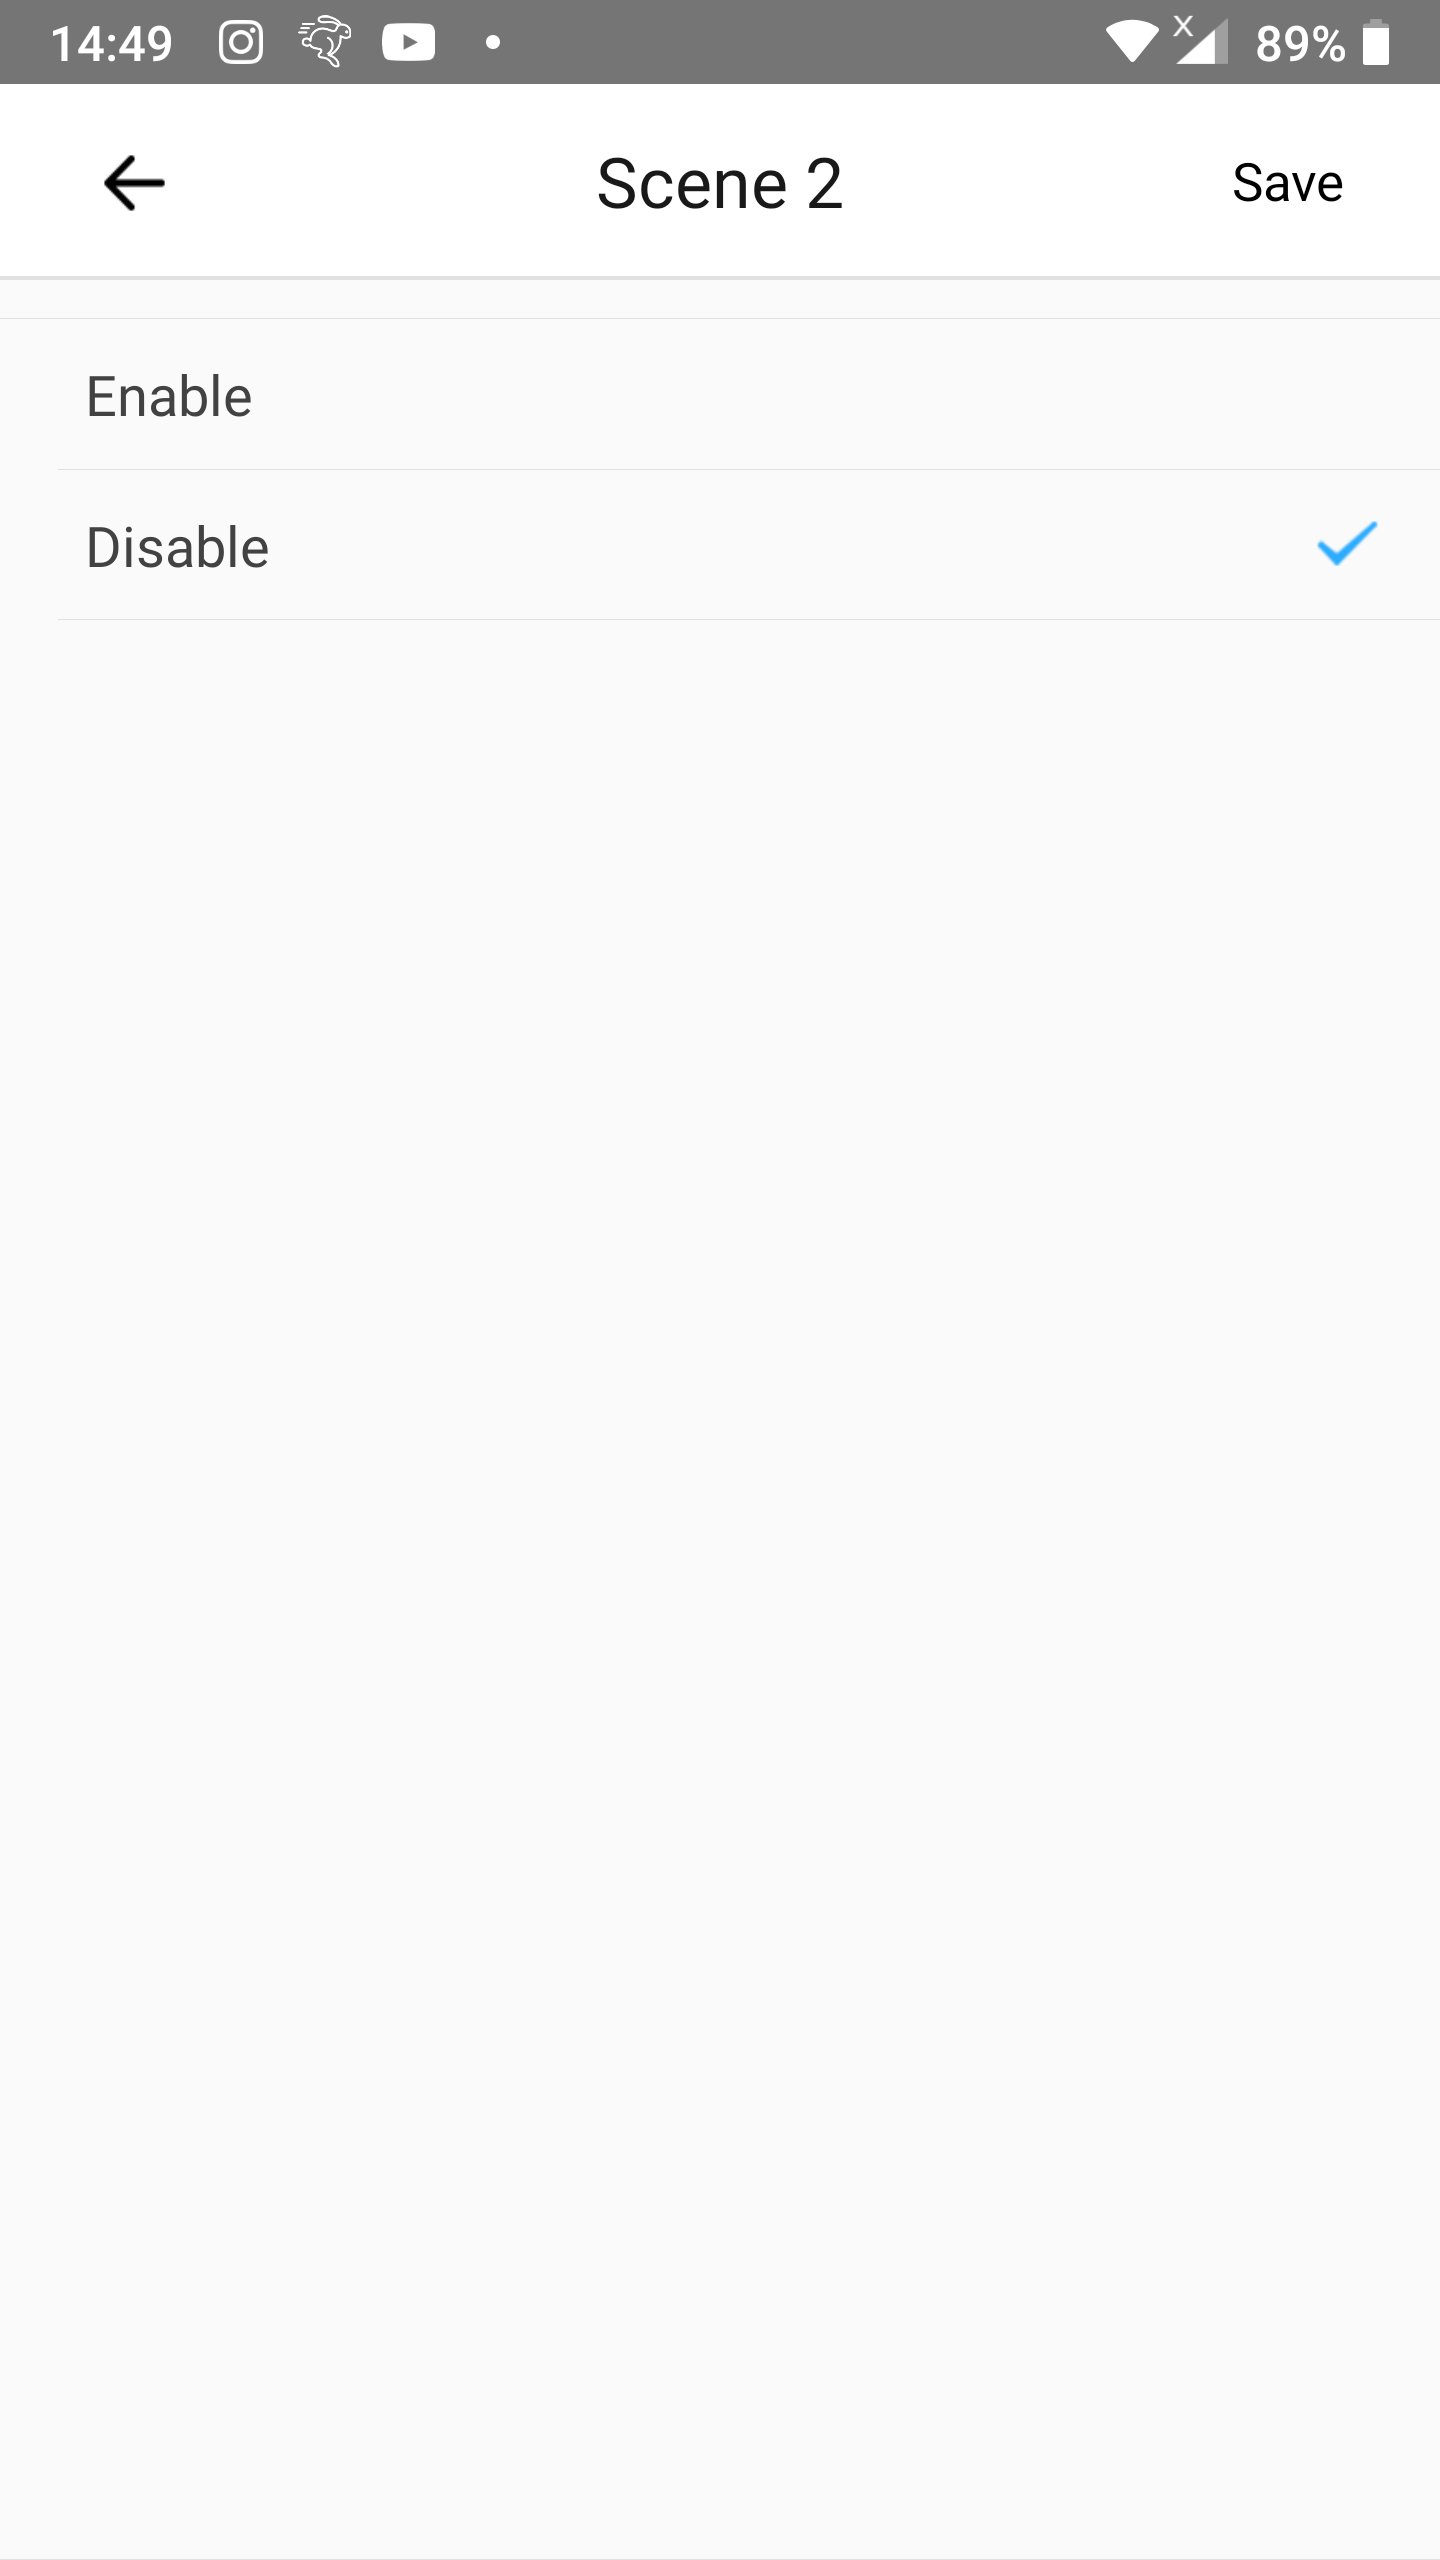
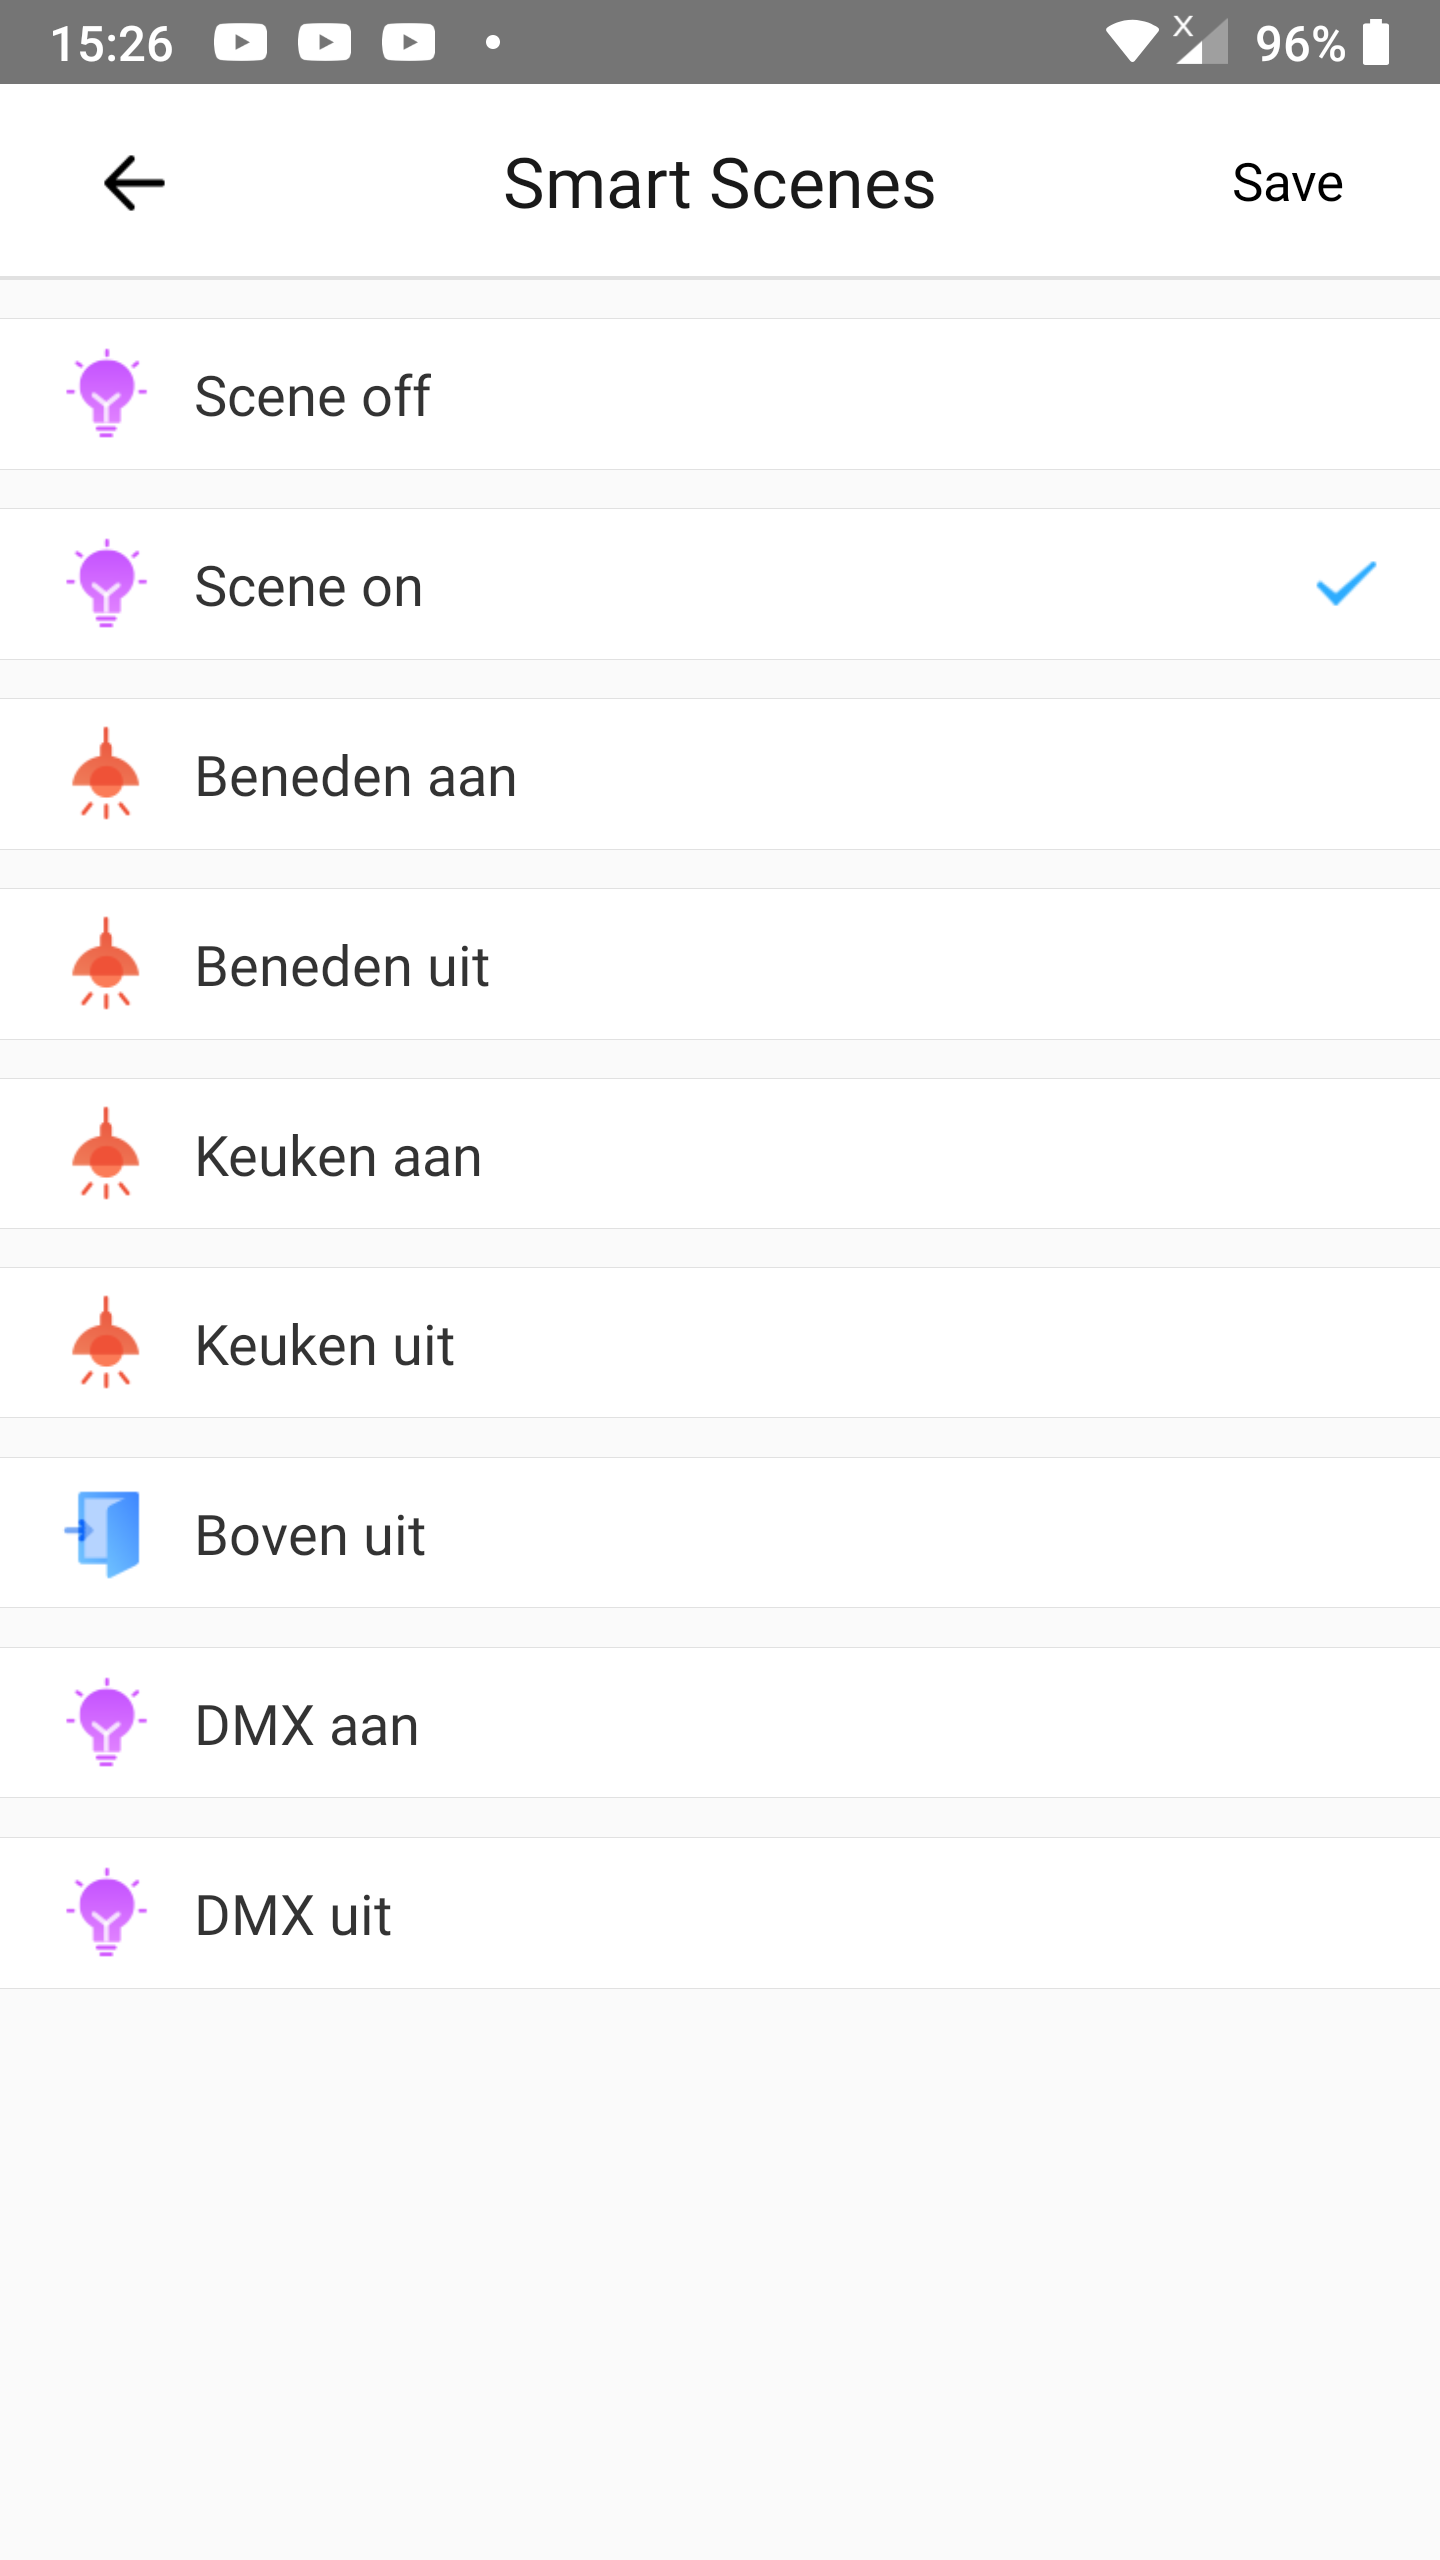
Add Scene on
This scene will:
- Enable
Scene 1so thatScene 1will turn the target device on when the external button is pressed. - Disable
Scene 2so thatScene 2doesn’t turn the target device off when the external button is pressed.
Step 1
- Go to the
Scenescreen. - Tap the
+icon in the top right corner.
Step 2
- Tap
Addright below If.
Step 3
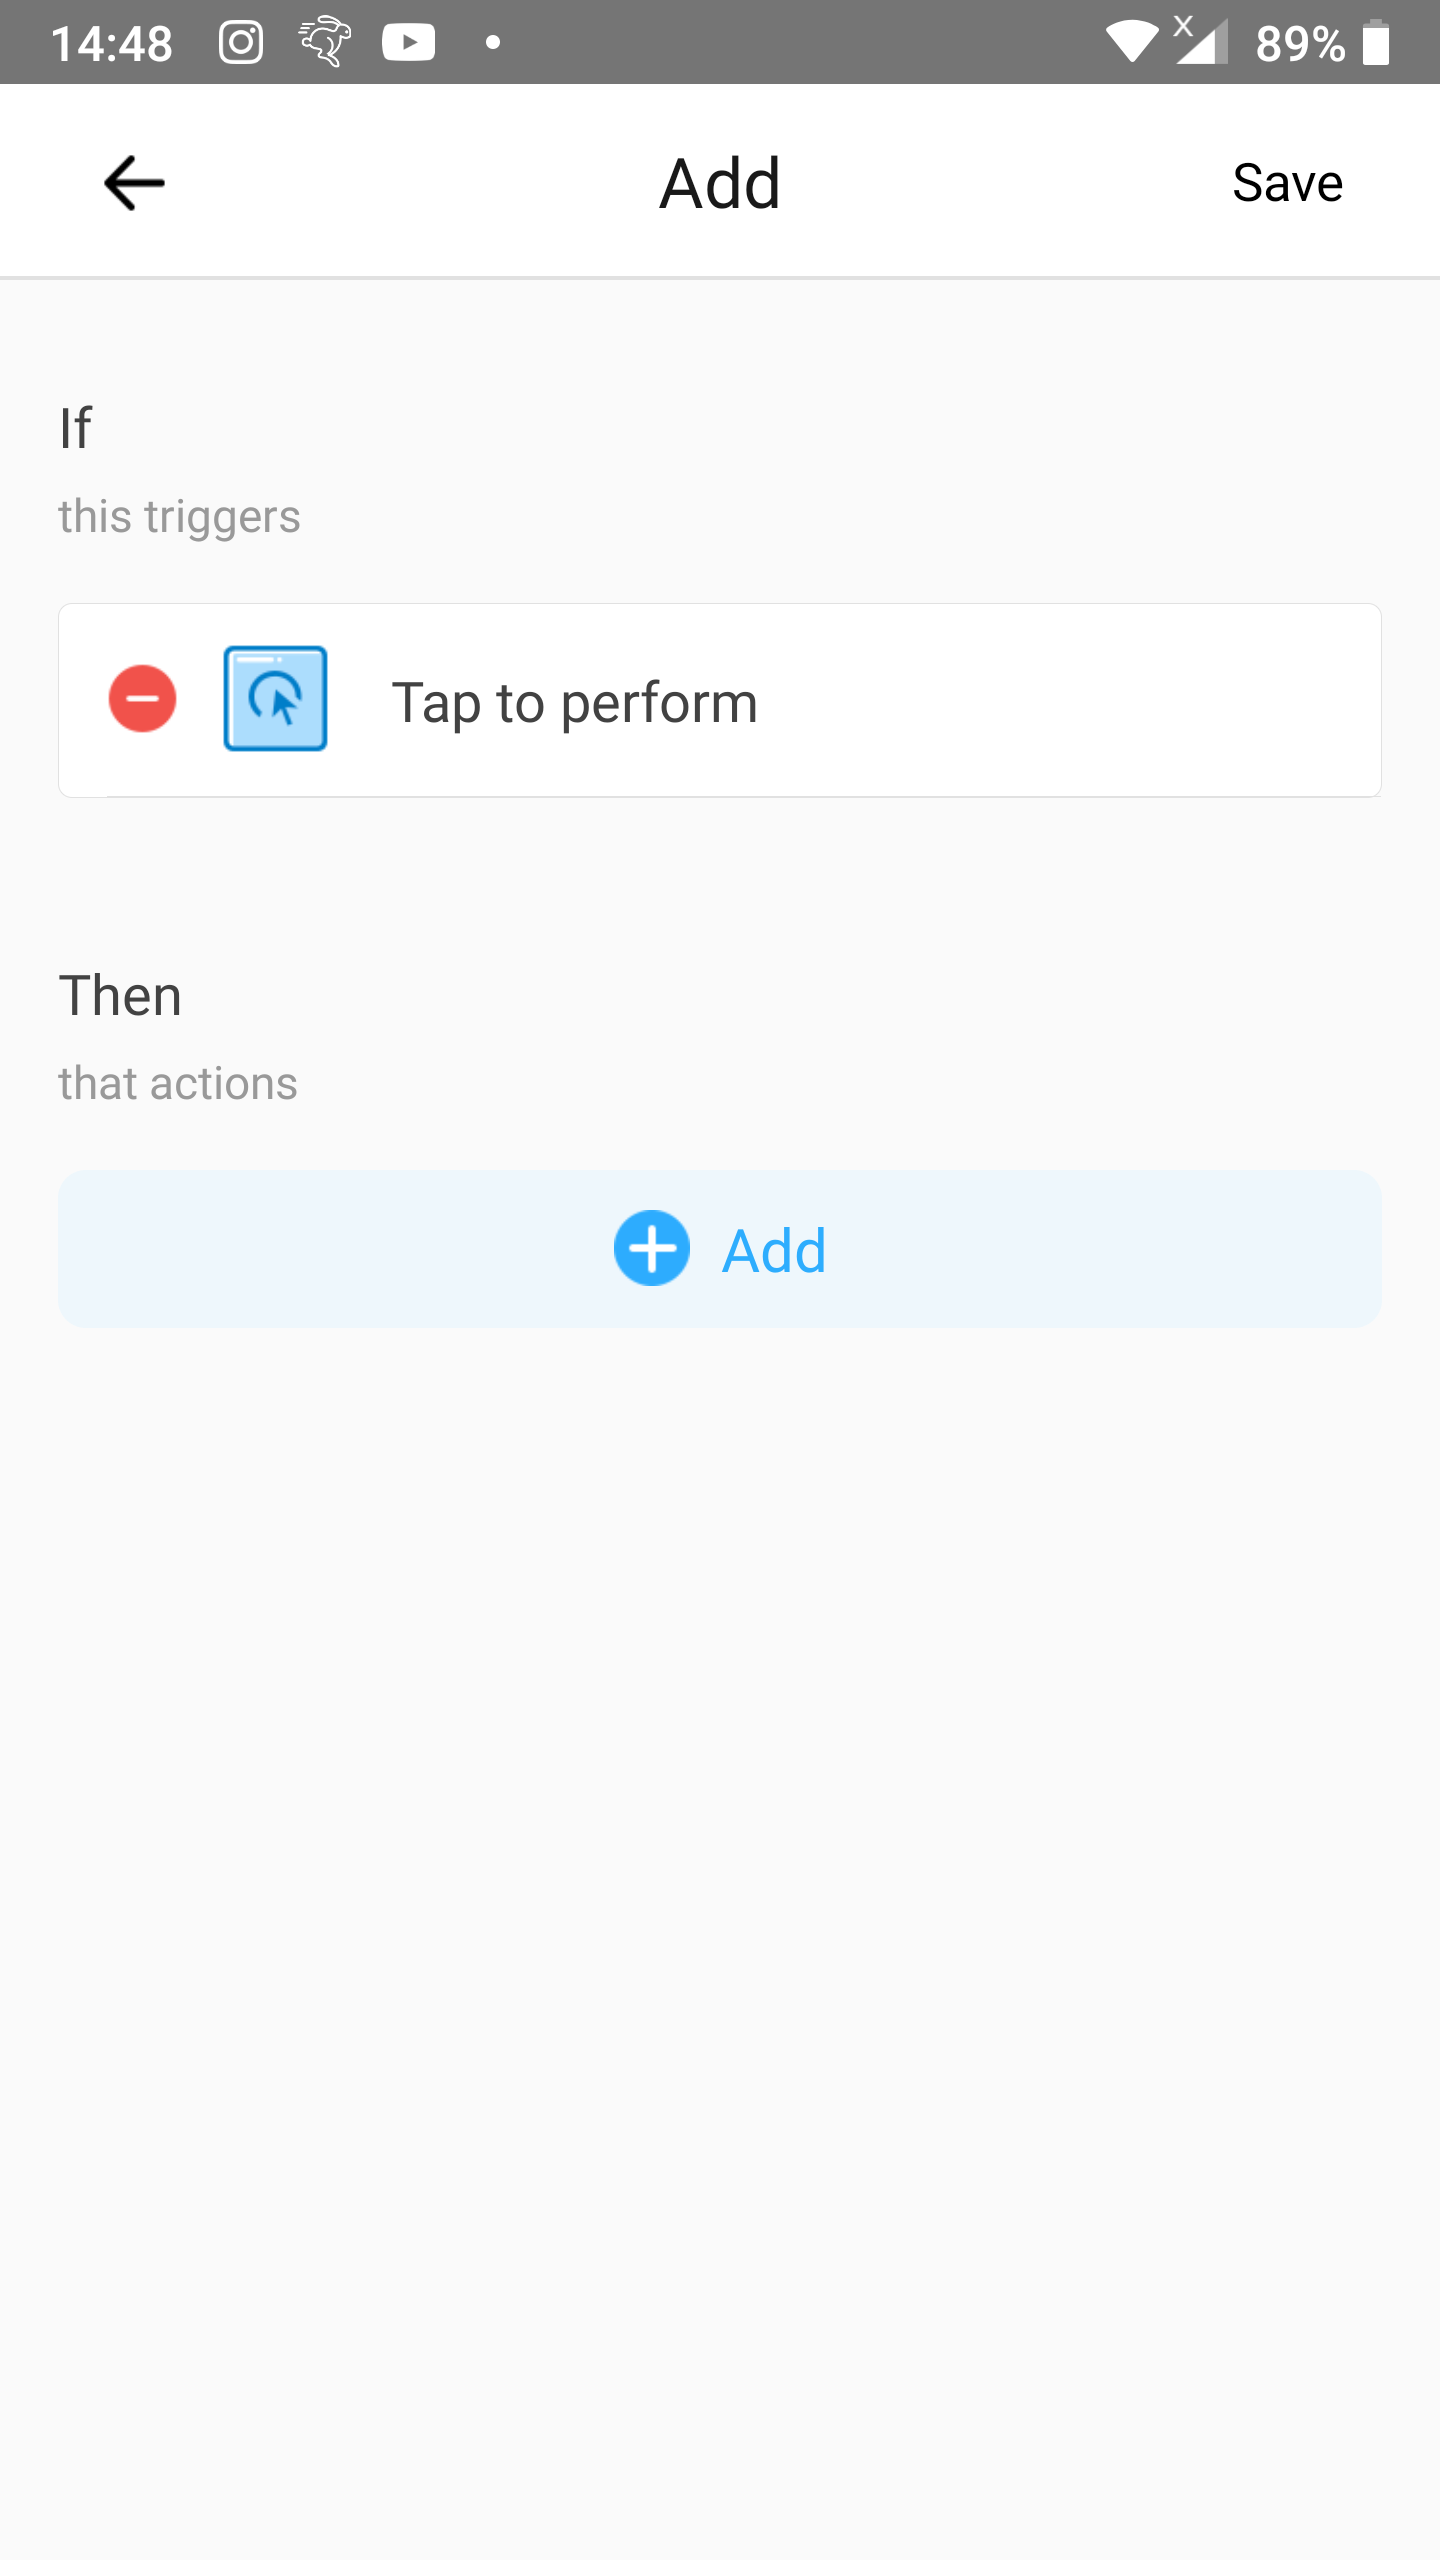
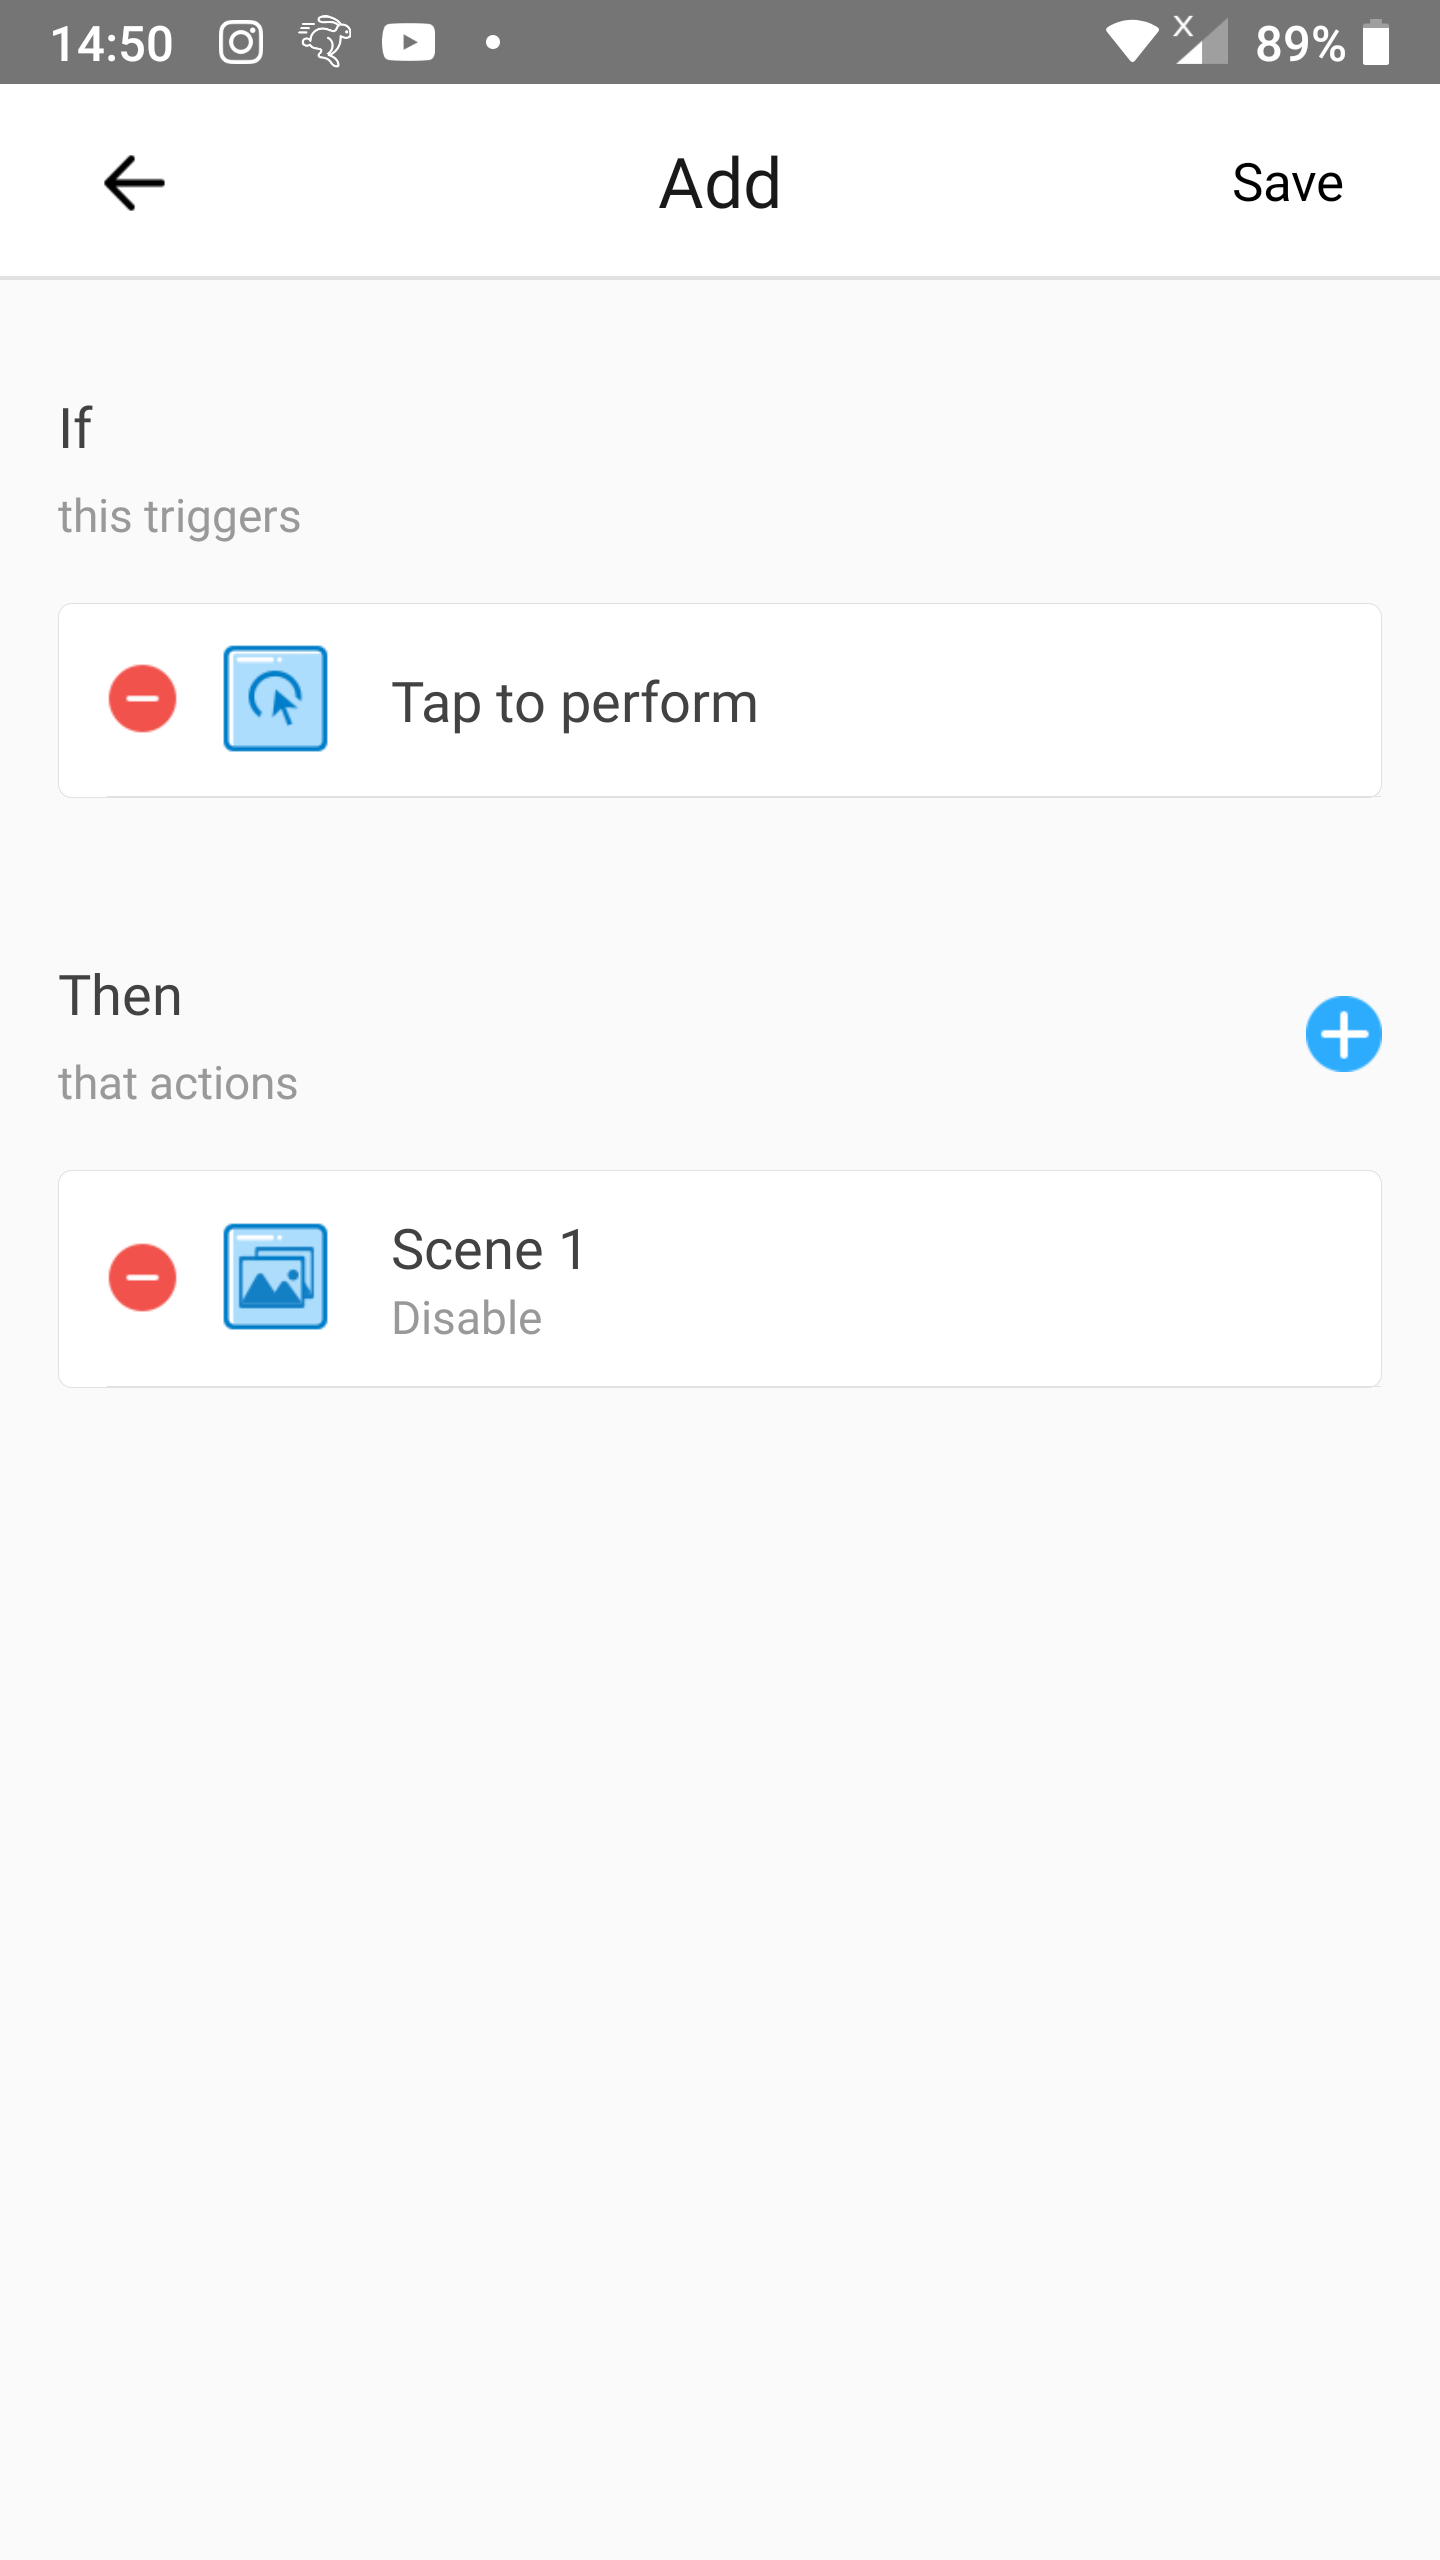
- Tap
Tap to perform.
Step 4
- Tap
Addright belowThen.
Step 5
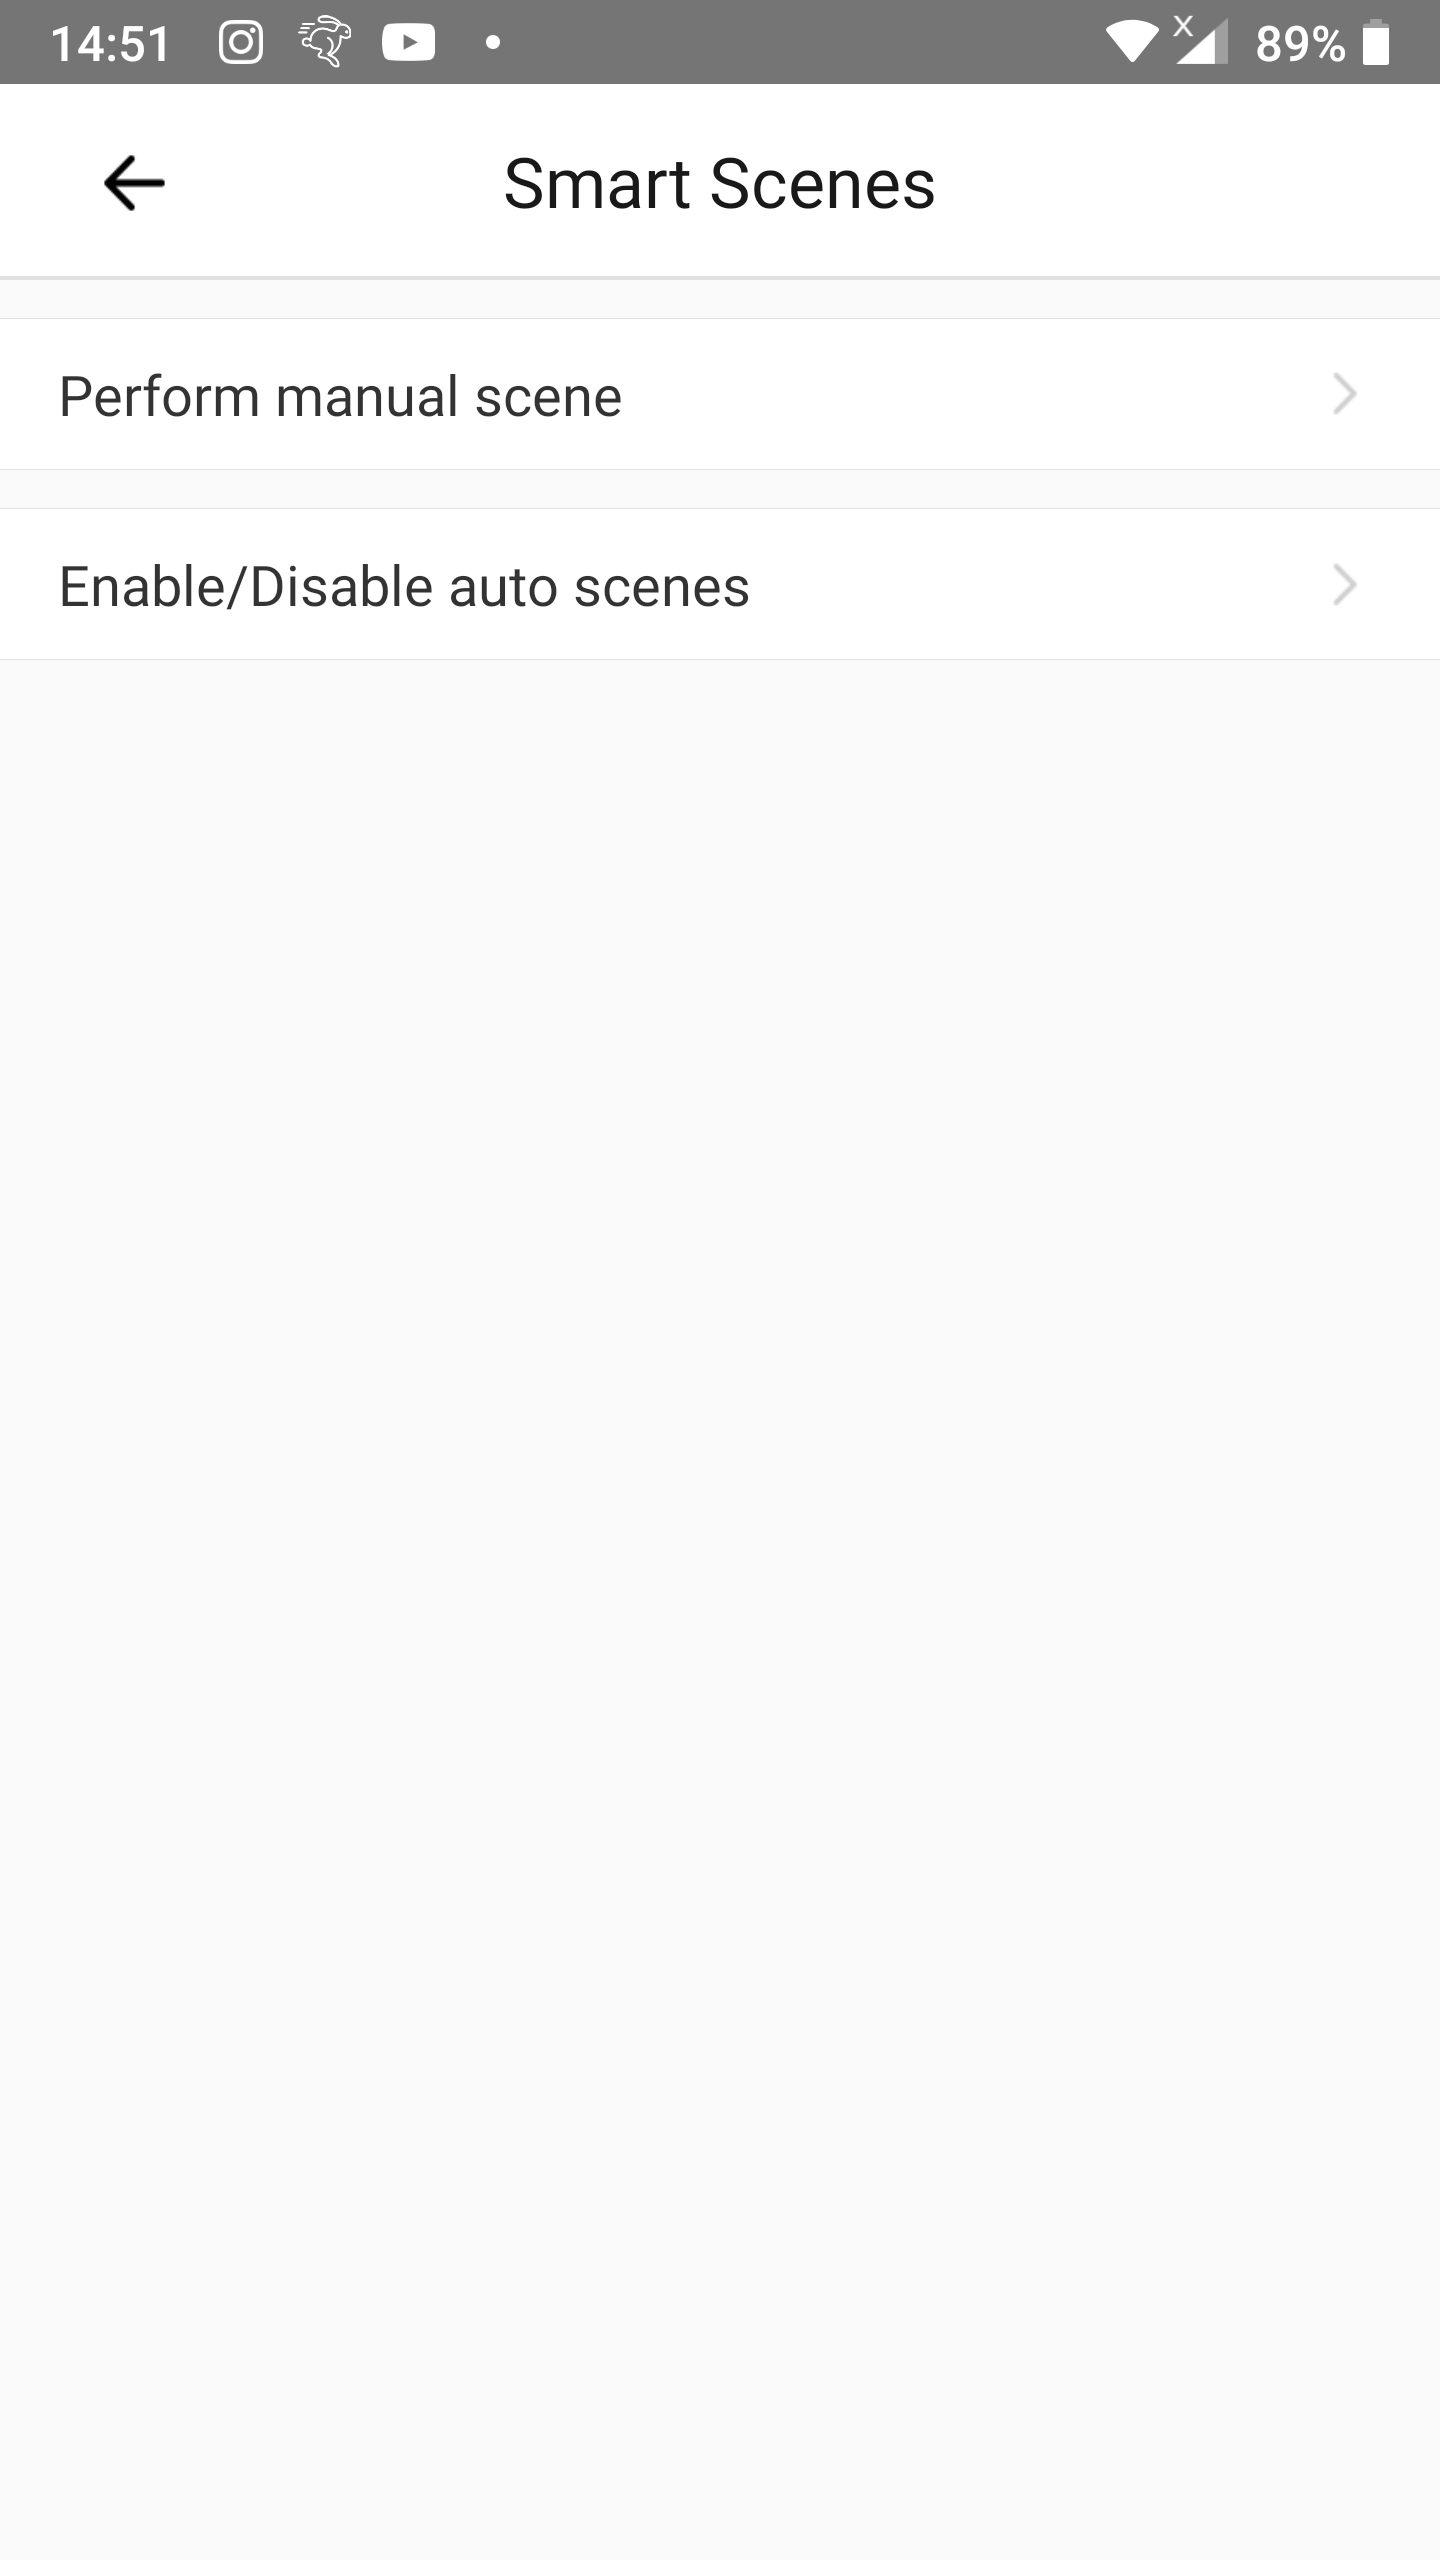
- Tap
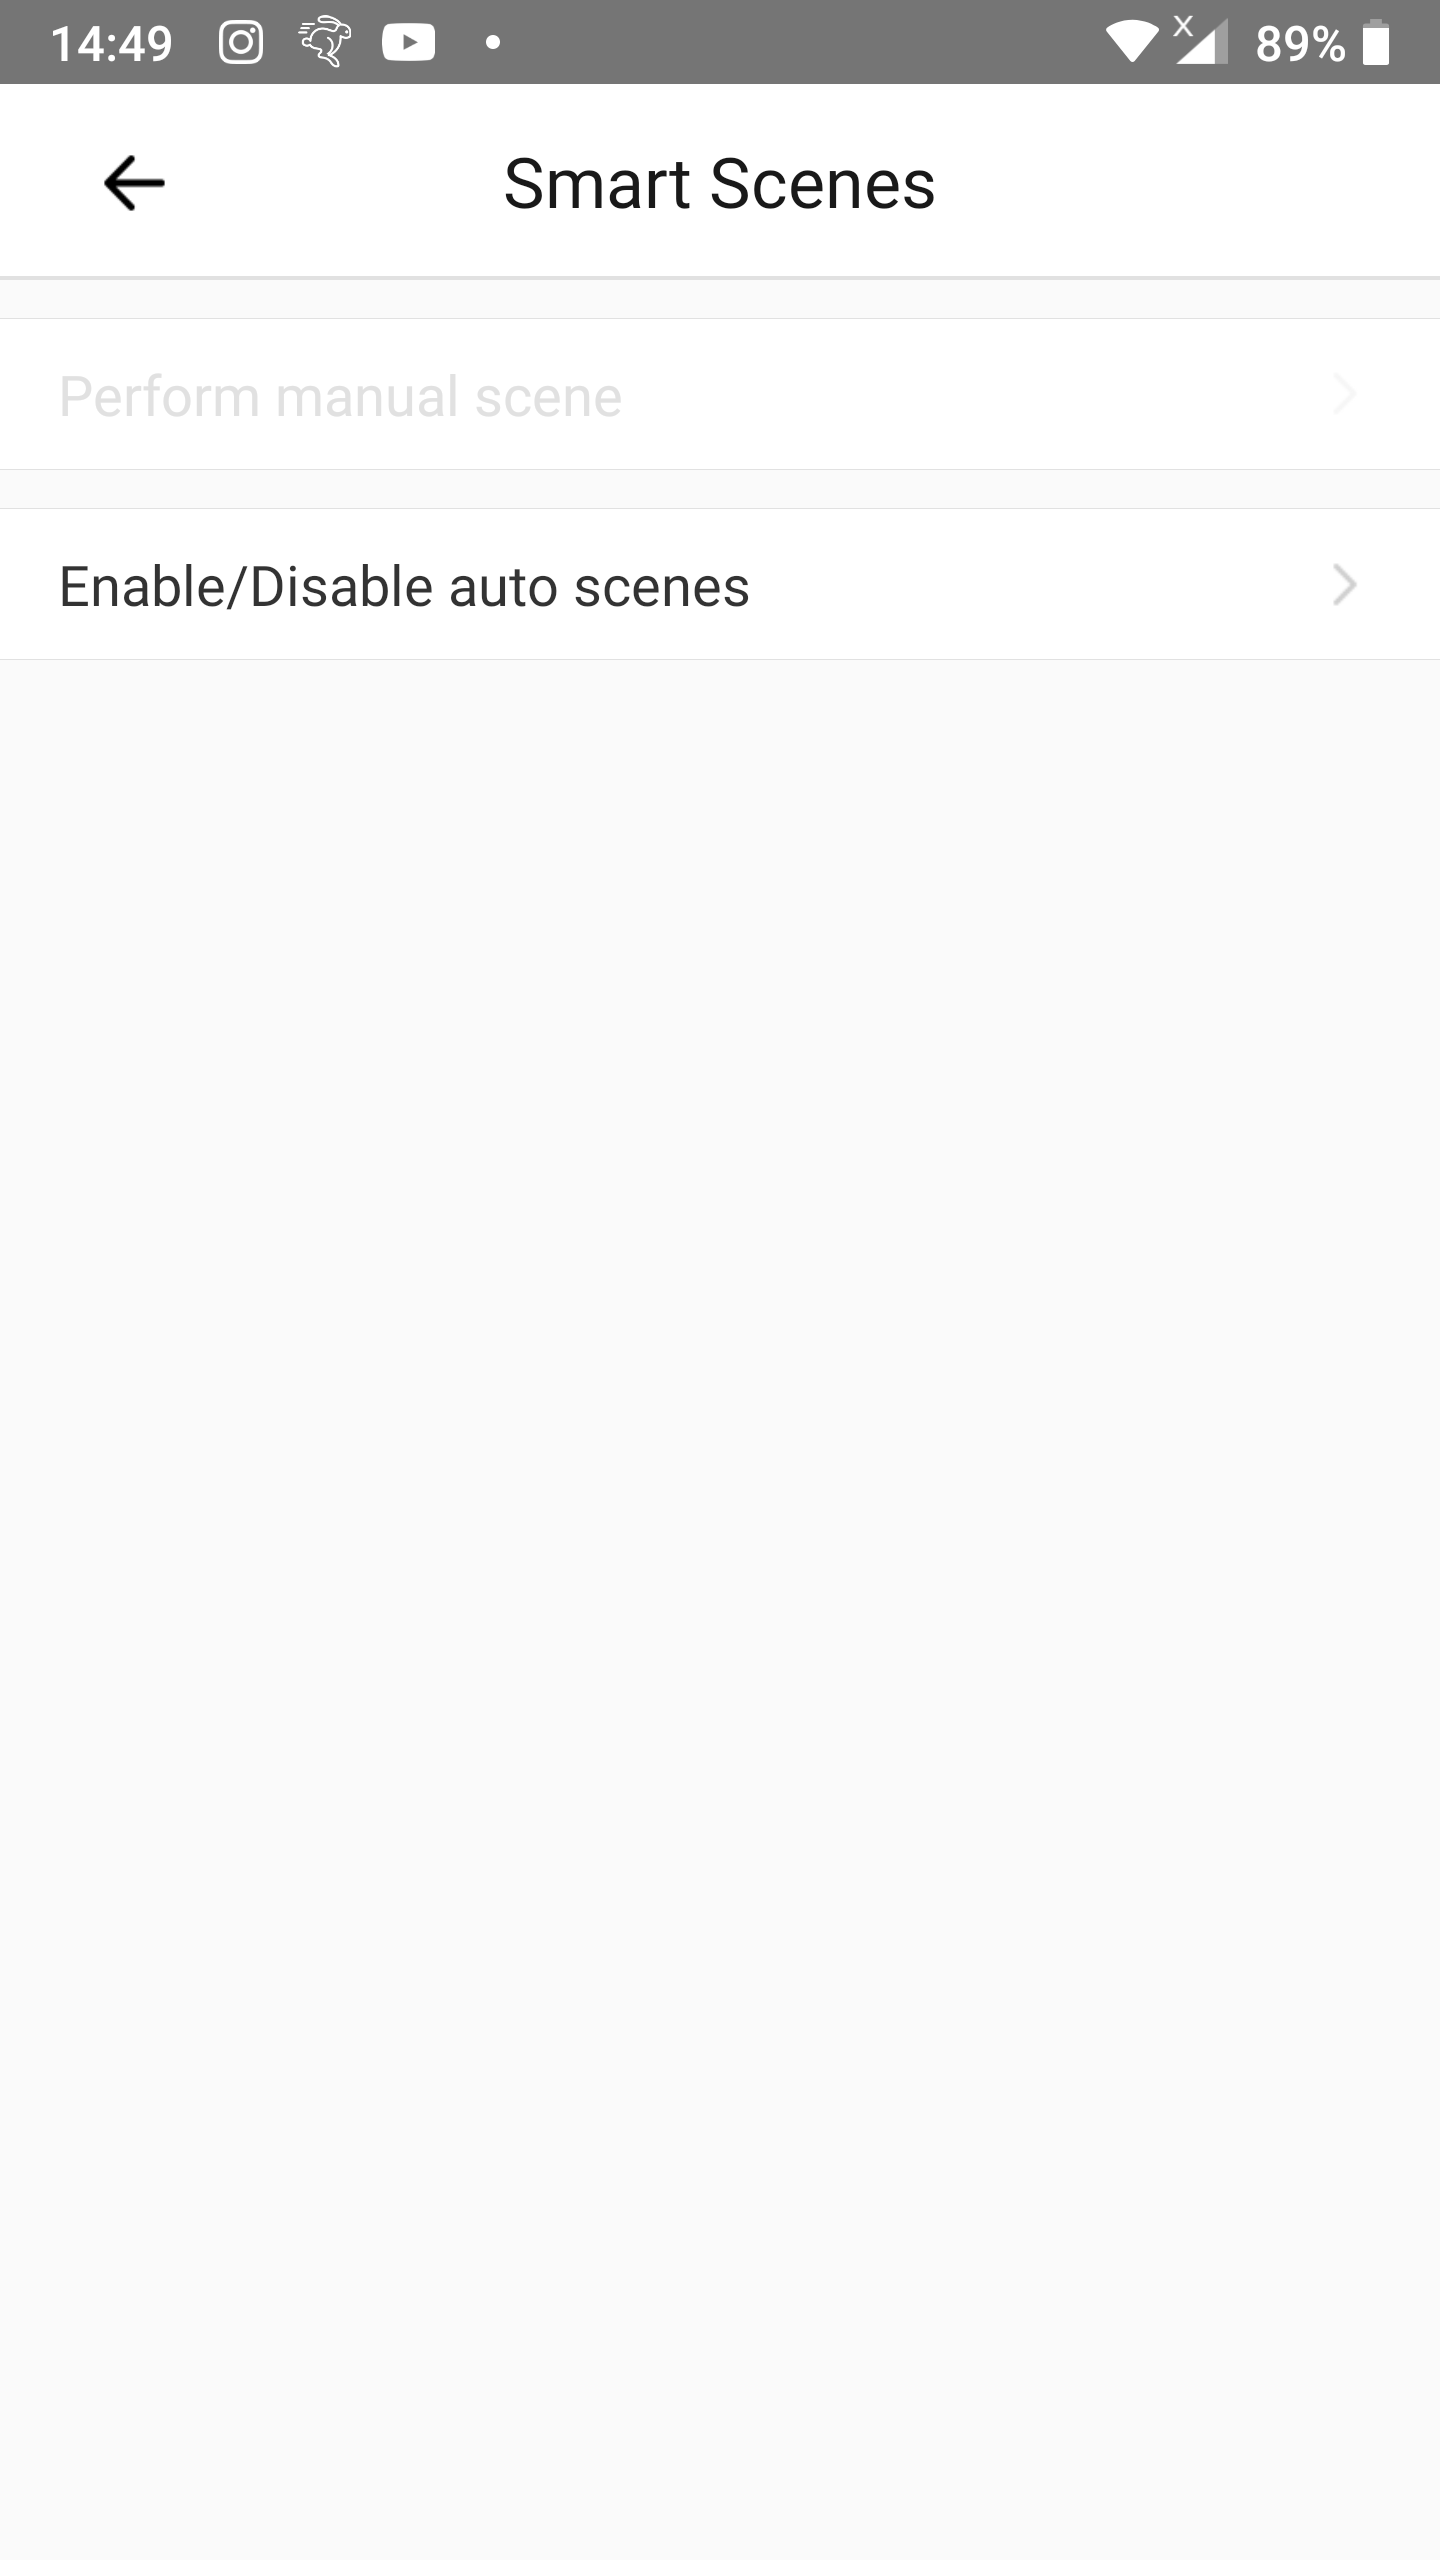
Smart Scenes.
Step 6
- Tap
Enable/Disable auto scenes.
Step 7
- Select the scene that turns the target device on.
- Earlier in this article we called that scene
Scene 1.
- Earlier in this article we called that scene
Step 8
- Tap
Enable.- A blue check mark at the right on that row will appear.
- Tap
Save.

Step 9
- Tap the
+icon on the right ofThen.
Step 10
- Tap
Smart Scenes.
Step 11
- Tap
Enable/Disable auto scenes.
Step 12
- Select the scene that turns the target device off.
- Earlier in this article we called that scene
Scene 2.
- Earlier in this article we called that scene
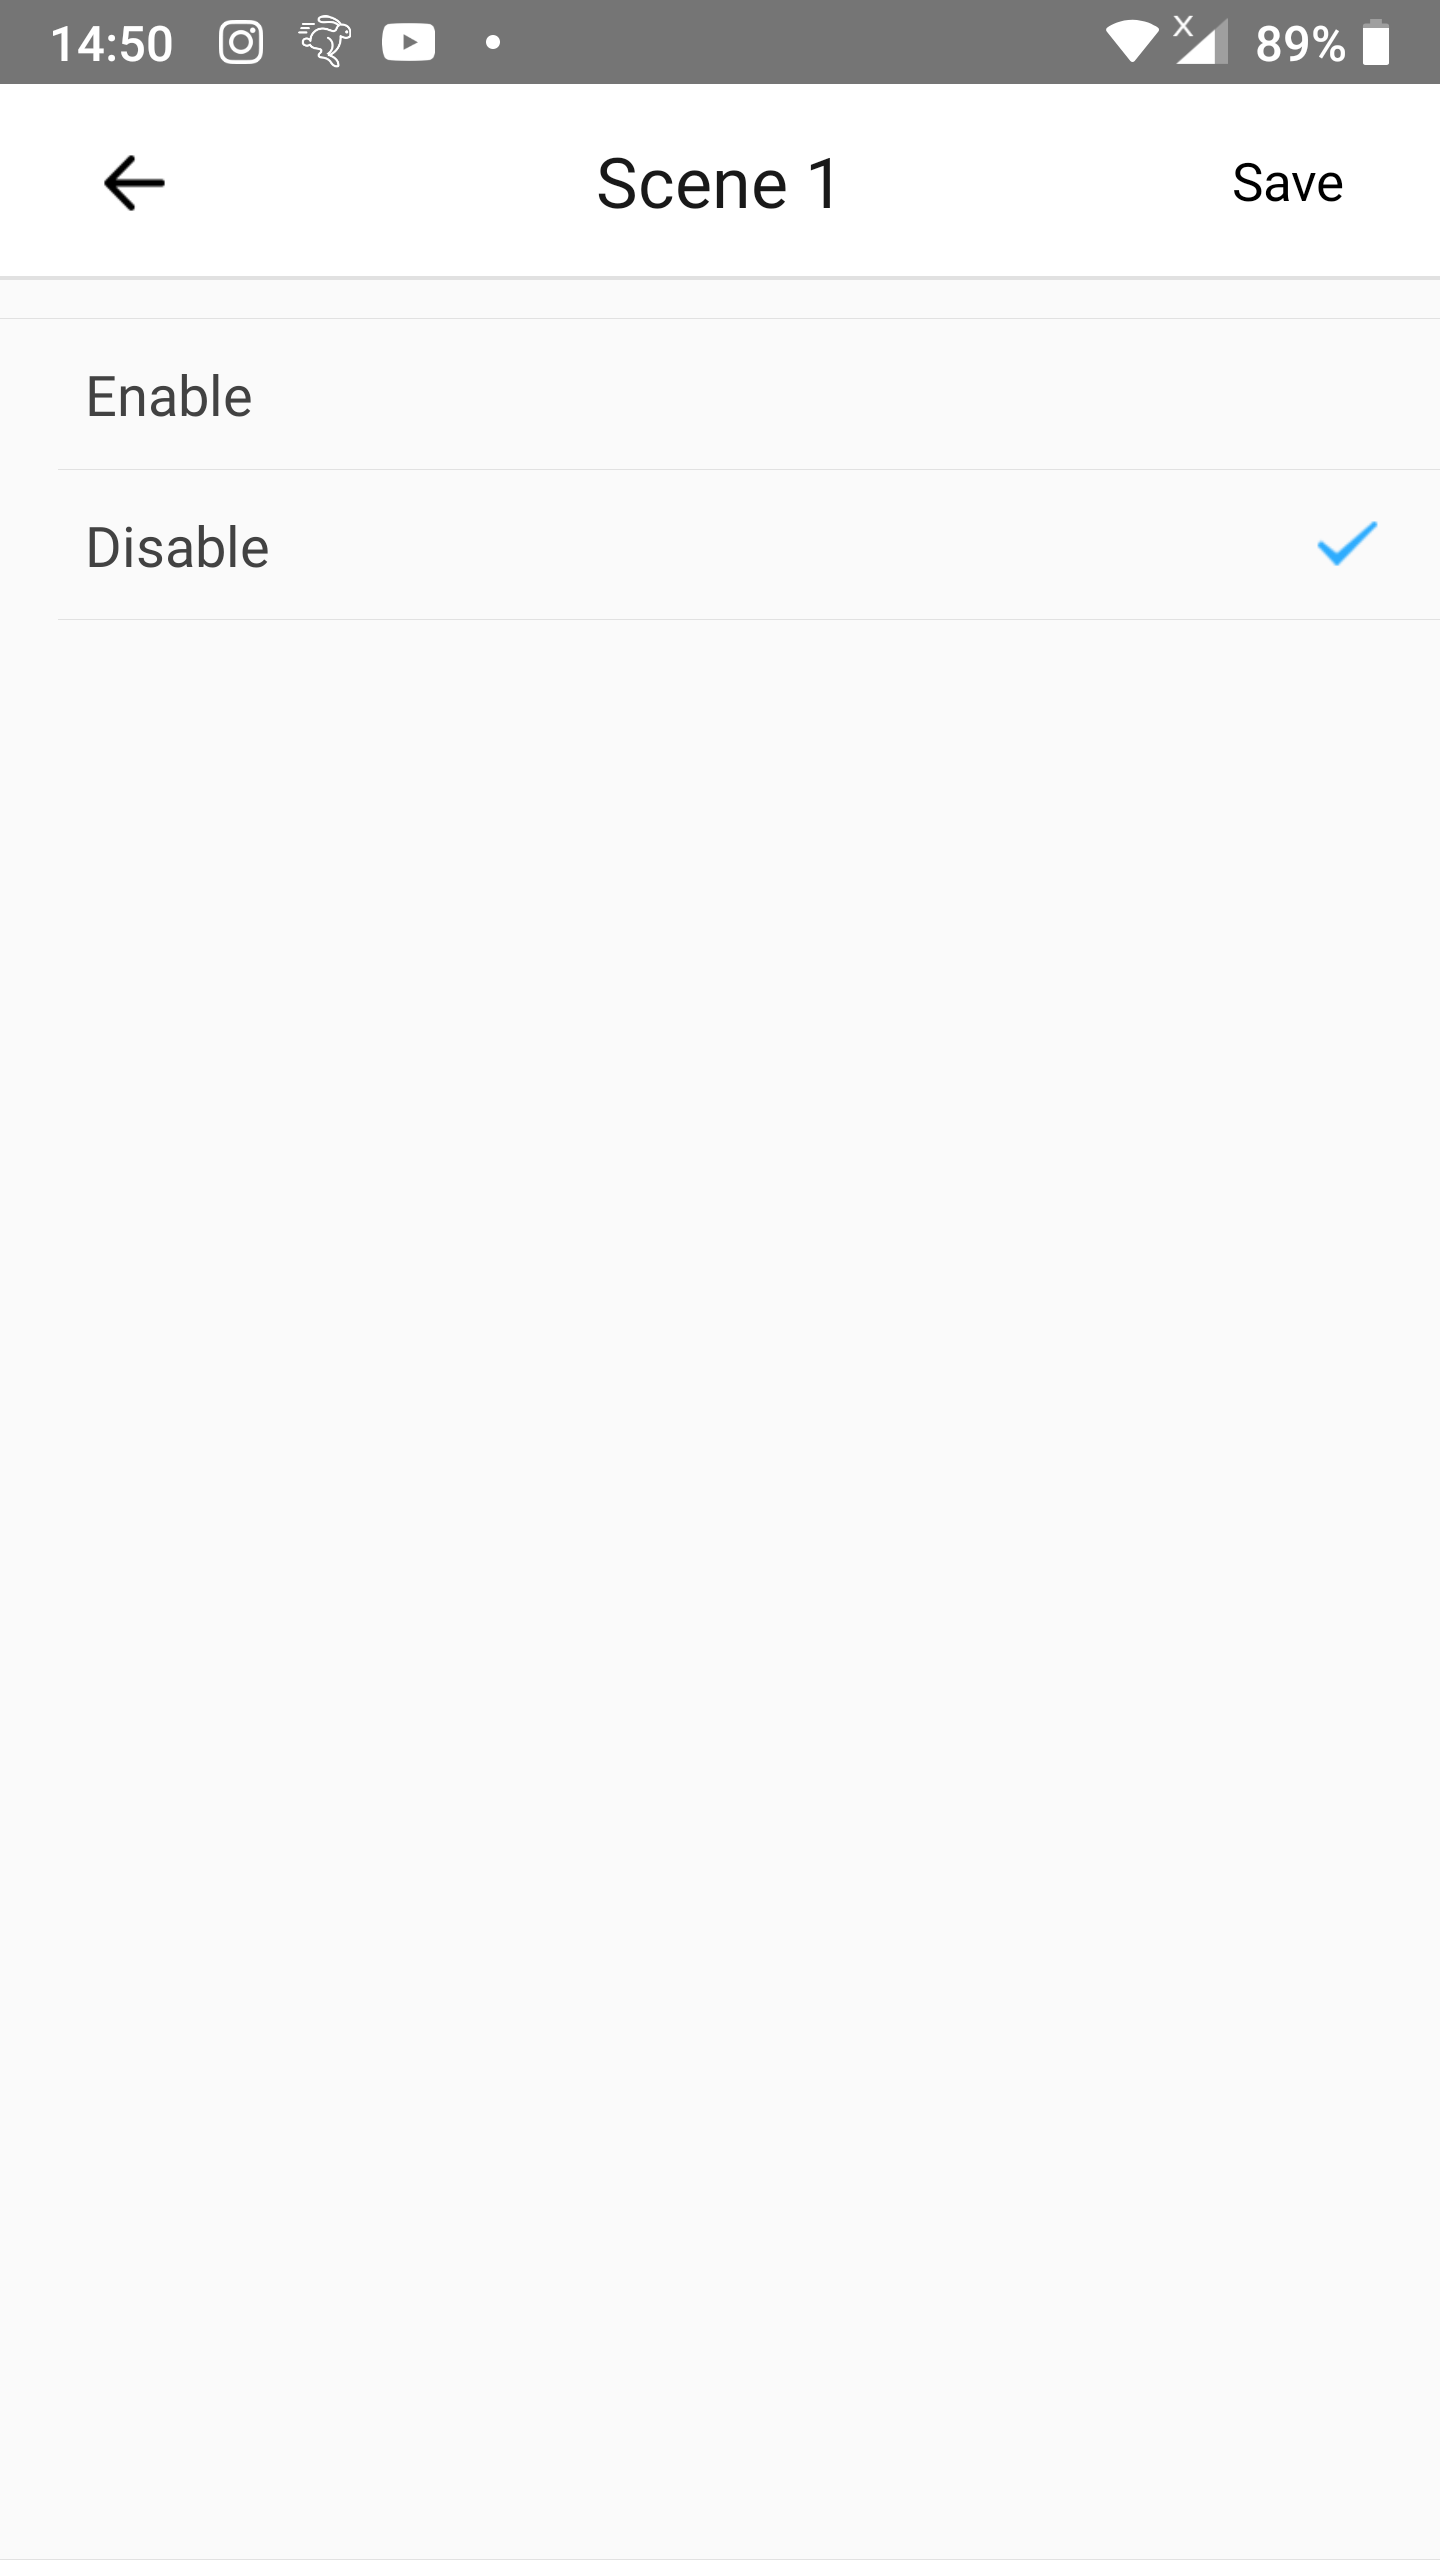
Step 13
- Tap
Disable.- A blue check mark at the right on that row will appear.
- Tap
Save.
Step 14
- Tap
Save.

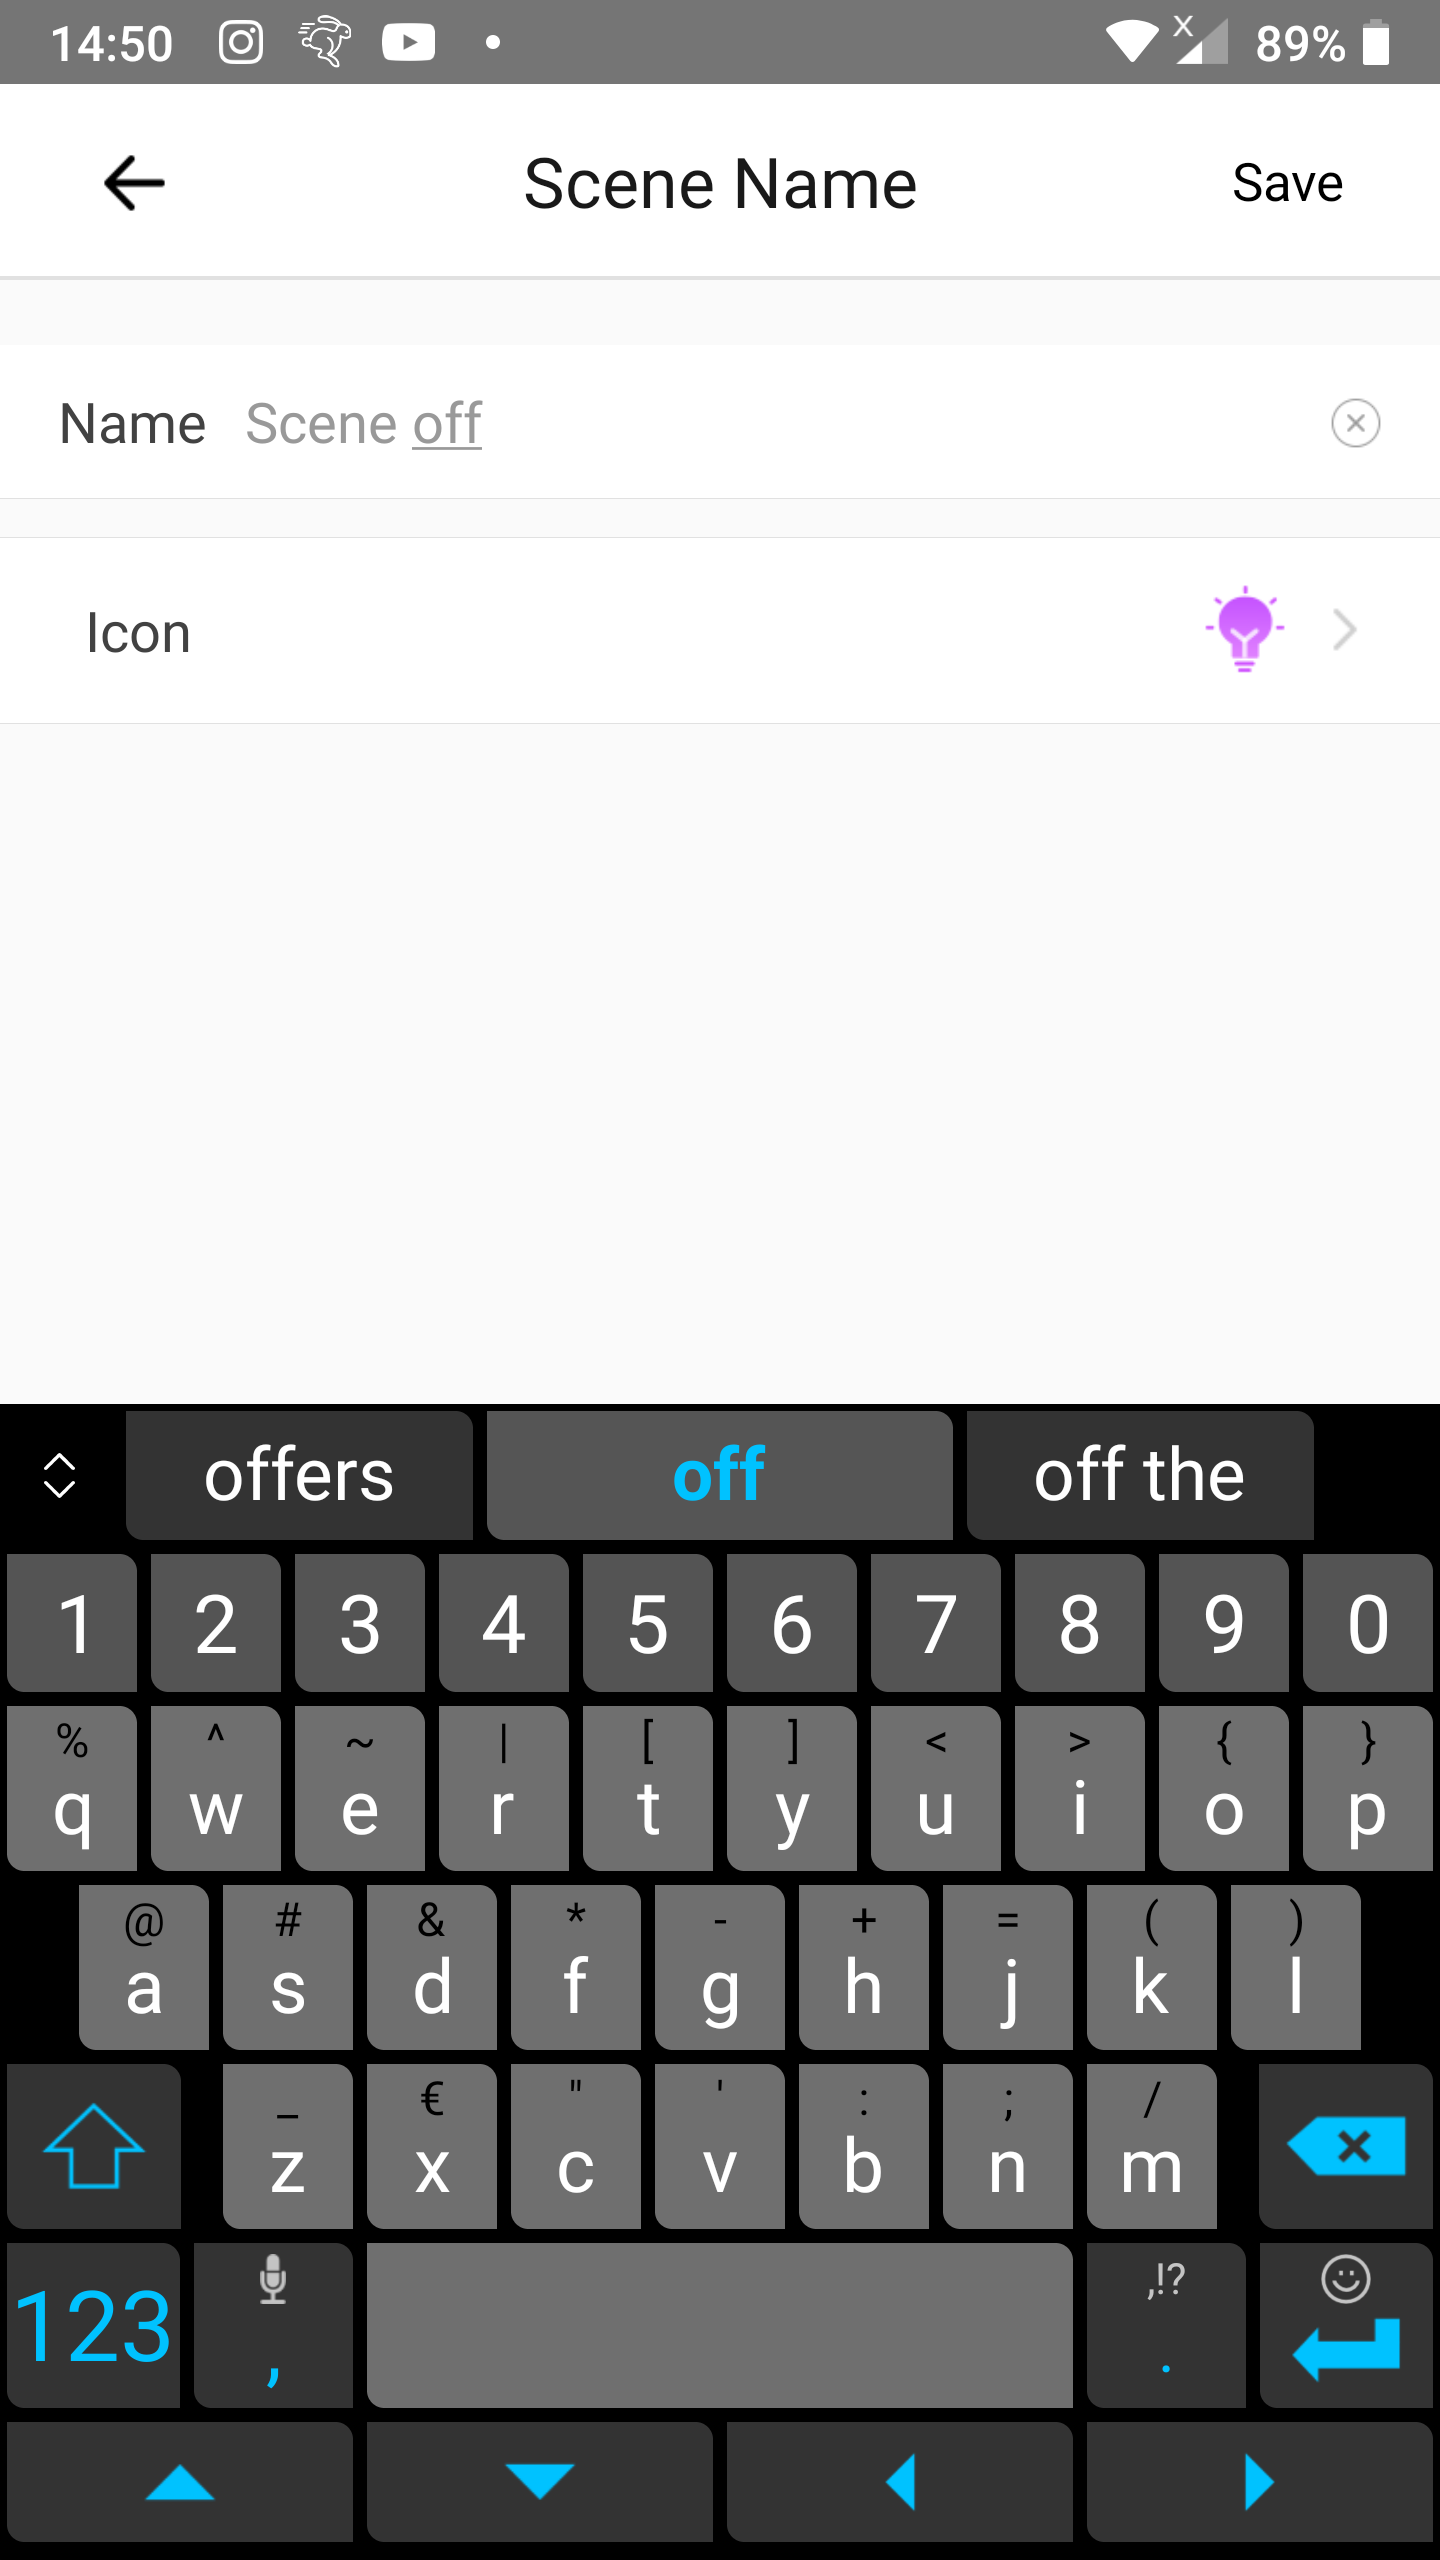
Step 15
- Insert a name for the scene after
Name.- In our case we entered
Scene onas name.
- In our case we entered
- Optionally you can choose an icon.
- Tap
Save.
Scene on is now fully complete.
Add Scene off
This scene will:
- Disable
Scene 1so thatScene 1doesn’t turn the target device on when the external button is pressed. - Enable
Scene 2so thatScene 2will turn the target device off when the external button is pressed.
Step 1
- Go to the
Scenescreen. - Tap the
+icon in the top right corner.
Step 2
- Tap
Addright below If.
Step 3
- Tap
Tap to perform.
Step 4
- Tap
Addright belowThen.
Step 5
- Tap
Smart Scenes.
Step 6
- Tap
Enable/Disable auto scenes.
Step 7
- Select the scene that turns the target device on.
- Earlier in this article we called that scene
Scene 1.
- Earlier in this article we called that scene
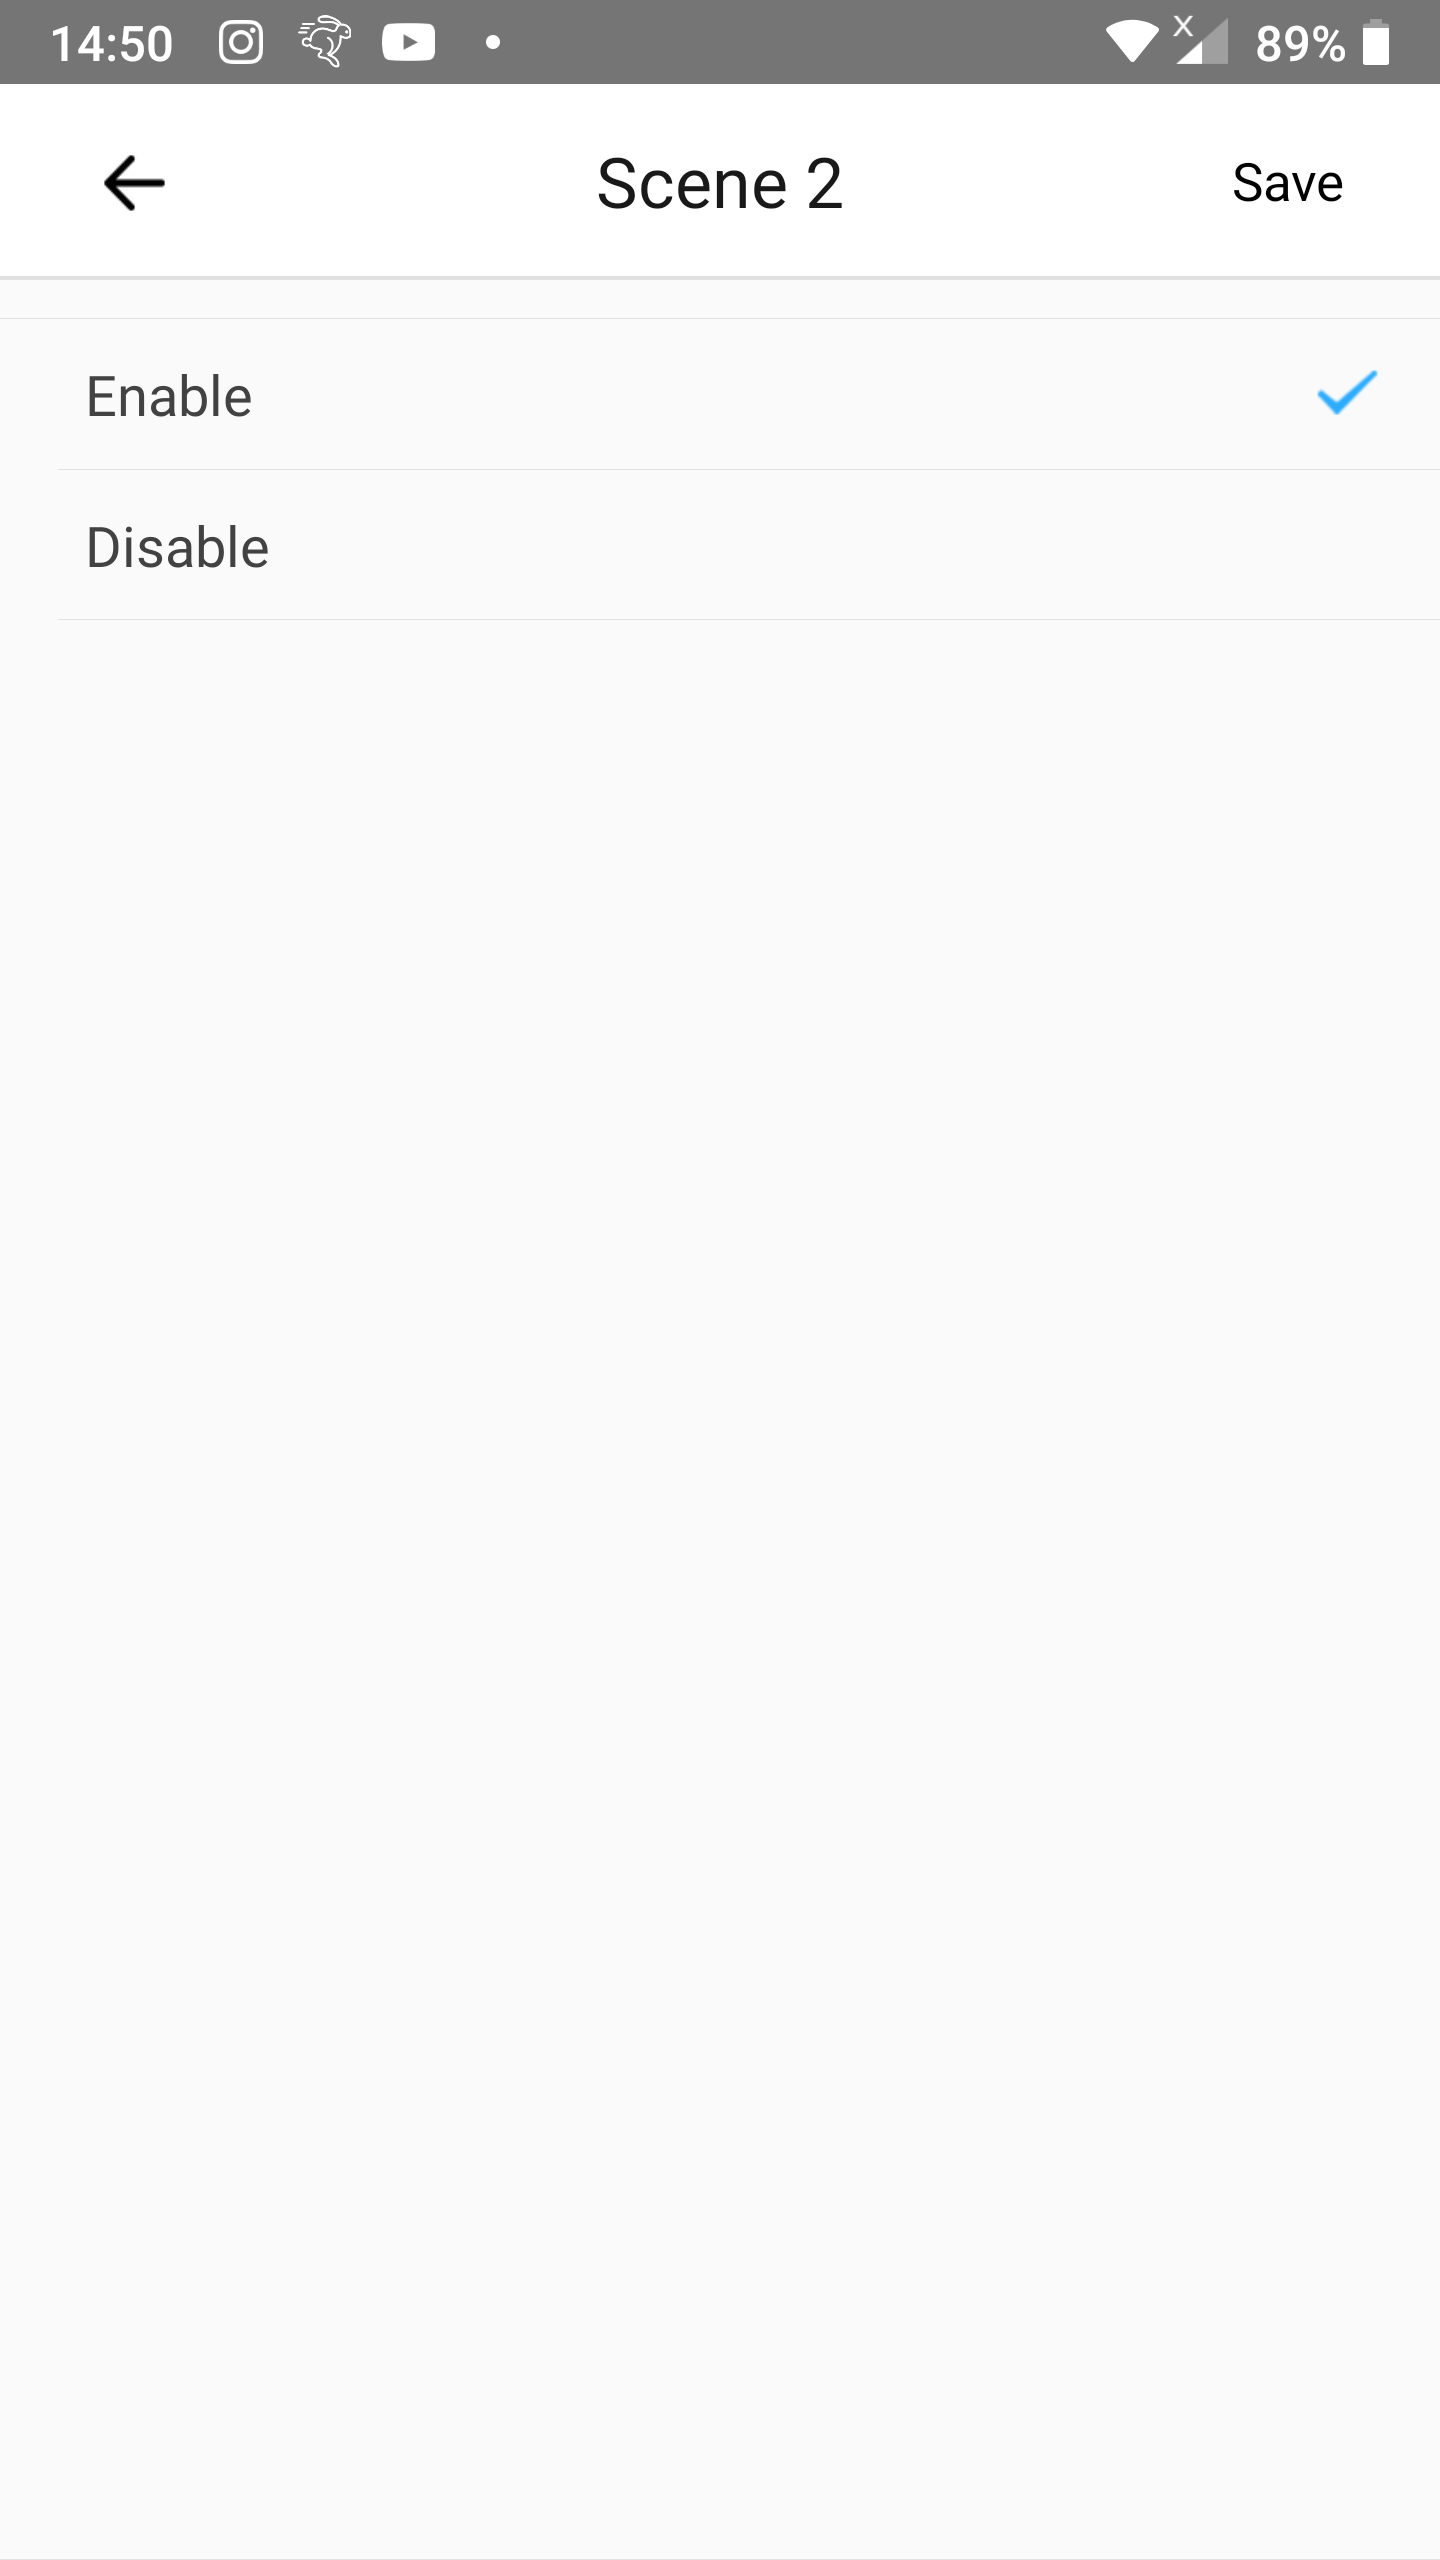
Step 8
- Tap
Disable.- A blue check mark at the right on that row will appear.
- Tap
Save.
Step 9
- Tap the
+icon on the right ofThen.
Step 10
- Tap
Smart Scenes.
Step 11
- Tap
Enable/Disable auto scenes.
Step 12
- Select the scene that turns the target device off.
- Earlier in this article we called that scene
Scene 2.
- Earlier in this article we called that scene
Step 13
- Tap
Enable.- A blue check mark at the right on that row will appear.
- Tap
Save.
Step 14
- Tap
Save.
Step 15
- Insert a name for the scene after
Name.- In our case we entered
Scene offas name.
- In our case we entered
- Optionally you can choose an icon.
- Tap
Save.
Scene off is now fully complete.
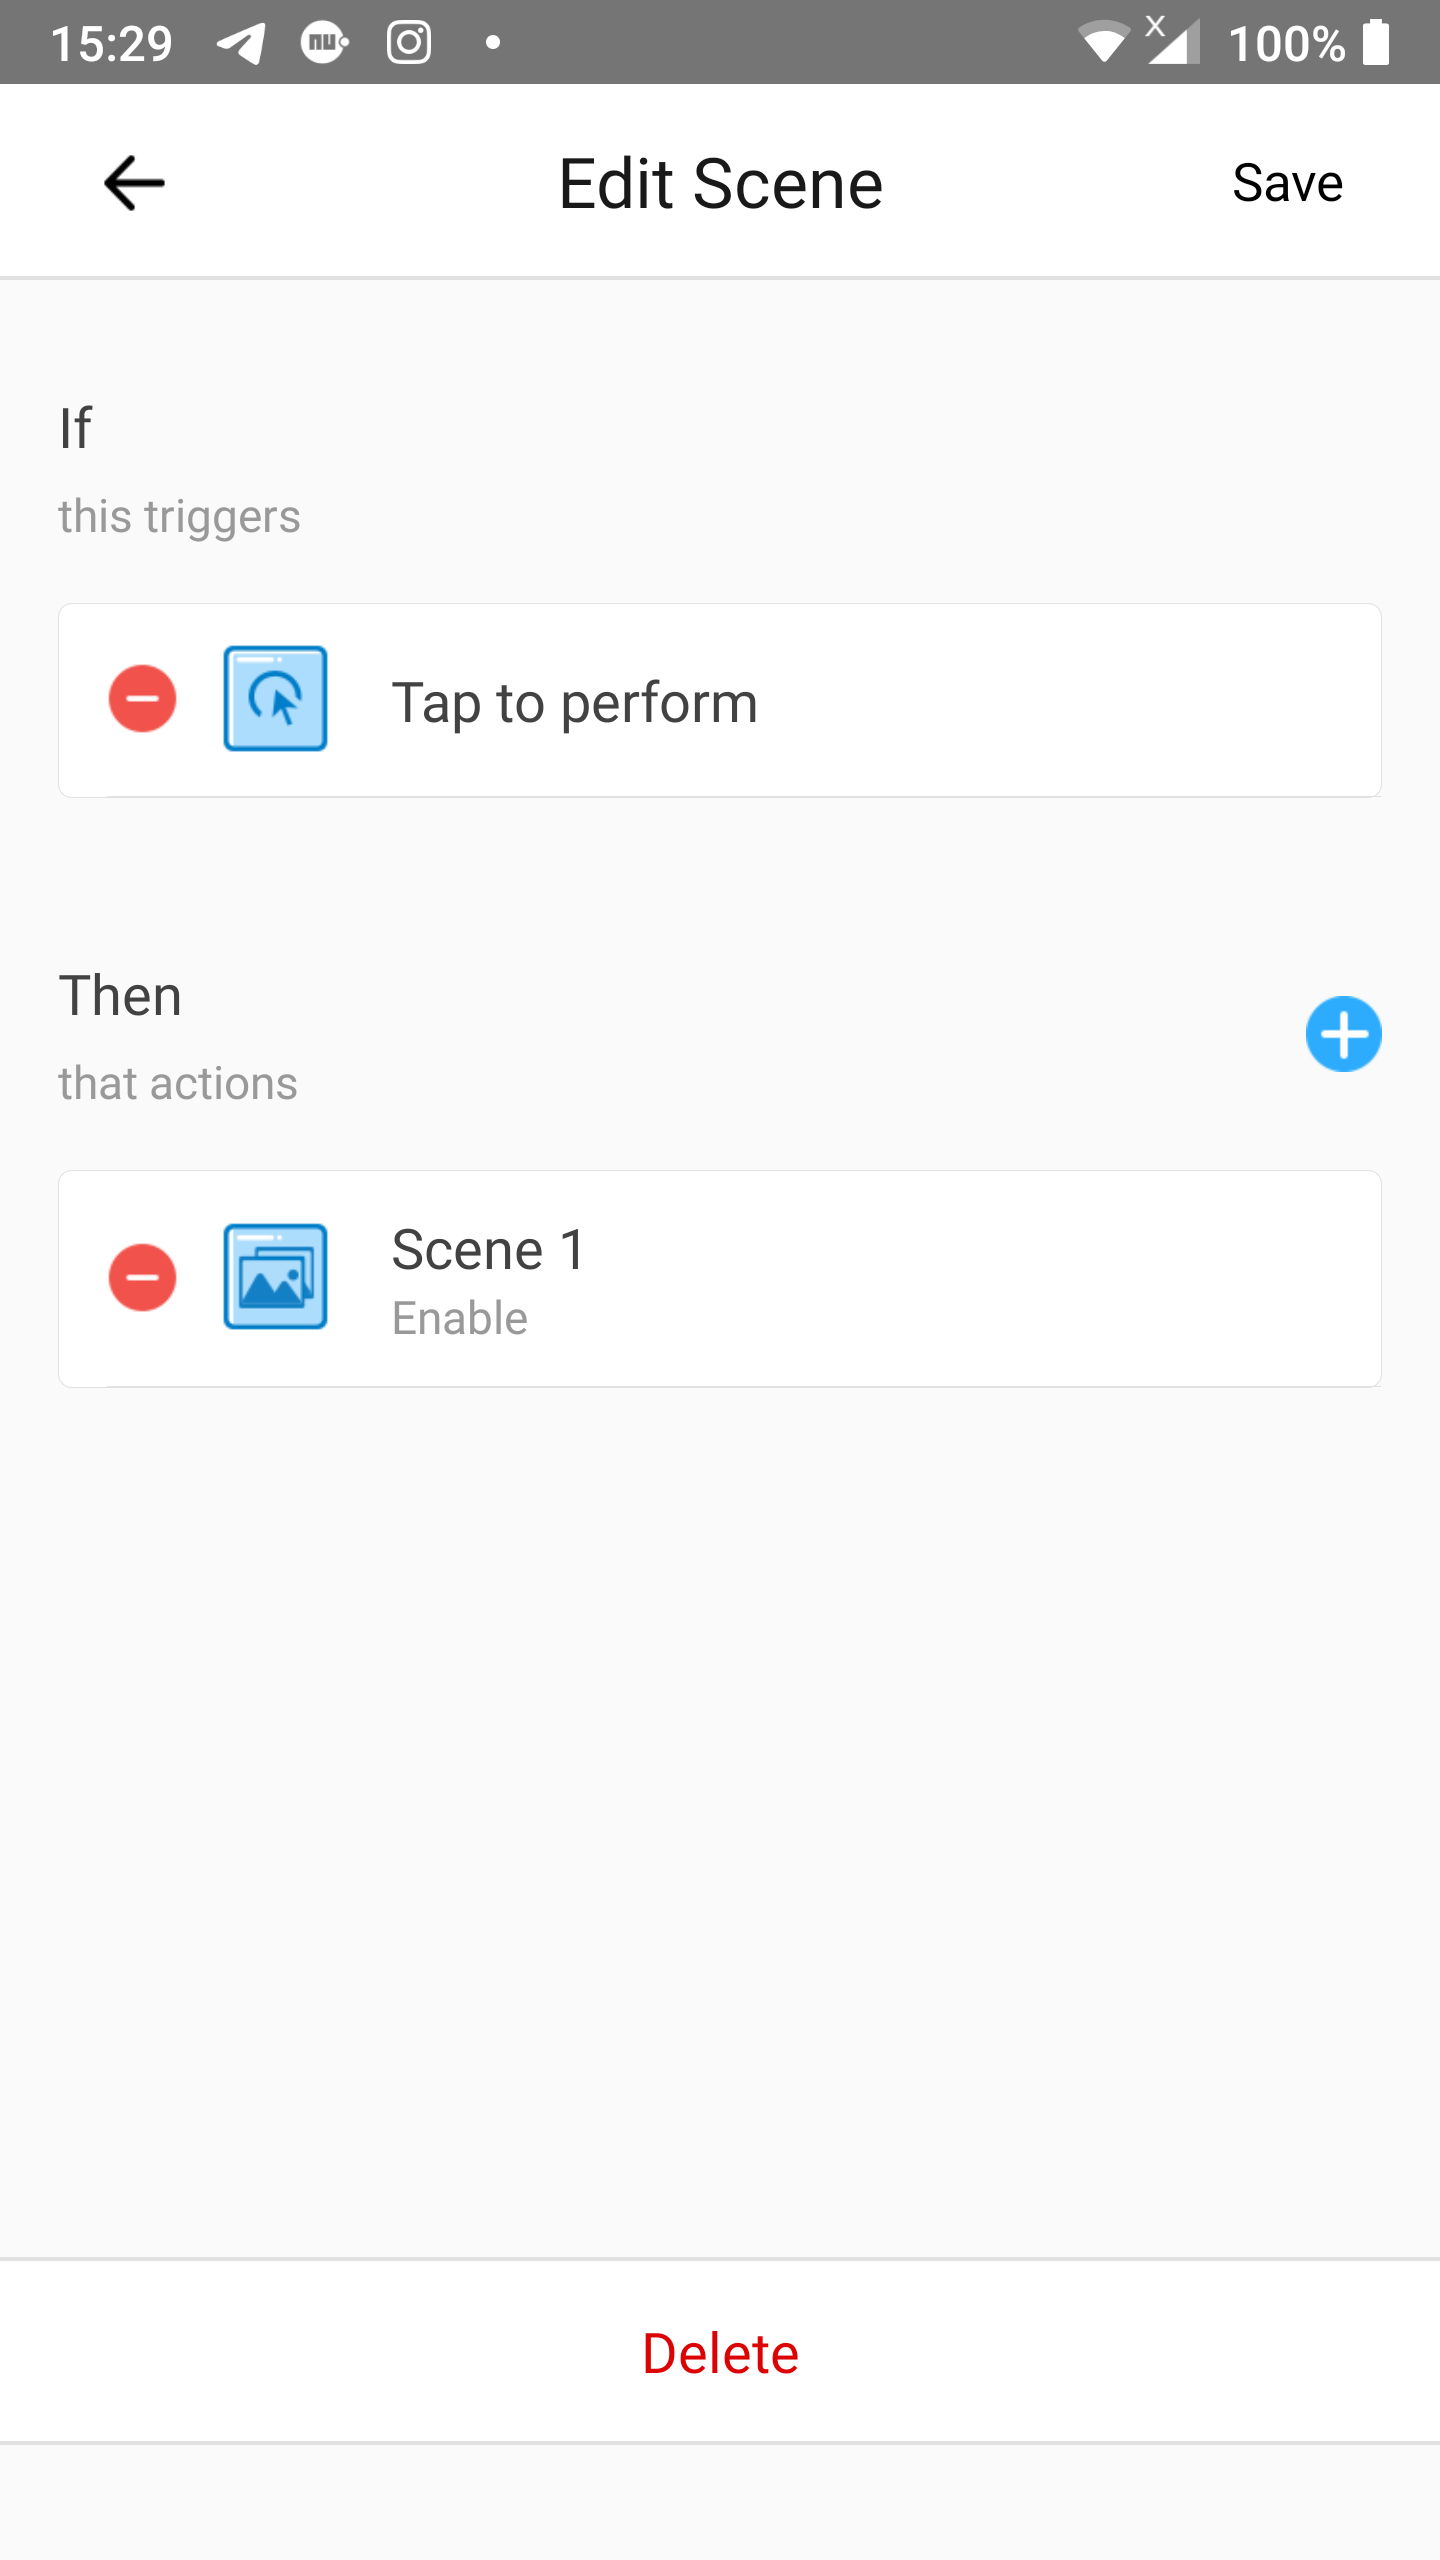
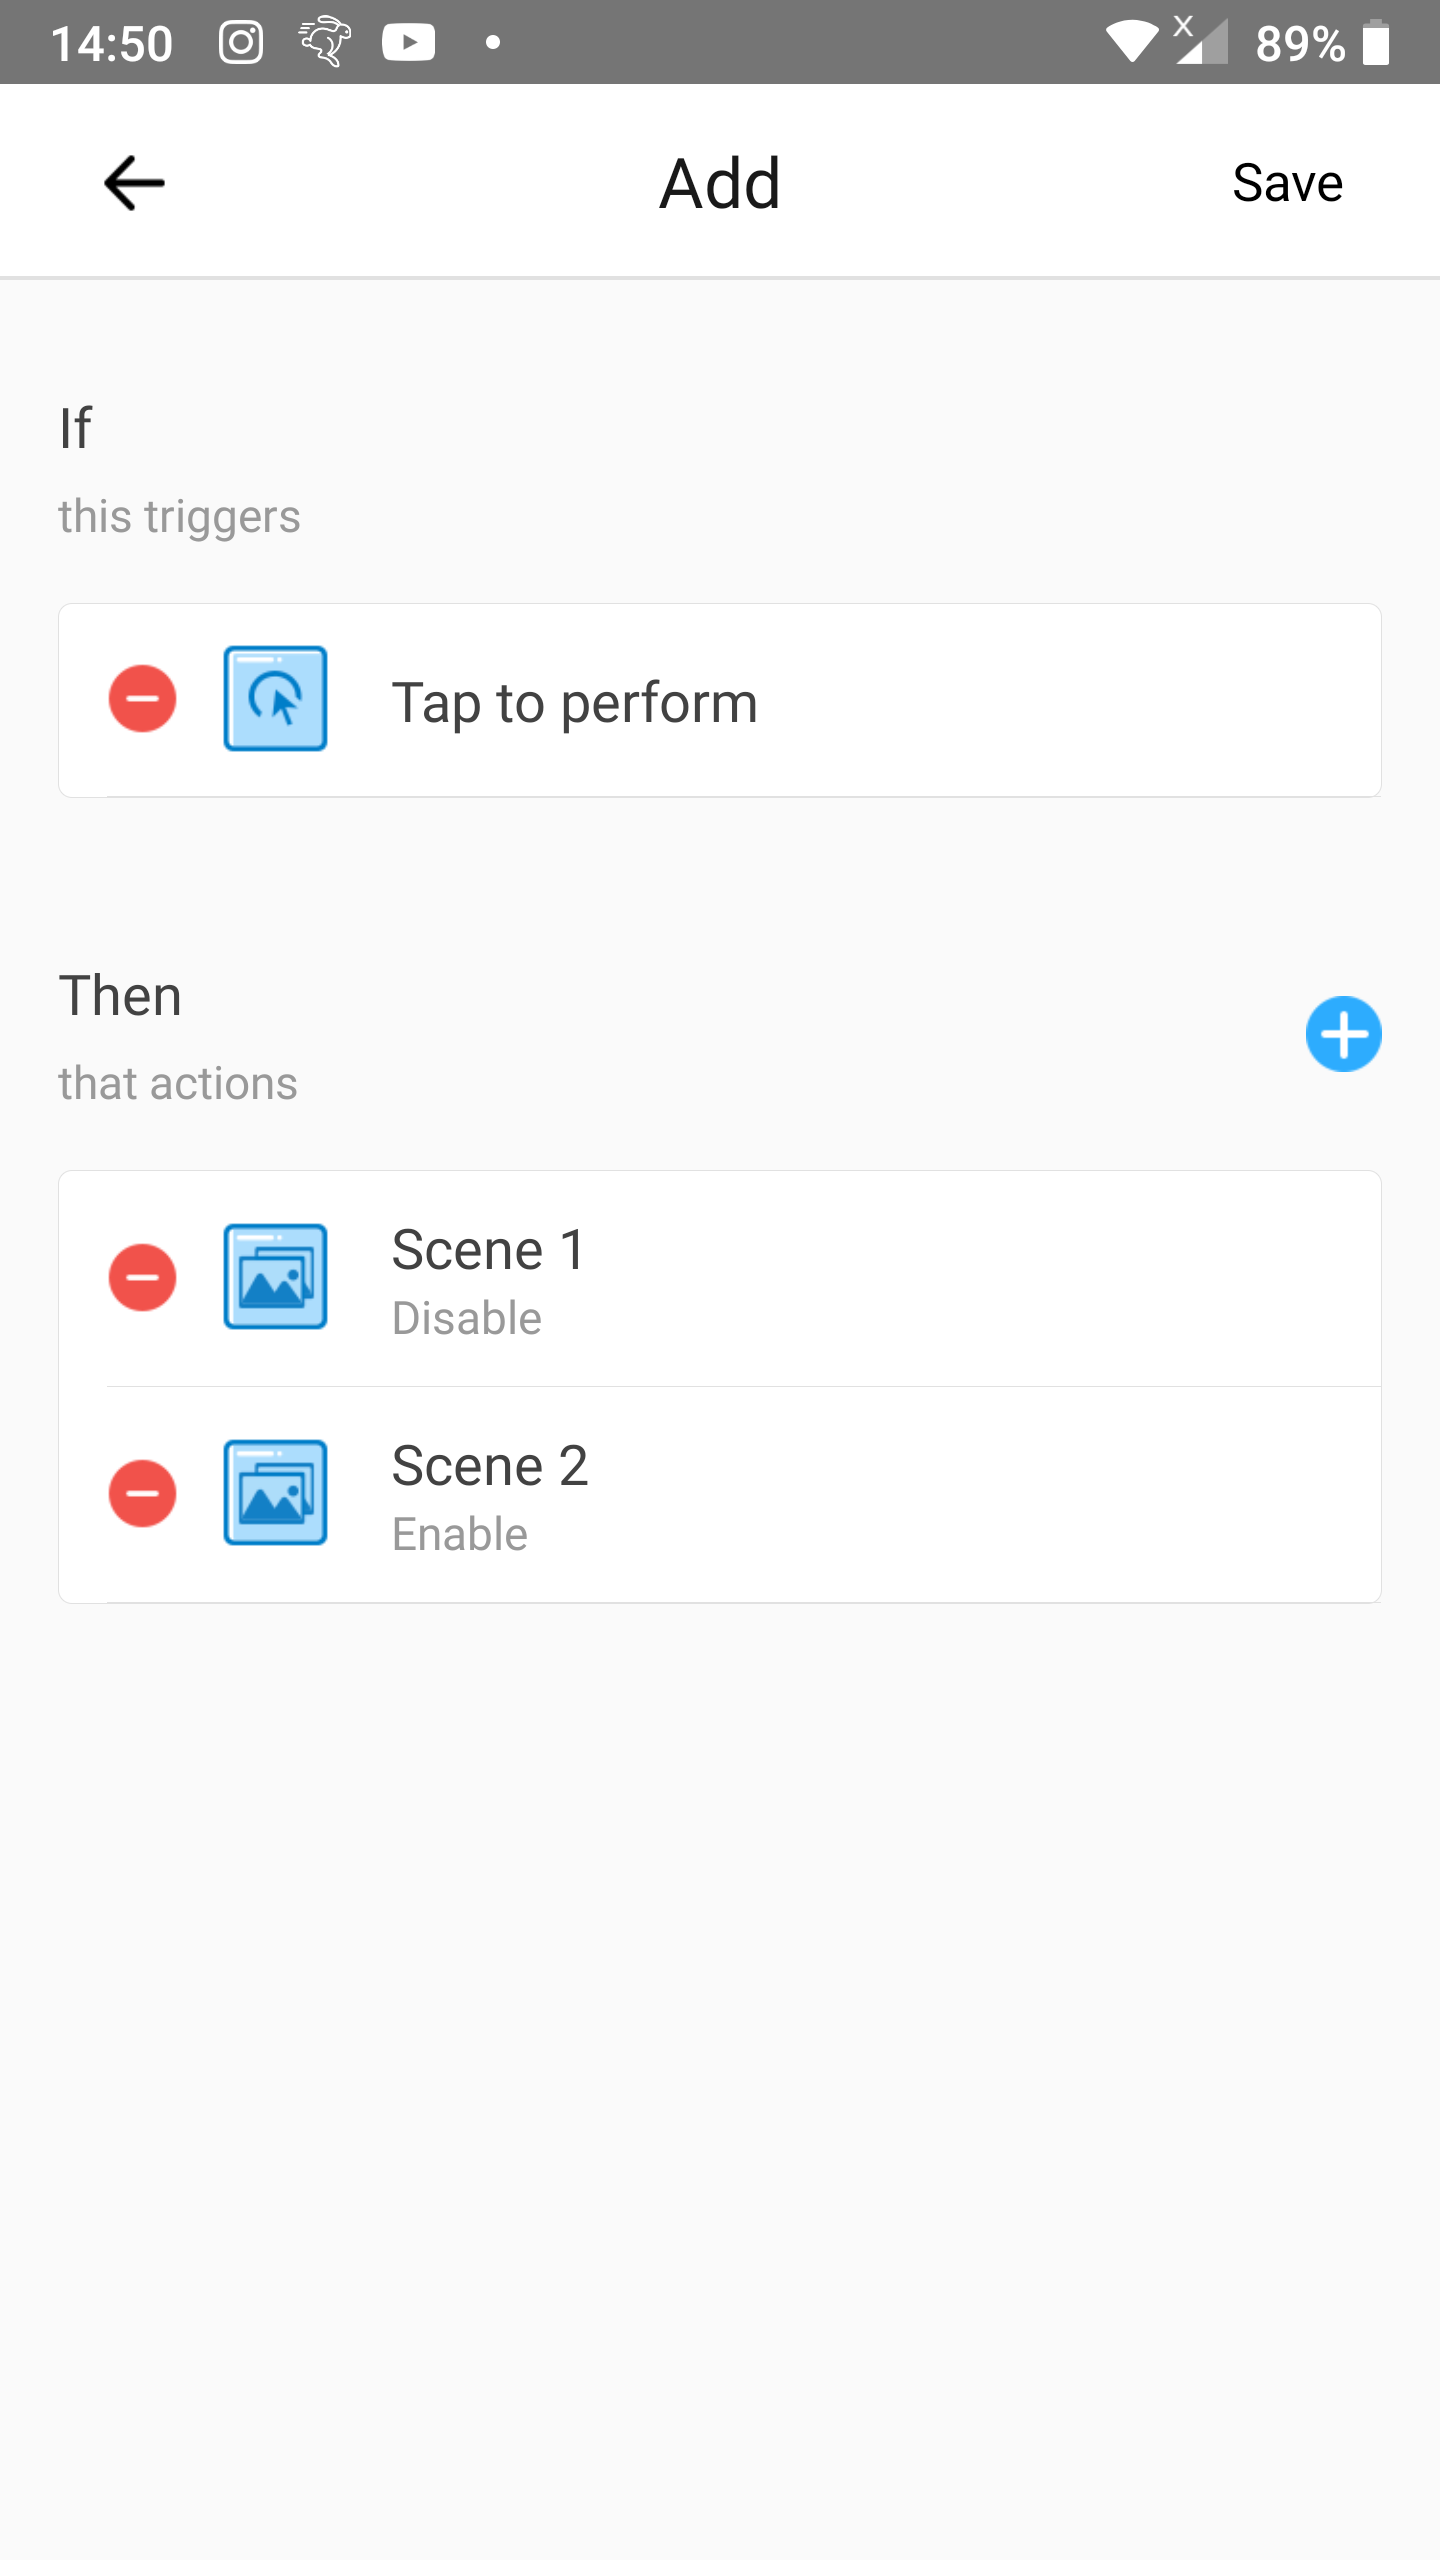
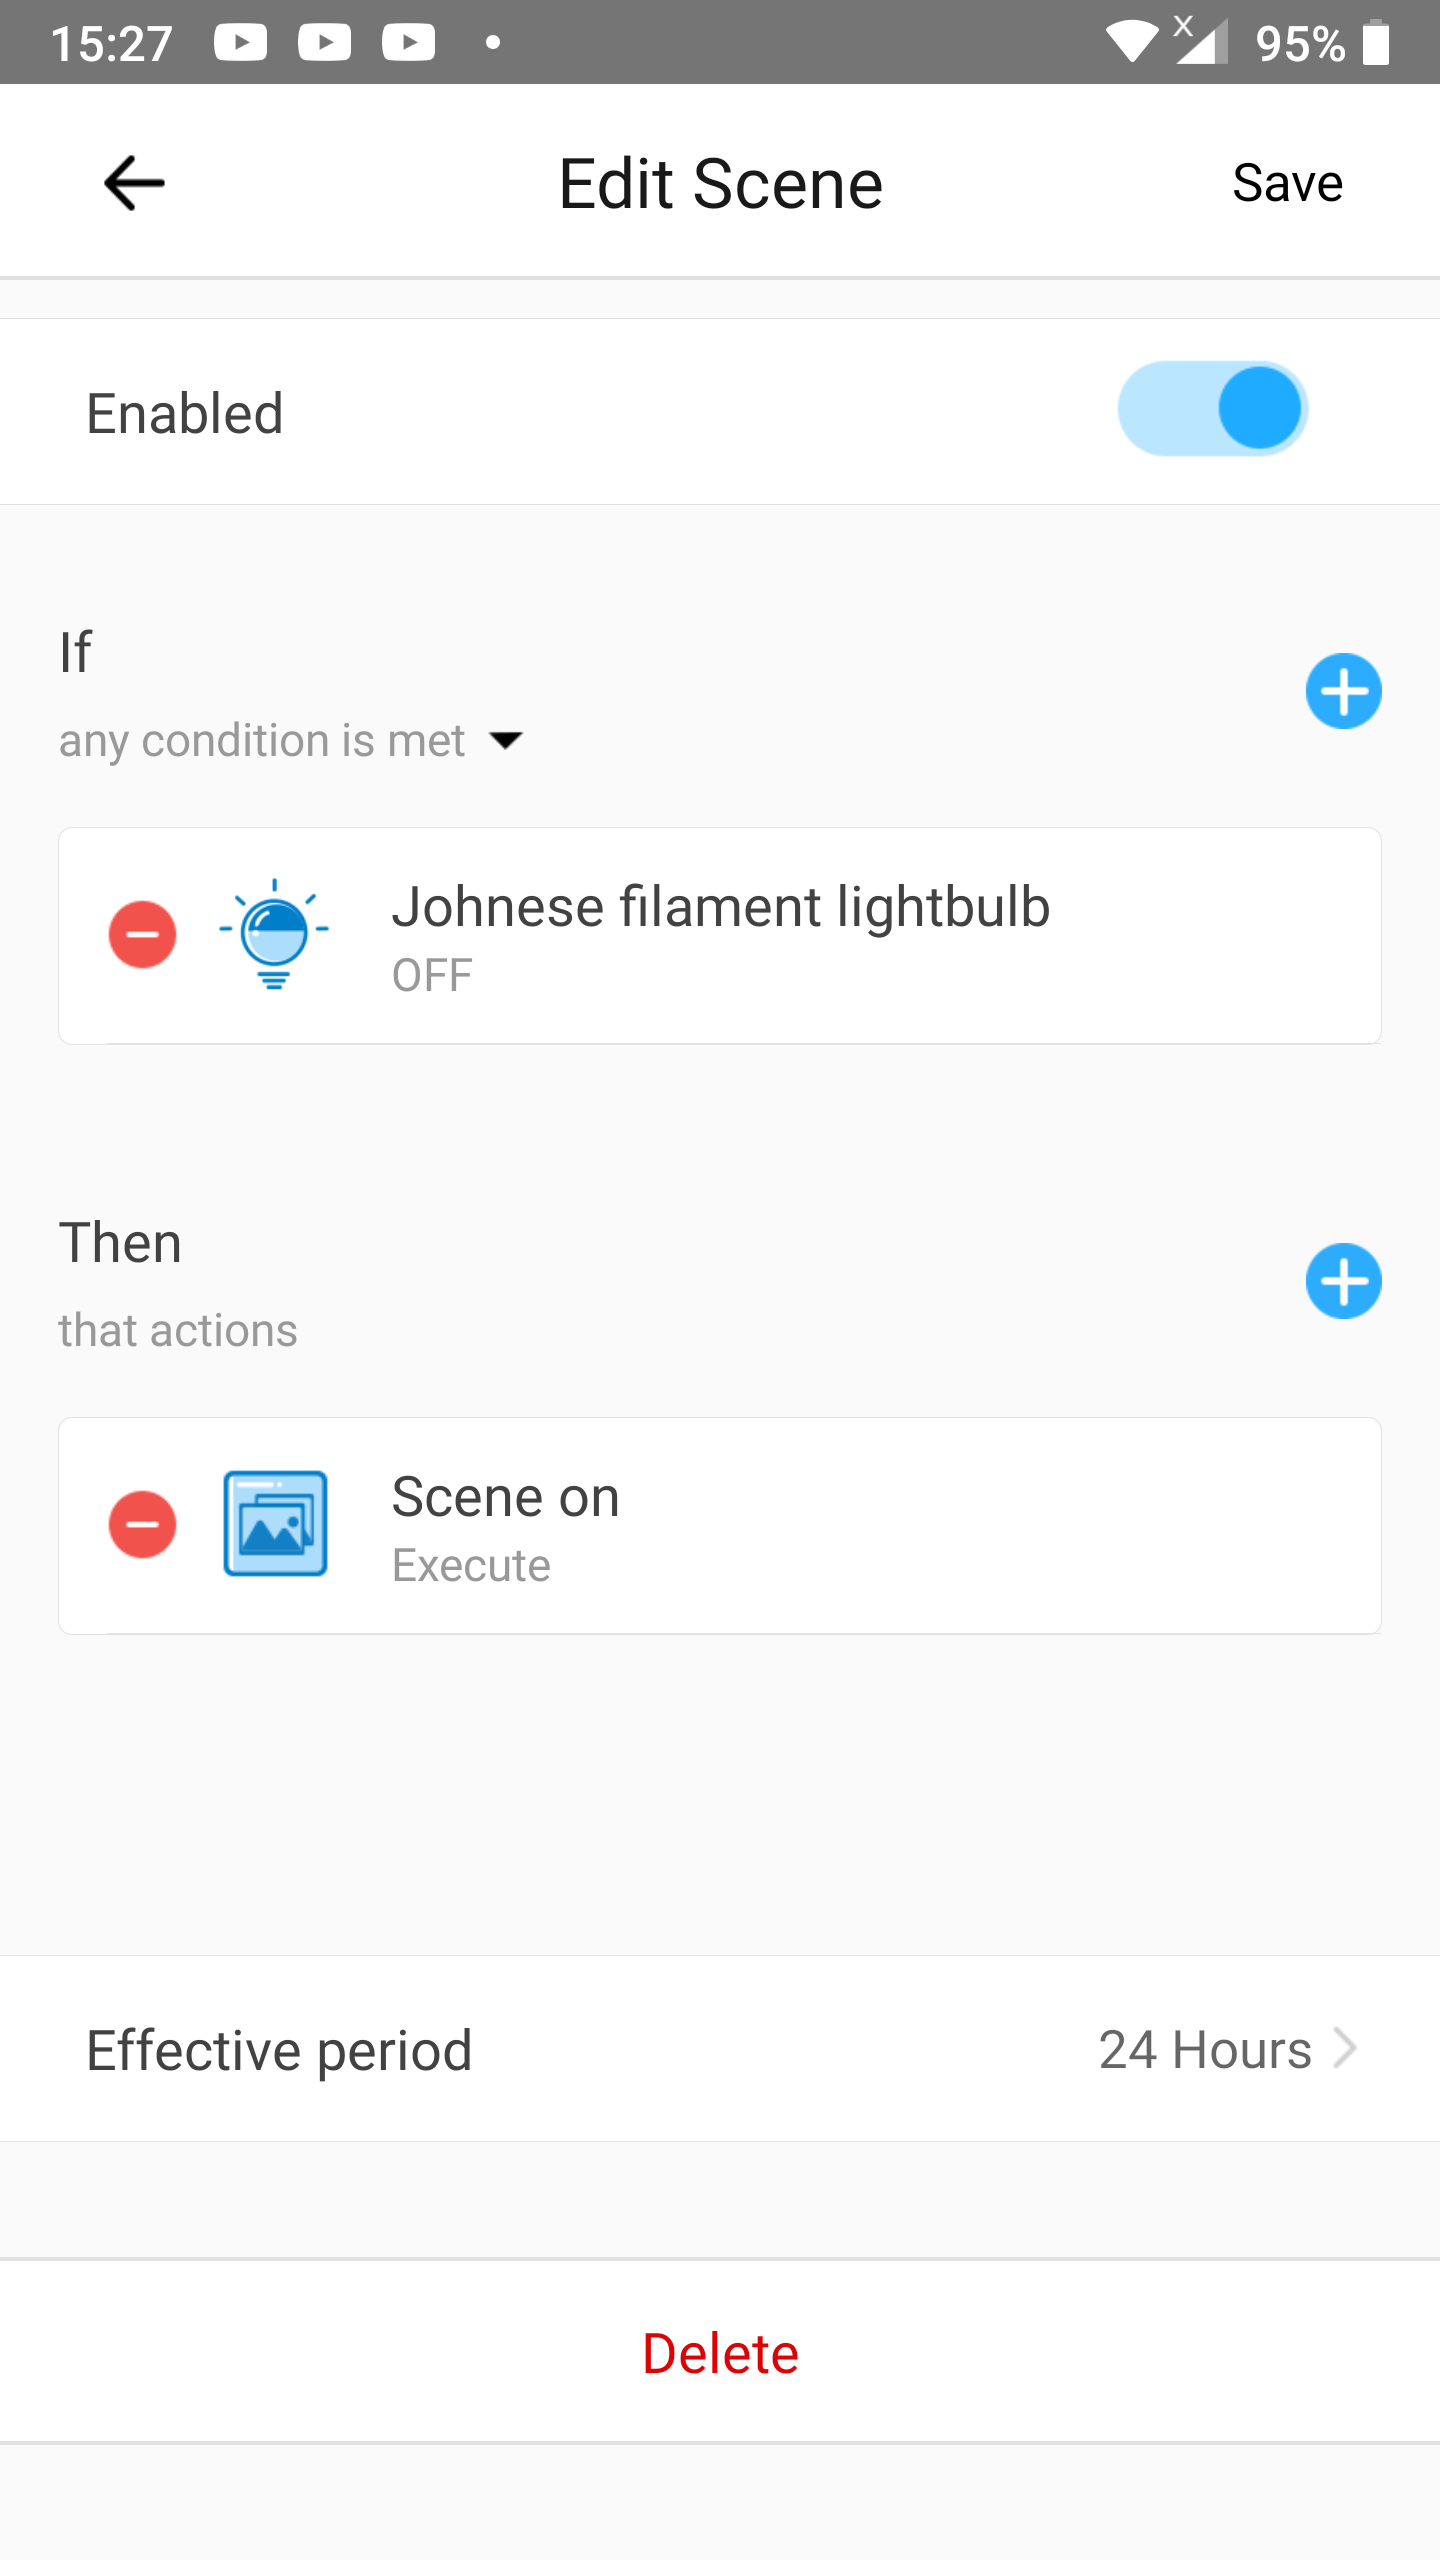
Modify Scene 1
This scene will:
- Turn the target device on after an external button press.
- Execute helper scene
Scene offto disable thisScene 1so that this scene doesn’t react on the external button press as the target device is already on.
Because both Scene 1 and the helper scene will refer to each other we couldn’t complete this scene in one flow. That is way we now arrived at part 2: modifying Scene 1.
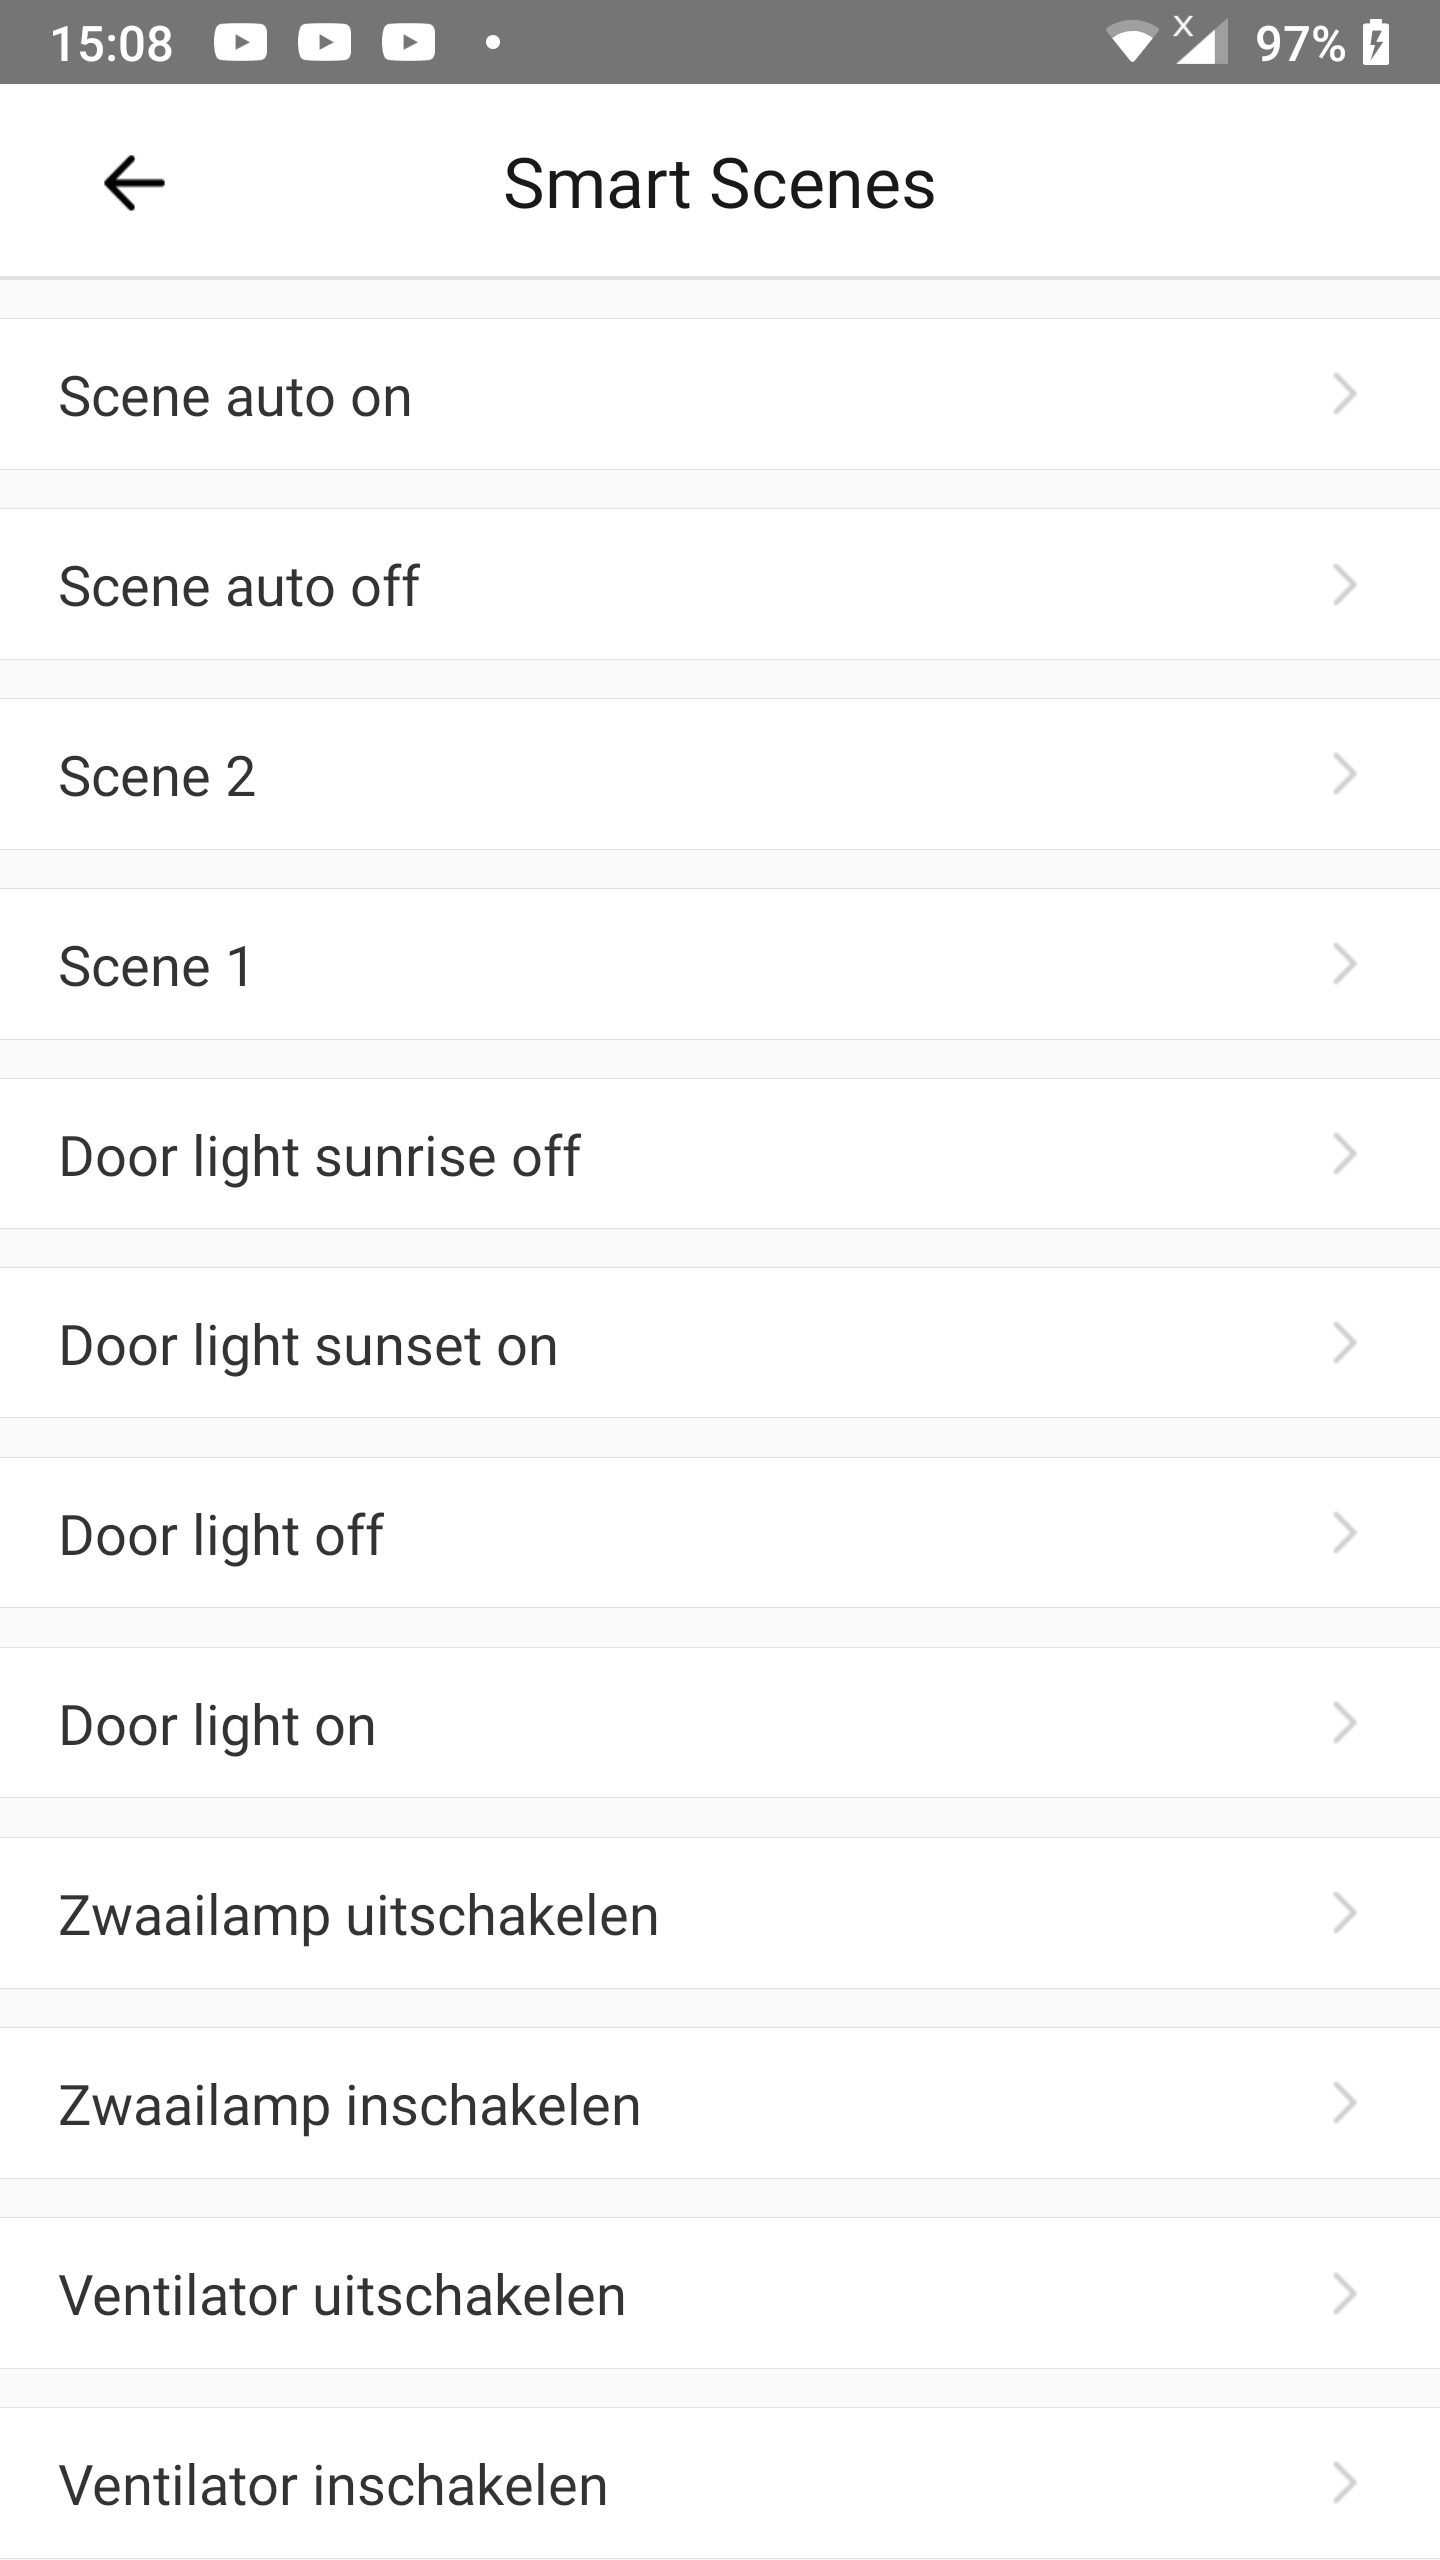
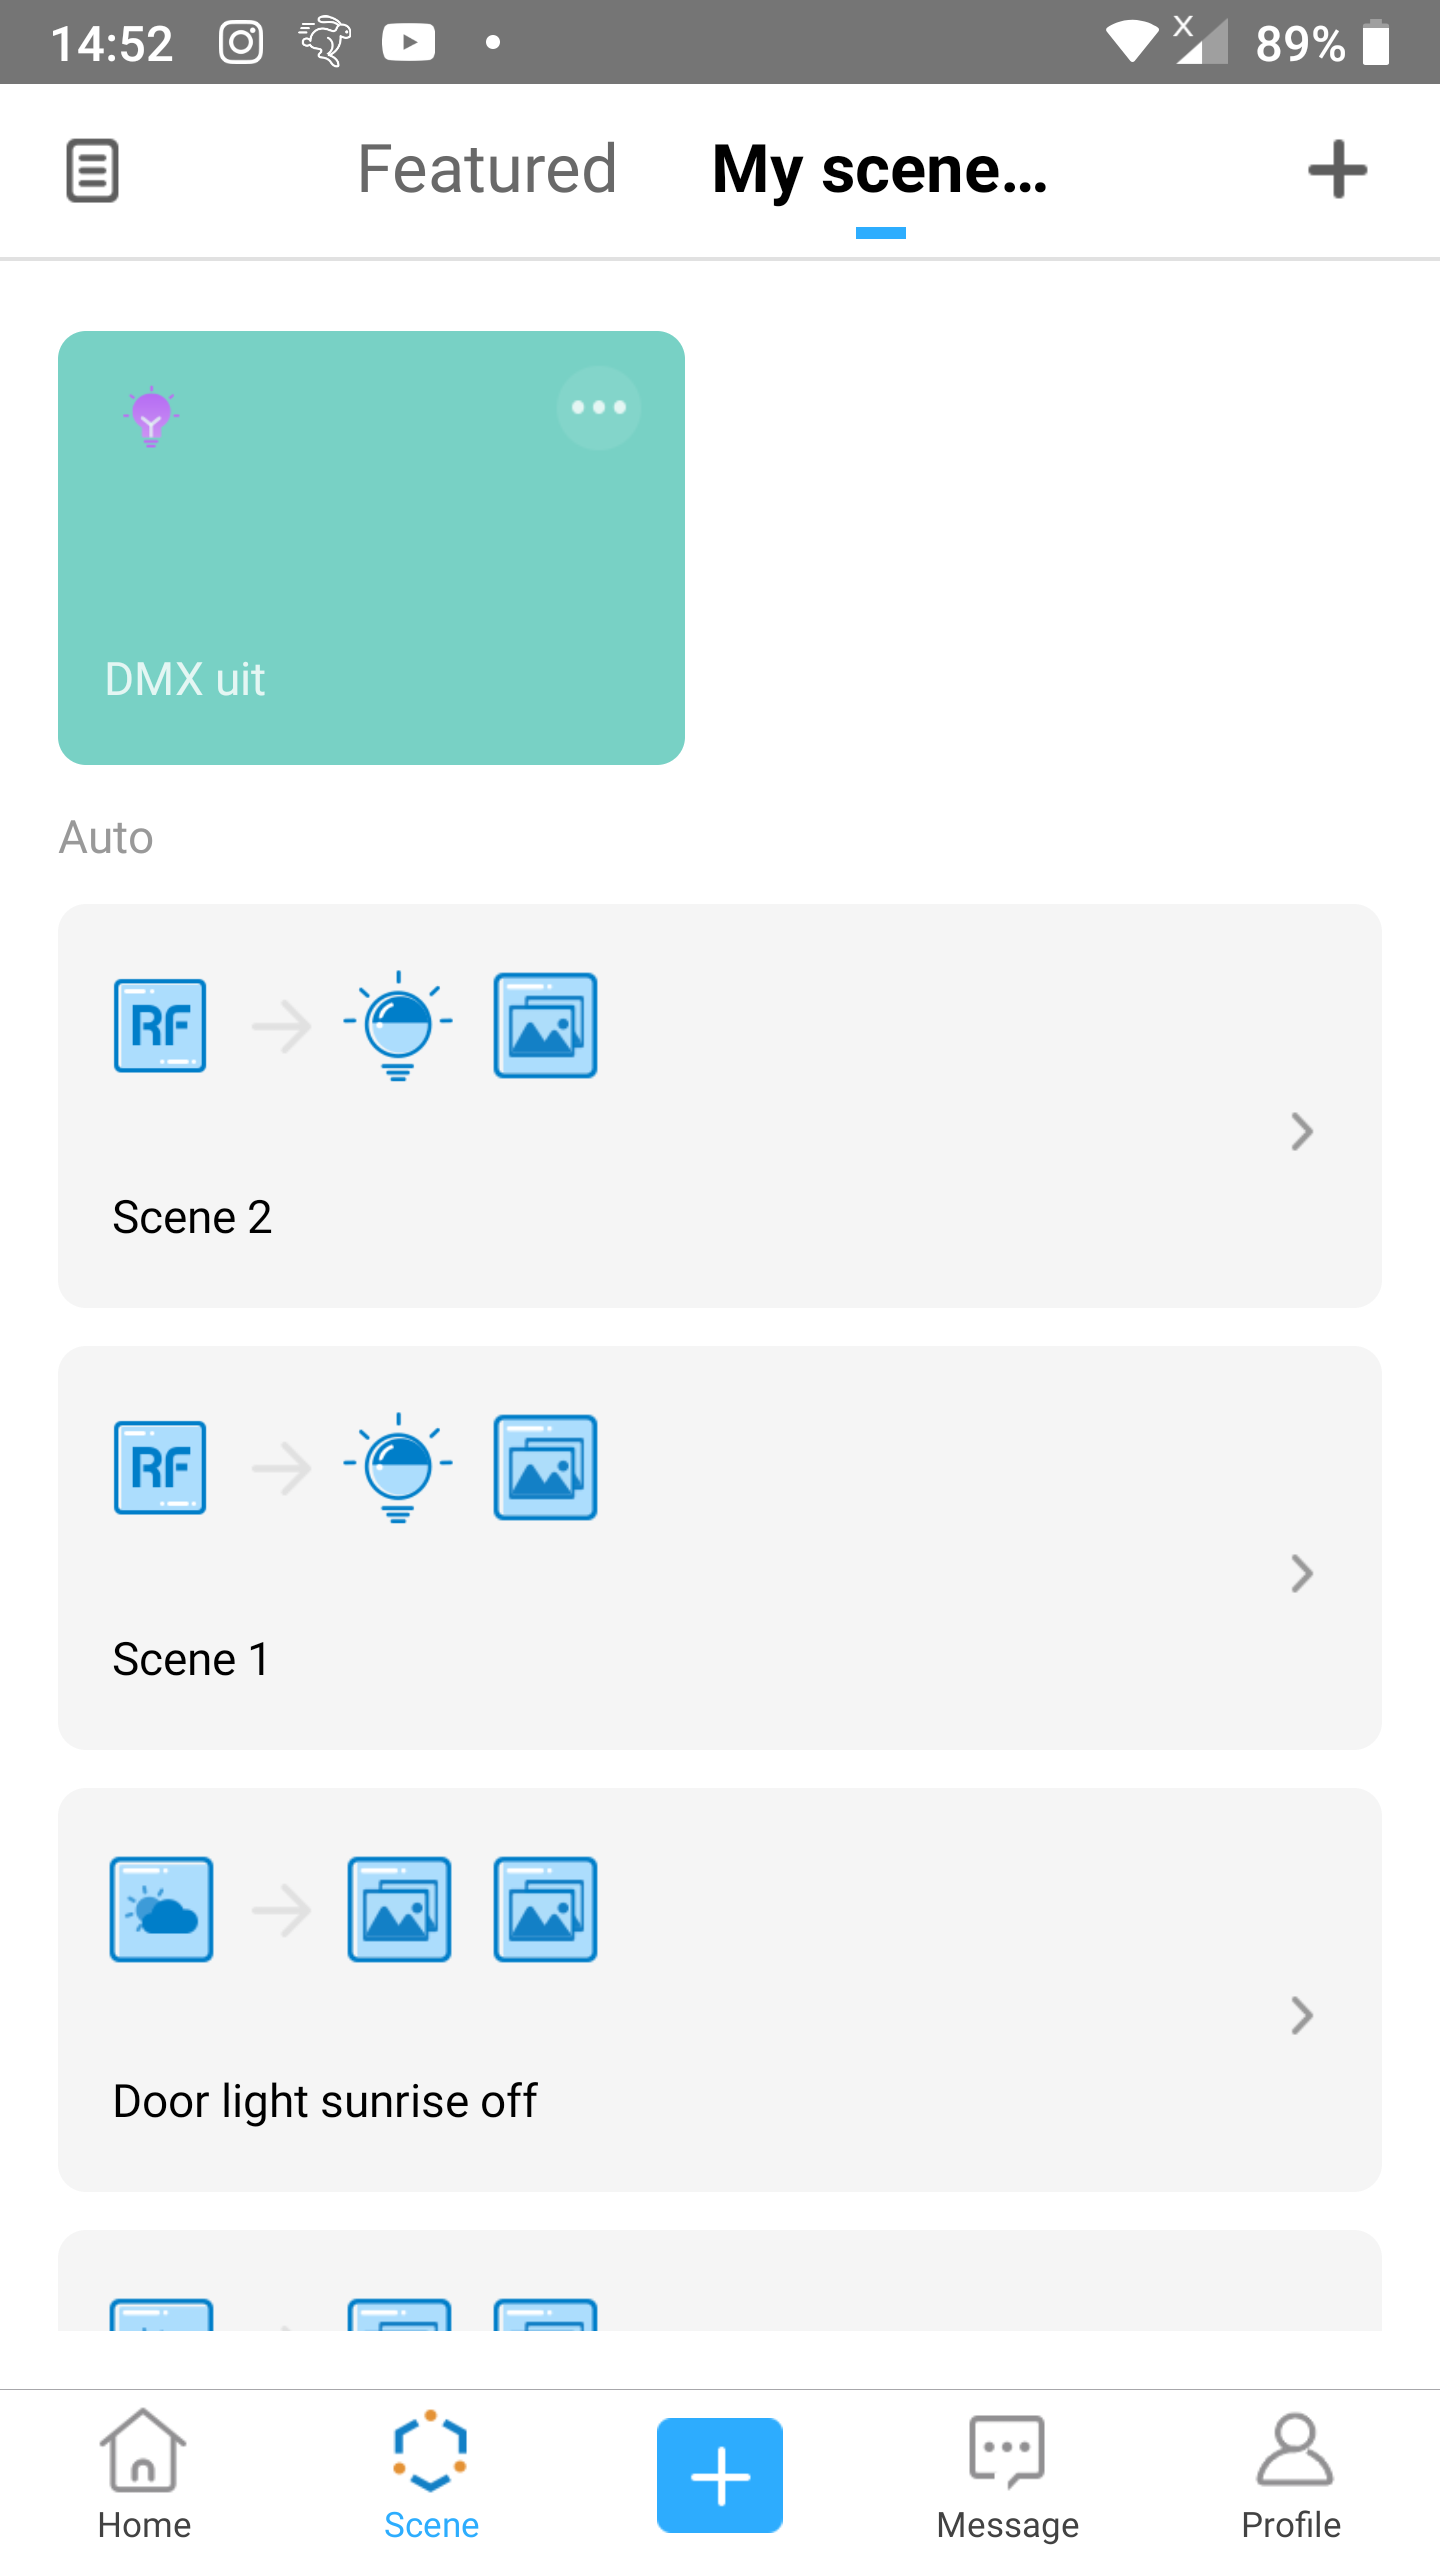
Step 1
- Go to the
Scenescreen. - Scroll down until you see the Auto scenes.
- Tap
Scene 1.
Step 2
- Tap the
+icon on the right ofThen.
Step 3
- Tap
Smart Scenes.
Step 4
- Tap
Perform manual scene.
Step 5
- Choose the scene you have setup to disable the first scene (so that it doesn’t turn on the target device when the external button is pressed whilst the target device is already on) an to enable the second scene (so that it does turn off the target device on the external button press).
- Earlier in this article we called that scene
Scene off. - A blue checkmark will appear at the right on that row.
- Earlier in this article we called that scene
- Tap
Save.

Step 6
- Tap Save.
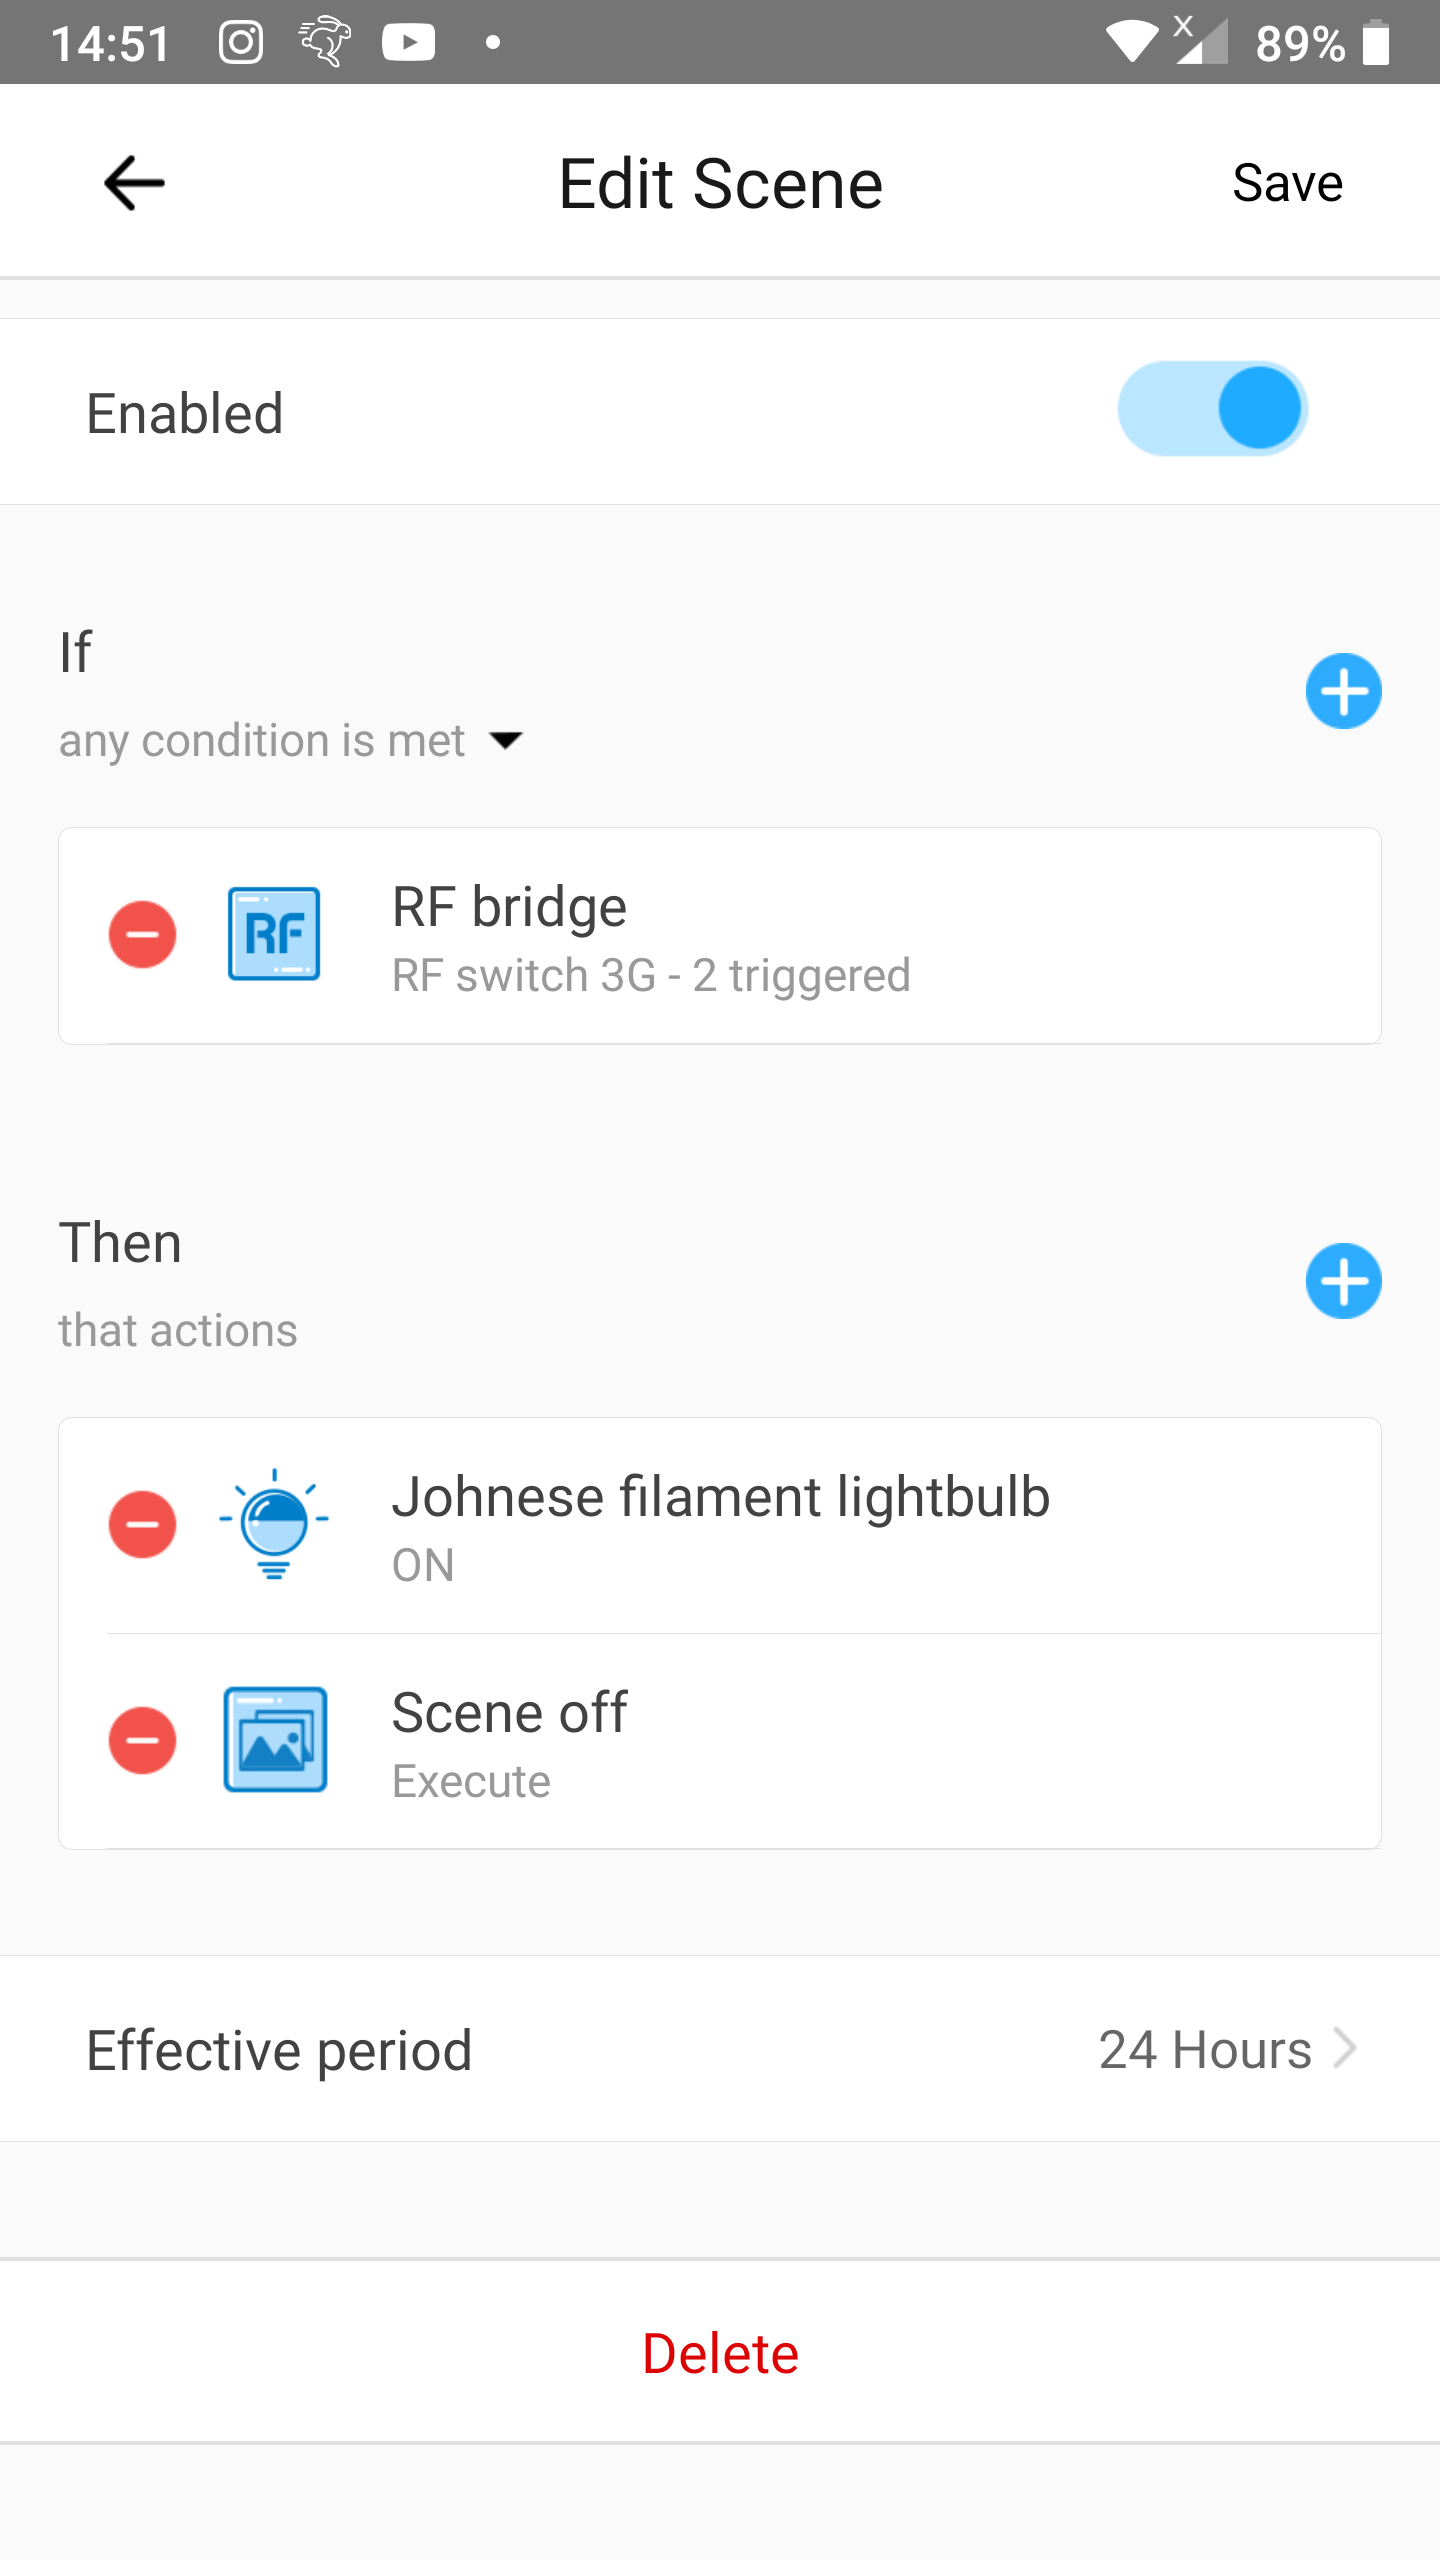
Step 7
- You can change the name after
Nameif you want.- We recommend to leave the name untouched.
- Tap
Save.
Scene 1 is now fully complete.
Modify Scene 2
This scene will:
- Turn the target device off after an external button press.
- Execute helper scene
Scene onto disable thisScene 2so that this scene doesn’t react on the external button press as the target device is already off.
Because both Scene 2 and the helper scene will refer to each other we couldn’t complete this scene in one flow. That is why we now arrived at part 2: modifying Scene 2.
Step 1
- Go to the
Scenescreen. - Scroll down until you see the Auto scenes.
- Tap
Scene 2.
Step 2
- Tap the
+icon on the right ofThen.
Step 3
- Tap
Smart Scenes.
Step 4
- Tap
Perform manual scene.
Step 5
- Choose the scene you have setup to disable the second scene (so that it doesn’t turn off the target device when the external button is pressed whilst the target device is already off) and to enable the first scene (so that it does turn on the target device on the external button press).
- Earlier in this article we called that scene
Scene on. - A blue checkmark will appear at the right on that row.
- Earlier in this article we called that scene
- Tap
Save.
Step 6
- Tap Save.
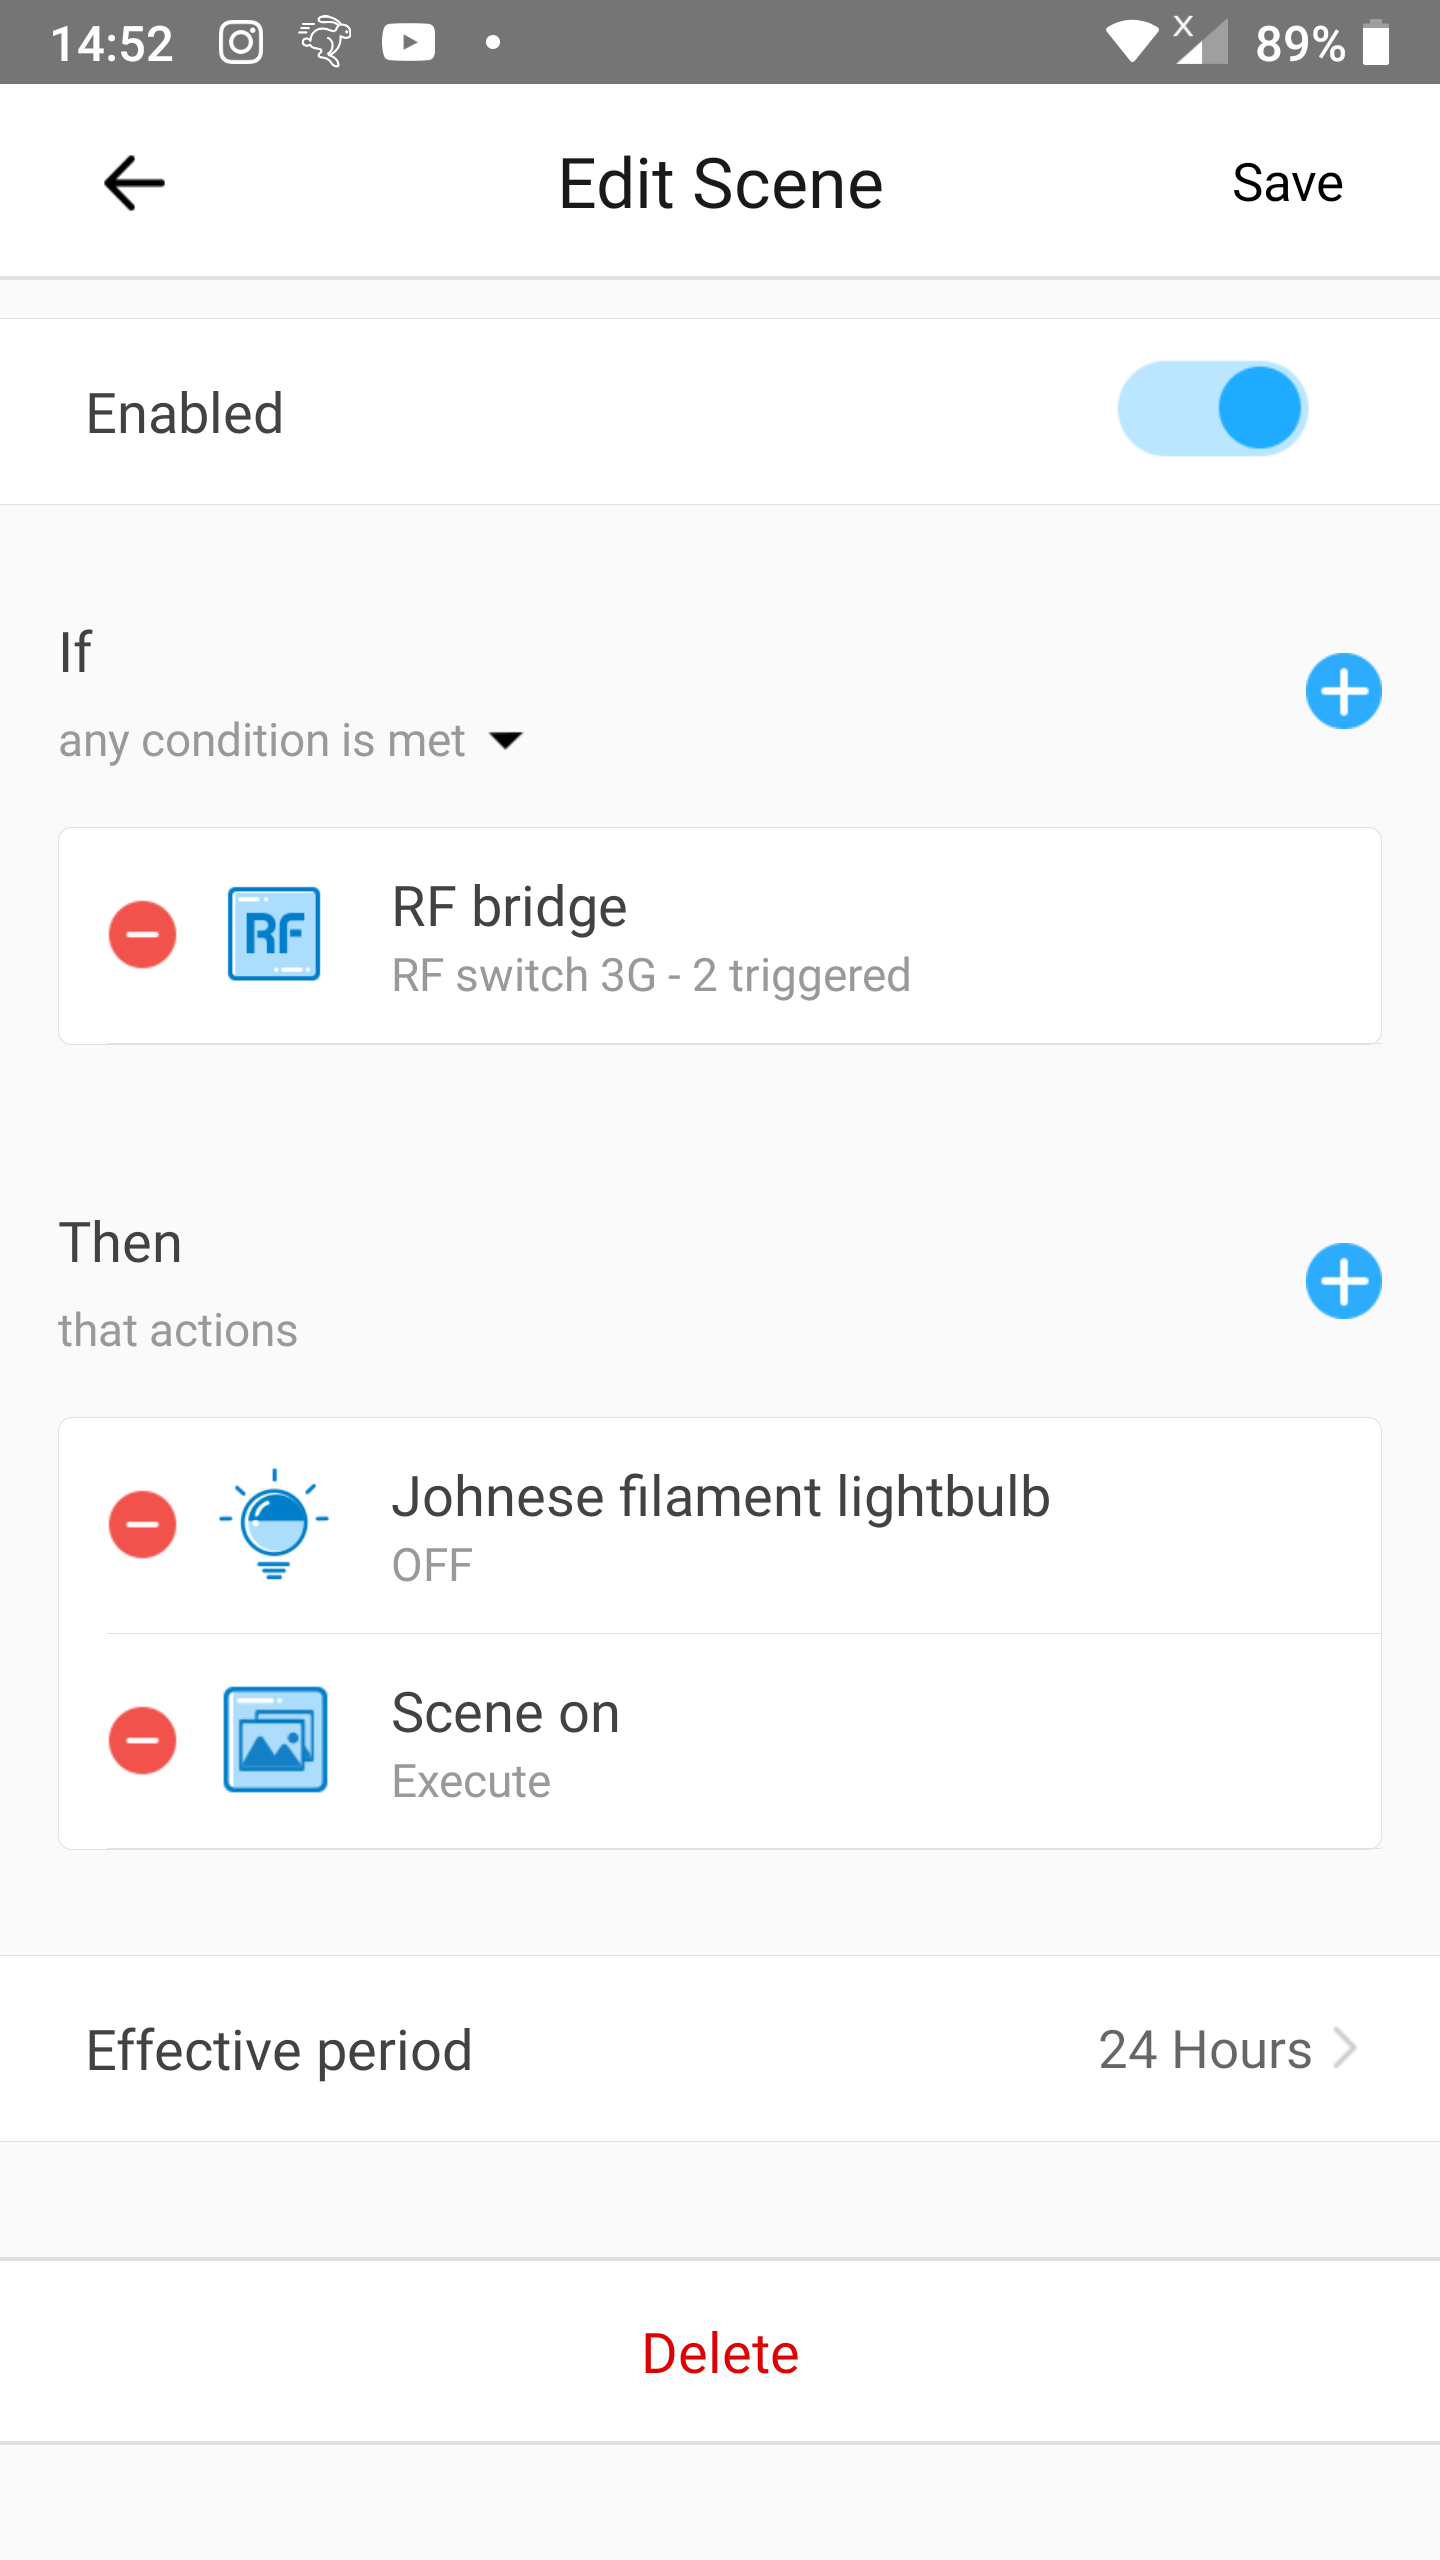
Step 7
- You can change the name after
Nameif you want.- We recommend to leave the name untouched.
- Tap
Save.
Scene 2 is now fully complete.
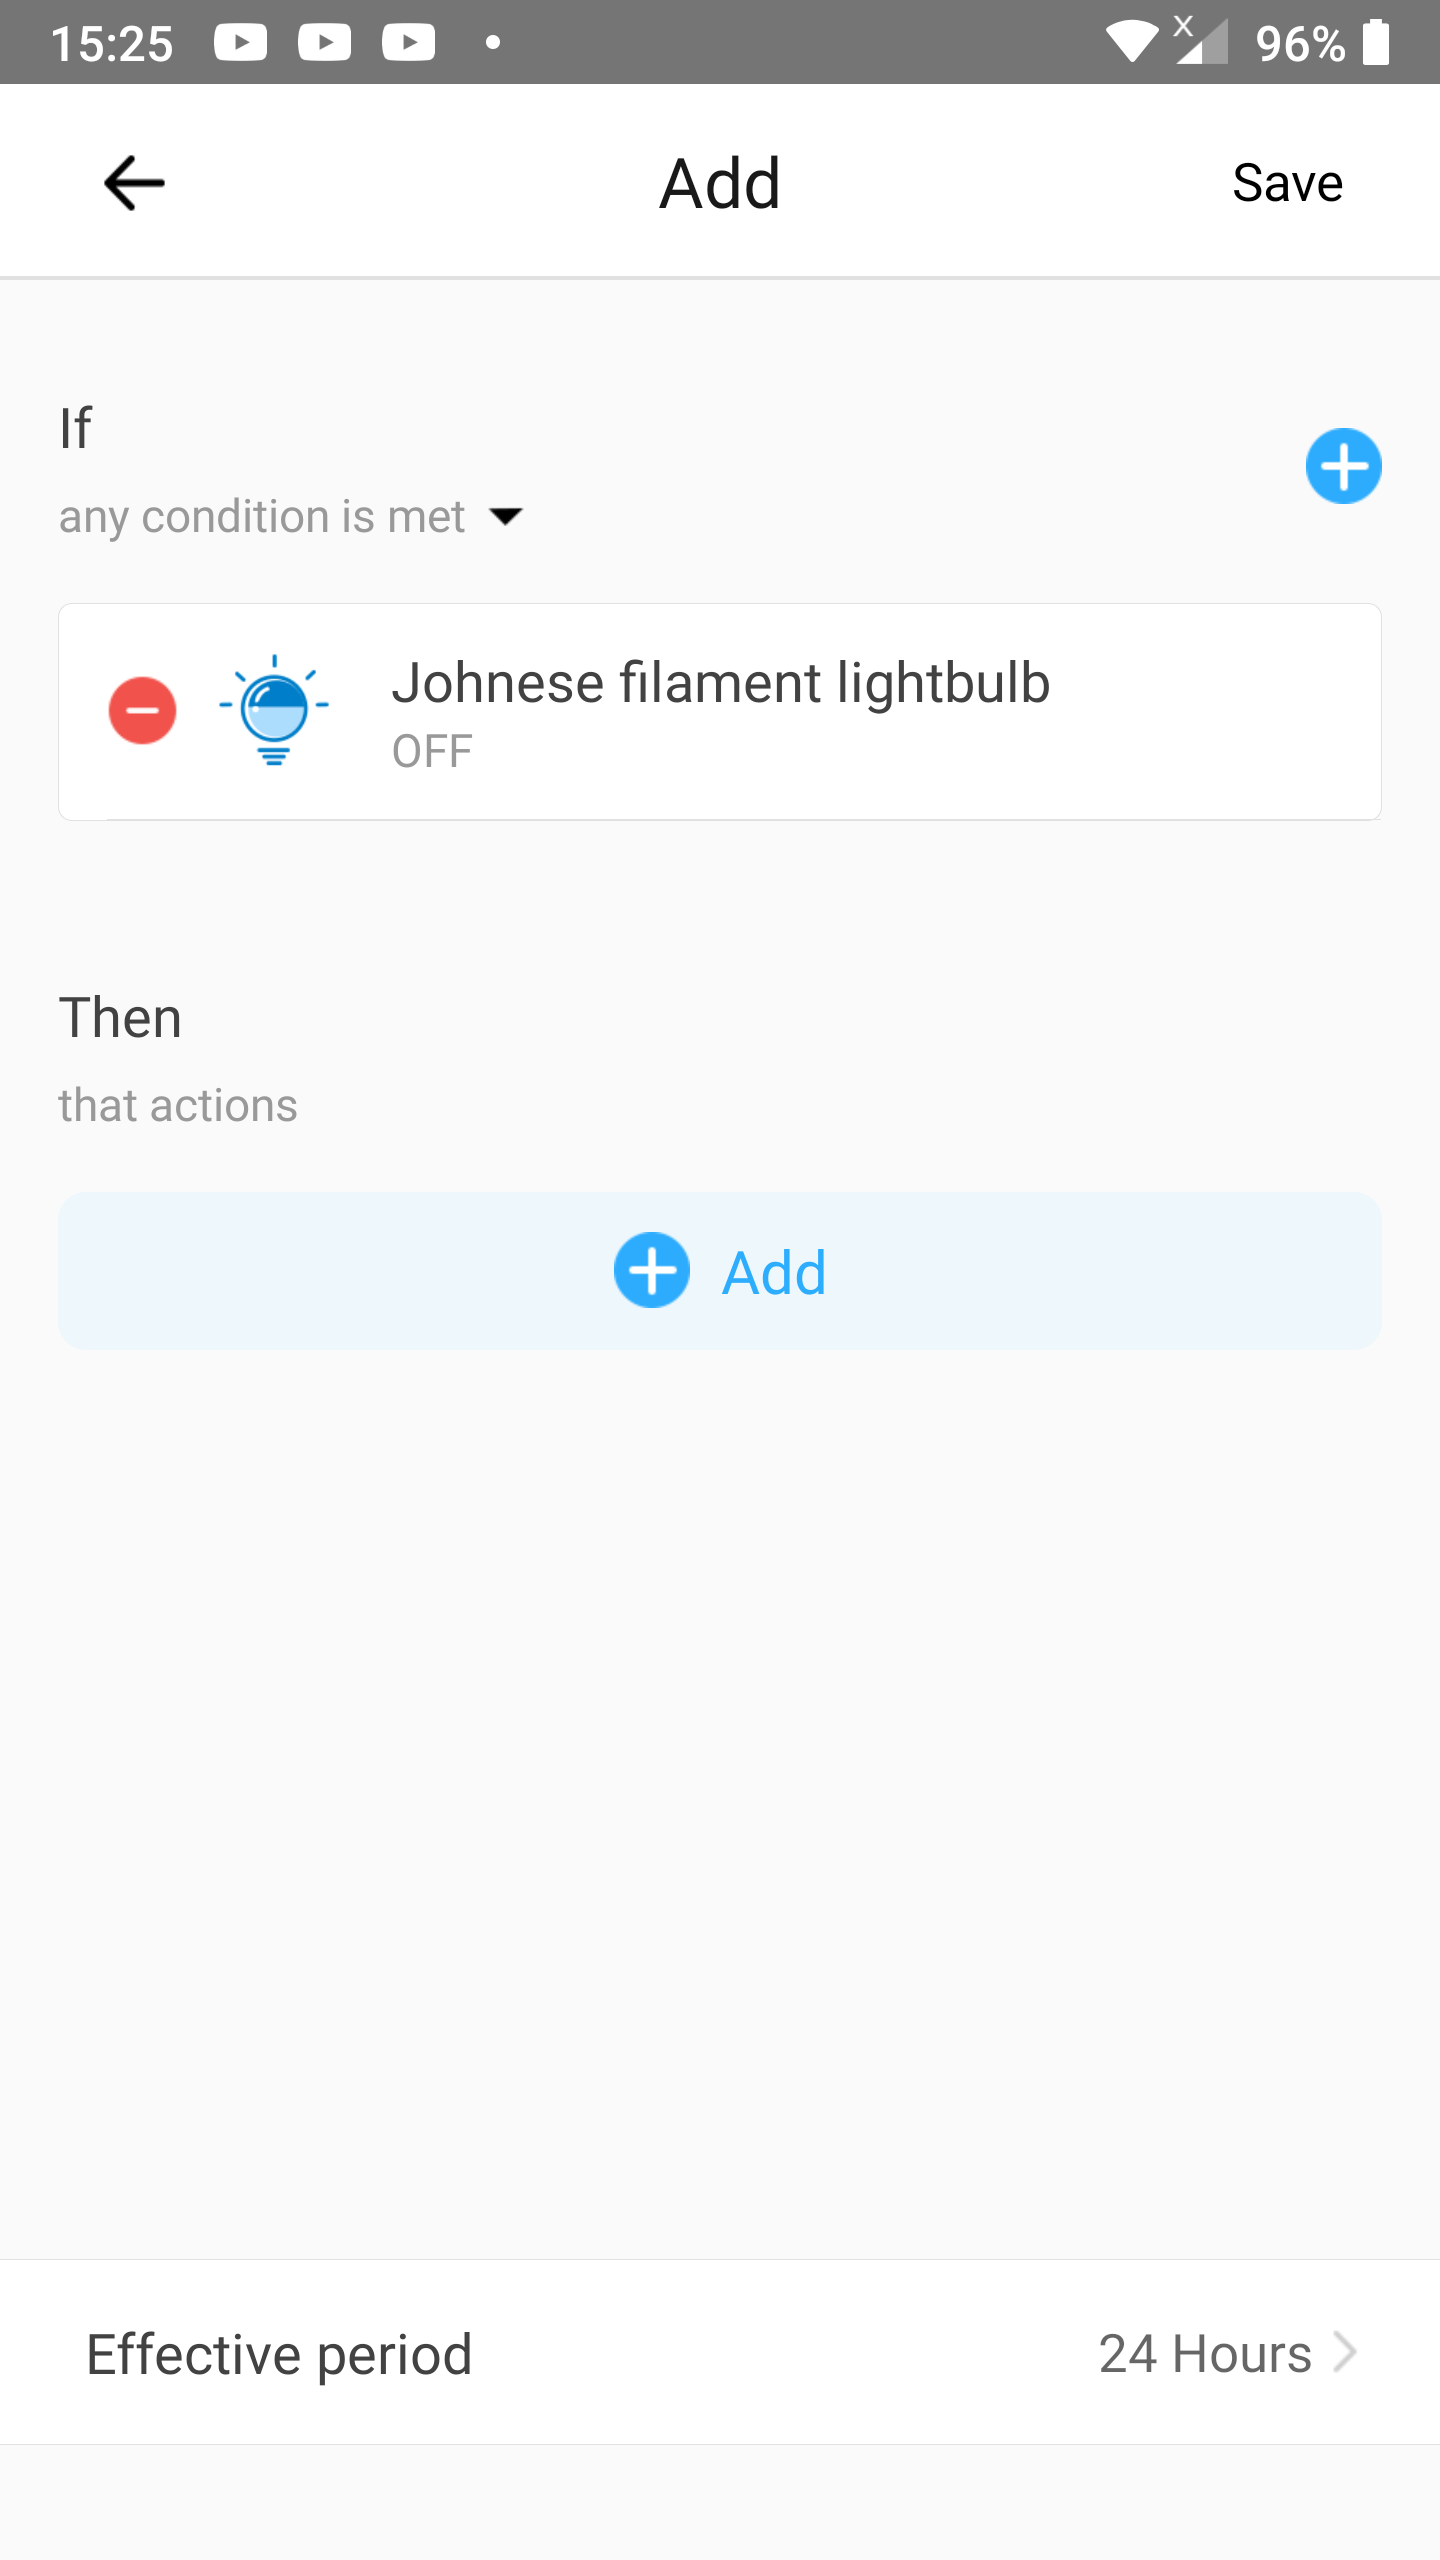
Add Scene auto on (optional)
This scene will:
- Be a shortcut to
Scene onreacting on the target device state going tooff. - This synchronize the automation scenes for the external button to the manual operation of the target device.
Scene on will:
- Enable
Scene 1so thatScene 1will turn the target device on when the external button is pressed. - Disable
Scene 2so thatScene 2doesn’t turn the target device off when the external button is pressed.
Step 1
- Go to the
Scenescreen. - Tap the
+icon in the top right corner.
Step 2
- Tap
Addright below If.
Step 3
- Tap Smart Device.
Step 4
- Tap the target device.
- In our case that will be
Johnese filament lightbulb.
- In our case that will be
Step 5
- Tap the button
OFF.- A blue circle with a white checkmark will appear before the word
OFF.
- A blue circle with a white checkmark will appear before the word
- Tap
Save.
Step 6
- Tap
Addright belowThen.
Step 7
- Tap
Smart Scenes.
Step 8
- Tap
Perform manual scene.
Step 9
- Choose the scene you have setup to disable the second scene (so that it doesn’t turn off the target device when the external button is pressed whilst the target device is already off) and to enable the first scene (so that it does turn on the target device on the external button press).
- Earlier in this article we called that scene
Scene on. - A blue checkmark will appear at the right on that row.
- Earlier in this article we called that scene
- Tap
Save.
Step 10
- Tap
Save.
Step 11
- Insert a name for the scene after
Name.- In our case we entered
Scene auto onas name.
- In our case we entered
- Tap
Save.

Scene auto on is now fully complete.
Add Scene auto off (optional)
This scene will:
- Be a shortcut to
Scene offreacting on the target device state going toon. - This synchronize the automation scenes for the external button to the manual operation of the target device.
Scene off will:
- Disable
Scene 1so thatScene 1doesnt’t turn the target device on when the external button is pressed. - Enable
Scene 2so thatScene 2will turn the target device off when the external button is pressed.
Step 1
- Go to the
Scenescreen. - Tap the
+icon in the top right corner.
Step 2
- Tap
Addright below If.
Step 3
- Tap Smart Device.
Step 4
- Tap the target device.
- In our case that will be
Johnese filament lightbulb.
- In our case that will be
Step 5
- Tap the button
ON.- A blue circle with a white checkmark will appear before the word
ON.
- A blue circle with a white checkmark will appear before the word
- Tap
Save.
Step 6
- Tap
Addright belowThen.
Step 7
- Tap
Smart Scenes.
Step 8
- Tap
Perform manual scene.
Step 9
- Choose the scene you have setup to disable the first scene (so that it doesn’t turn on the target device when the external button is pressed whilst the target device is already on) an to enable the second scene (so that it does turn off the target device on the external button press).
- Earlier in this article we called that scene
Scene off. - A blue checkmark will appear at the right on that row.
- Earlier in this article we called that scene
- Tap
Save.
Step 10
- Tap
Save.

Step 11
- Insert a name for the scene after
Name.- In our case we entered
Scene auto offas name.
- In our case we entered
- Tap
Save.

Scene auto off is now fully complete.
All steps completed
Congratulations!
You can make another 1-button toggle but you have to remember the scenes needs other unique names to make it easier to keep them apart of each other. You could add the name of the target device to the end of the involved scenes.
You must be logged in to post a comment.