eWeLink Community Knowledge Base
Using one button to toggle another device (approach 1)
WARNING!
You can find the article about the second approach here: Using one button to toggle another device (approach 2)
Quite often you will find yourself in a situation where you would like to have the ability where you want to want to use one button to toggle another device between ON and OFF states. The best way to operate a device with 1 button on another device is to use scenes but you will see scenes don’t have a toggle feature (at least at the moment of writing this tutorial at October 23rd, 2020 and eWeLink 4.6.0). How do you solve that issue?
With thanks to the community we created this tutorial. Special thanks to Anuar Ahmad who shared his idea and screenshots on Facebook and allowed us to use his text and images.
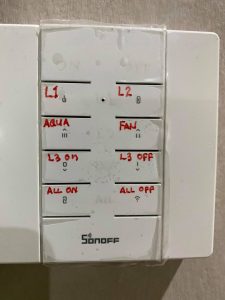
This tutorial assumes the button to control the other device with is a RF button. This could be Zigbee button too.
In short
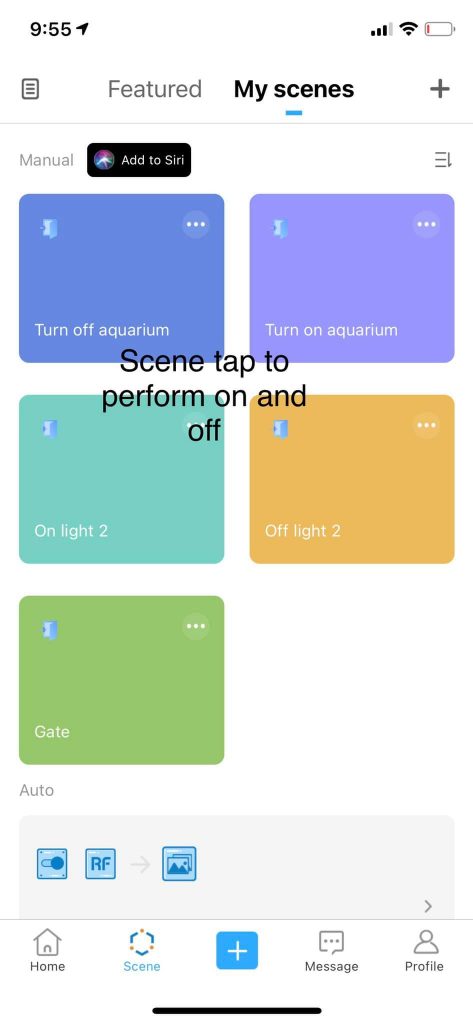
Create 4 scenes:
- Create a tap-to-perform scene to turn the target device on.
- Create a tap-to-perform scene to turn the target device off.
- Create an automated scene to turn the target device on with a button on another device.
- Created an automated scene to turn the target device off with a button on another device.
When you are done with all steps below your endresult will look like something that is displayed here at the screenshot at the right.
Create the tap-to-perform scenes for on and off
- Go to the Scene screen of the eWeLink app and tap the
+sign in the upper right corner. - Right below
Iftap theAddbutton. - Tap the row
Tap to perform. - You wil return to the If / Then screen.
- Tap
Addright belowThen. - Tap
Smart Device. - Choose the target device.
- Choose the action:
ON. - Tap
Savein the upper right corner. - Tap
Savein the upper right corner again. - Give the scene a name. E.g. “Device on”. In the example on the screenshots of this page “On light 2” is chosen.
- Choose an icon if desired.
- Tap
Savein the upper right corner. - You will return to the Scene overview screen.
- Repeat steps 1 to 14 for the OFF command of the target device and at step 11 you need to change “on” into “off” this time.
Create the automated scene to turn the target device on
- Go to the Scene screen of the eWeLink app and tap the
+sign in the upper right corner. - Right below
Iftap theAddbutton. - Tap the row
Smart Device. - Choose the target device (in the example in the screenshot on the right the target device is “Light 2”).
- Choose
OFF. - Tap
Savein the upper right corner. - You will return to the If / Then screen.
- On the right of the header “If” a blue
+sign is shown. Tap that sign. - Tap the row
Smart Device. - Choose the device that holds your button. In this example it will be a RF button linked to a RF bridge called “Bridge 2”.
- Select the correct button.
- Tap
Savein the upper right corner. - Tap the line
any condition is met. - Tap
all conditions are metin the popup at the bottom of the screen. - Tap
Addright belowThen. - Tap
Smart Scenes. - Tap
Perform manual scenes. - Choose the scene you created in the chapter “Create the tap-to-perform scenes for on and off” that turns the target device on. In the example on the screenshot on the right it is
On light 2. A tick will show up at the right of the name. - Tap
Savein the upper right corner. - You will get back to the If / Then screen.
- Leave the
Effective periodat24 hours. - The result will look like something as displayed on the screenshot on the right.
- Tap
Savein the upper right corner. - Give the scene a name. E.g. “Turn target device on”.
- Tap
Savein the upper right corner. - You will return to the Scene overview screen.
The end result will look like the screenshot below. Click a black i symbol to get more information about the refering step of the actionlist at the left of the image.

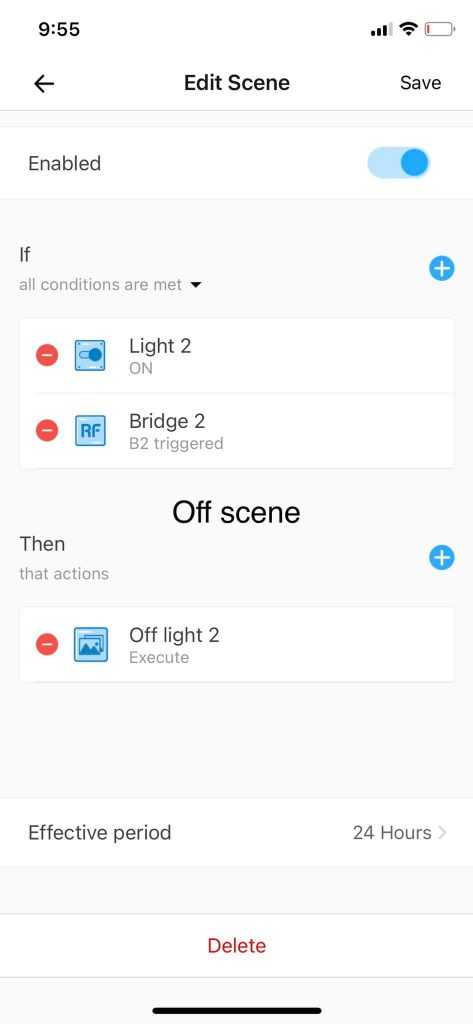
Create the automated scene to turn the target device off
- Go to the Scene screen of the eWeLink app and tap the
+sign in the upper right corner. - Right below
Iftap theAddbutton. - Tap the row
Smart Device. - Choose the target device (in the example in the screenshot on the right the target device is “Light 2”).
- Choose
ON. - Tap
Savein the upper right corner. - You will return to the If / Then screen.
- On the right of the header “If” a blue
+sign is shown. Tap that sign. - Tap the row
Smart Device. - Choose the device that holds your button. In this example it will be a RF button linked to a RF bridge called “Bridge 2”. It should be the same device as chosen in the chapter “Create the automated scene to turn the target device on” above.
- Select the correct button. It should be the same button as chosen in the chapter “Create the automated scene to turn the target device on” above.
- Tap
Savein the upper right corner. - Tap the line
any condition is met. - Tap
all conditions are metin the popup at the bottom of the screen. - Tap
Addright belowThen. - Tap
Smart Scenes. - Tap
Perform manual scenes. - Choose the scene you created in the chapter “Create the tap-to-perform scenes for on and off” that turns the target device off. In the example on the screenshot on the right it is
Off light 2. A tick will show up at the right of the name. - Tap
Savein the upper right corner. - You will get back to the If / Then screen.
- Leave the
Effective periodat24 hours. - The result will look like something as displayed on the screenshot on the right.
- Tap
Savein the upper right corner. - Give the scene a name. E.g. “Turn target device on”.
- Tap
Savein the upper right corner. - You will return to the Scene overview screen.
The end result will look like the screenshot below. Click a black i symbol to get more information about the refering step of the actionlist at the left of the image.
You must be logged in to post a comment.